


 TL;DR:
You can sync data between iPhones during the initial device setup using native tools like Quick Start and iCloud, or transfer specific files post-setup using iCloud Settings, AirDrop, or third-party desktop software.
● Quick Start transfers data in 30 to 60 minutes by placing both devices near each other via Bluetooth without requiring a prior backup, while iCloud restores take 1 to 2 hours over Wi-Fi and are limited by the 5GB free storage cap.
● If both iPhones are already set up and share the same Apple ID, you can merge specific data types like contacts, notes, and passwords directly through the iCloud Settings menu, or use AirDrop to manually send locally stored files.
● MobileTrans Desktop is necessary if you need to transfer data between iPhones operating on different Apple IDs, bypassing cloud limits to complete the sync in 10 to 30 minutes without overwriting existing data on the receiving device.
Ask AI for a summary
 ChatGPT
 Perplexity
 Gemini
 Claude
 Grok
Grok
"Hello, I just purchased an iPhone 17 for my child as a present. However, the issue is she's trying to sync data from her old iPhone to the new one. Is there any way you think she can sync data from iPhone to iPhone without disrupting the device? Please, assist."
Transferring data from one iPhone to another is essential when upgrading to a new iPhone or ensuring that your devices remain synchronized. Fortunately, Apple provides several seamless methods to sync iPhone to iPhone, whether via iCloud, Quick Start, iTunes, or third-party apps.
In this guide, we’ll cover the best ways to sync iPhone to iPhone, ensuring that all your photos, contacts, messages, apps, and settings are transferred effortlessly.


Part 1: Why Sync iPhone to iPhone?
✅ Upgrading to a new iPhone: Transfer all data seamlessly to your new device.
✅ Keeping multiple iPhones in sync: Ensure your contacts, messages, and media stay updated across devices.
✅ Restoring lost data: If you’ve reset your iPhone, syncing restores everything.
Now, let’s dive into the best methods to sync iPhone to iPhone.
Part 2: How to Sync Data from iPhone to iPhone with a Click
Method 1: Sync iPhone to New iPhone with MobileTrans App
The MobileTrans App amplifies the device-switching experience by providing a secure and efficient transfer of contacts between iPhones. Its mobile-friendly design allows users to perform transfers directly from their devices, eliminating the need for a computer. The app supports batch transfers, making it ideal for those with extensive contact lists. With a focus on ease of use, the app breaks down the transfer process into guided steps, ensuring that even non-tech-savvy users can confidently navigate it.


Here's how to sync iPhone to iPhone with MobileTrans App:
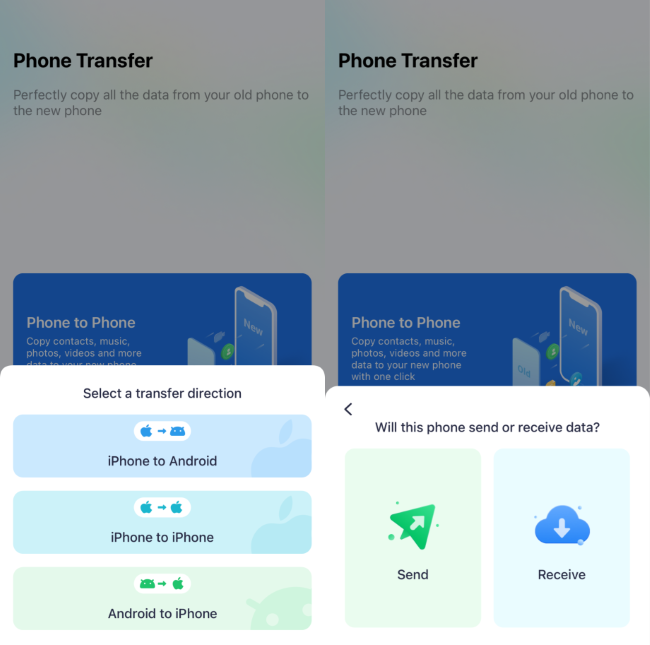
Step 1: Firstly, install and launch MobileTrans app. Then tab the Phone to Phone button. Tab iPhone to iPhone as your transfer direction. Tab Send in your old iPhone and Receive in your new iPhone.
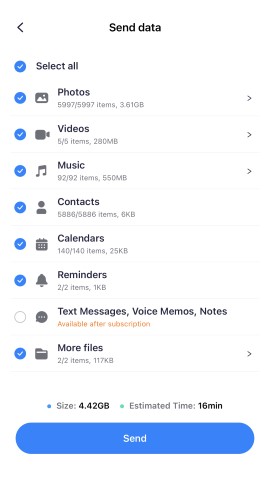
Step 2: Secondly, select the data to transfer from your old iPhone and tap the Send button.
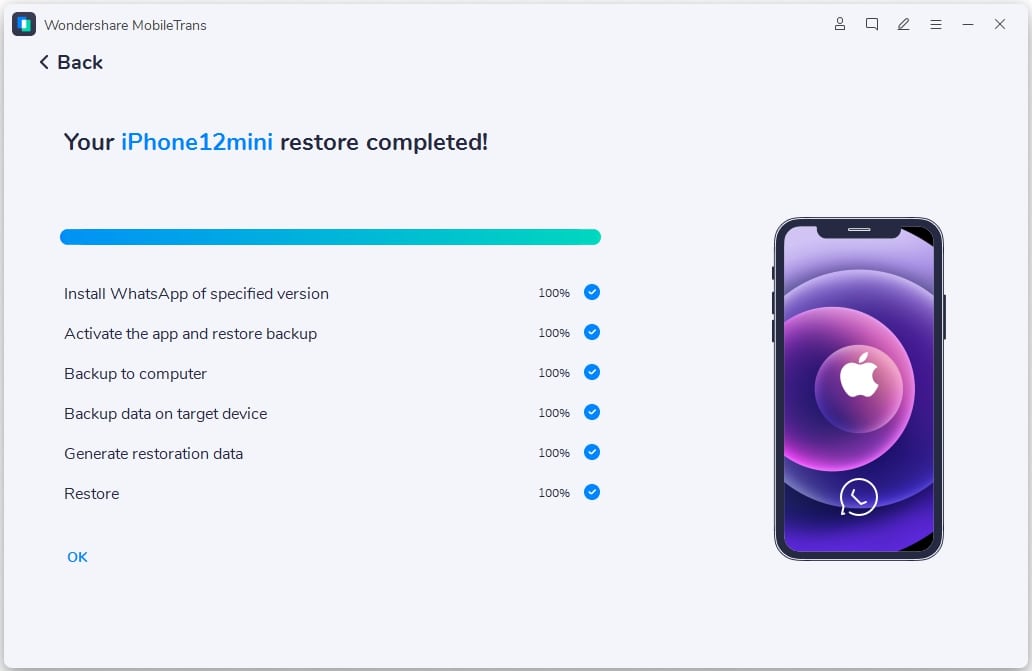
Step 3: Once you've made your data selections, start the transferring process. Wait until the process is finished before disconnecting either device.

Method 2: Sync iPhone to iPhone with MobileTrans (Desktop Version)
For a one-click solution that allows full iPhone syncing, MobileTrans – Phone Transfer is the best option.
MobileTrans - Phone Transfer
- • Efficiently transfer data between iPhones with different Apple IDs
- • Does not affect existing data.
- • Data transfer between over 6000 mobile devices.
- • It supports the best data privacy protection.
- • Transfer data quickly and smoothly.
 4.5/5 Excellent


Step 1: Install the latest version of MobileTrans on your computer, then connect the iPhones to the PC and launch the app. Find the 'Phone transfer' module in the left bar and select "Phone to Phone" from the option.
Step 2: Select the "Transfer" column. Tick the checkbox of the category of data you intend to transfer from your old iPhone to the new iPhone. Then, click Start to begin the transfer process.

Step 3: MobileTrans will start to transfer your files from iPhone to iPhone. Afterward, you can disconnect both devices from the PC.
Part 3: How to Sync Old iPhone to New iPhone During Setup
If you just purchased a new iPhone, there are different methods you could use to sync old iPhone to new iPhone with the same Apple ID during setup, and here we'll teach you. There are multiple ways for your iPhone to sync data with another iPhone, and you don't have to always use iCloud. But, when you set up a new phone, iCloud is the best way to sync between iPhones.
Method 1: Sync iPhone to iPhone with iCloud Backup
Any iPhone user should be familiar with iCloud backup. Yes, as we all know, iCloud allows users to back up data including, photos, videos, and messages to cloud storage, thereby making it easy to sync and transfer data across different iOS devices. Also, the iCloud sync feature allows you to sync from old iPhone to new iPhone, which will be explained in the next part.
If you're not familiar with how to sync iPhone to iPhone with iCloud backups, the simple steps outlined below will walk you through the process.
Step 1: On your old iPhone, open the Settings app and tap on your Apple ID banner.
Step 2: Tap iCloud.
Step 3: Scroll to iCloud Backup on the same page and tap on it. Then, turn on its toggle and tap Backup Now to back up the iPhone's data to iCloud. Make sure you connect your iPhone to a stable WiFi network for the operation to be executed smoothly.

Step 4: Get your new iPhone and turn it ON. Set it up until you reach Apps & Data screen.
Step 5: On the Apps & Data screen, tap Restore from iCloud backup.

Step 6: Sign in to iCloud on your old iPhone. Then, select the most recent Backup and complete the operation.
Method 2: Sync iPhone to New iPhone using iTunes Backup
Apple iTunes can also be used to sync iPhone to iPhone. Yes, it just involves backing up the data on your old iPhone to iTunes, then restoring the data from iTunes backup to your new iPhone. For this operation, you need a PC with iTunes installed on it to operate seamlessly.
Follow the steps illustrated below to use iTunes backup to sync iPhone to iPhone;
Step 1: Install the latest version of iTunes on your Windows computer and launch it.
Step 2: Get your old iPhone and connect it to the PC using a compatible USB cable.
Step 3: On your PC, move the cursor to the top left corner of the screen and click the iPhone icon. Select Summary from the left-hand side, then click on Backup Now to back up your data to iTunes.

Step 4: Wait for the backup process to complete. Afterward, turn on your new iPhone and set it up until you reach Apps & Data screen.
Step 5: Select Restore from Mac or PC and tap on Next to proceed.

Step 6: Connect your new iPhone to your PC and launch iTunes. Again, Click the iPhone icon, then select Summary. Afterward, click on the Restore Backup button.

Method 3: Sync Old iPhone to New iPhone via Quick Start
Quick Start can also sync old iPhone to new iPhone. But unlike other previously mentioned methods that require you to back up your iPhone first, this method just needs you to place both iPhones next to each other and connect them via Bluetooth.
The process to sync iPhone with Quick Start is explained below.
Step 1: Get both iPhones and turn them on.
Step 2: Now, on your new iPhone, complete the required setup until you reach the Quick Start screen.
Step 3: Once you reach the Quick Start screen, place the old iPhone next to the new one. By doing so, a pop-up will appear on the old iPhone screen. Just tap on Continue.

Step 4: A blue animation will appear on your new iPhone. Hold your old iPhone above the new one and ensure that the Animation is at the center of the viewfinder.
- A notification will appear on your new iPhone saying Finish on New iPhone.
Step 5: Finally, provide your old iPhone password when requested on your new iPhone. Then, follow the on-screen instructions to sync old iPhone to new iPhone.
Part 4: How to Sync iPhone to iPhone After Setup
The methods discussed above can only be used to sync data from one iPhone to another iPhone during setup. So, if you've set up your iPhone, you need to carry out the data syncing operation via iCloud from the settings on your phone. However, you must ensure the two iPhones you want to sync data between are using the same Apple ID.
Method 1: Sync Old iPhone to New iPhone - Contacts
You can easily sync your old iPhone contacts to your already set up new iPhone from your Settings app. The steps to use this method is explained below;
Step 1: Open the Settings app on your old iPhone and tap on your Apple ID banner.
Step 2: Tap on iCloud, then scroll down to Contacts and turn on the toggle next to it.
Step 3: Next, on your new iPhone, repeat Step 1. Then scroll down to Contact and turn it ON.

- By doing so, a pop-up will appear asking you to Merge or Cancel. Select Merge to sync contacts from the old iPhone to the new iPhone.
Note: For contacts stored on Google, just add the Google Account on your old iPhone to the new iPhone.
Method 2: Sync iPhone to New iPhone - Files
Files on an old iPhone can also be synced to an iPhone you've already set up. But it depends on where you stored the files. So, to save you from stress, we've explained three different ways to sync files from iPhone to the new iPhone quickly and easily.
For Cloud-based app
If you have any cloud-based app to store your files on your old iPhone, you can easily install the same app on your new iPhone and log into the same account, you shall see your files.
For iCloud Drive Files:
To sync files saved in your iCloud drive between your old iPhone and the new iPhone, the follow the following steps will help you complete the action;
Step 1: Open Settings app on the old iPhone and tap on the Apple ID banner.

Step 2: Select iCloud and turn on iCloud Drive.

Step 3: Now, login your old iPhone Apple ID on your new iPhone. Then, go to settings and turn on iCloud drive.
Your files should successfully sync within a few minutes.
For Files Stored in Local Storage:
If you want to sync files stored in your old iPhone local storage, the best way to execute the operation is by airdropping the files to your new iPhone via Airdrop.
Step 1: Turn on Airdrop on the two iPhones.

Step 2: Find and select the files you want to sync to your new iPhone on the old iPhone.
Step 3: Tap on the Share icon, then from the pop-up, select Airdrop and choose the new iPhone from to sync the files.

Method 3: Sync iPhone to iPhone - More Data
There are lots more iPhone data you can sync from iPhone to iPhone after setting up. Follow the step-by-step instructions below to get the job done.
data supported: photos, videos, notes, reminders, calendars, messages, passwords, health data
Step 1: Open the Settings app on your old iPhone and tap on your Apple ID profile at the top.

Step 2: Tap on iCloud and turn on the toggle next to the above-mentioned data types.

Step3: Up next, on your new iPhone, go to Settings > iCloud and enable the same sync settings.
Step4: you'll be given the option to Merge data. Tap Merge to sync iPhone to iPhone data instantly.
Note: If you only have 5GB of free iCloud storage, you can skip iCloud photos and use Google Photos to back up iPhone photos(as photos take up large space). and install the app on the other iPhone.
FAQs
1. How long does it take to sync an iPhone?
It depends on the method:
- Quick Start: 30 mins - 1 hour
- iCloud: 1-2 hours (depends on Wi-Fi speed)
- iTunes/Finder: 30 mins - 1 hour
- MobileTrans: 10-30 mins
2. Why is my new iPhone stuck on “Setting Up Apple ID”?
Common fixes:
- Restart both iPhones.
- Ensure two-factor authentication is enabled on your Apple ID.
- Check Apple’s System Status for outages.
3. How to check if everything transferred correctly?
Verify:
- Photos: Open the Photos app.
- Messages: Check the most recent threads.
- Apps: Ensure all apps are downloaded (gray icons mean pending).
Conclusion
A while ago, you must have been considering the process of syncing iPhone to iPhone difficult. But if you've read the article above, we believe you have gained enough knowledge to use different methods to sync iPhone to iPhone.
Besides, regardless of whether the iPhones you want to transfer data between have the same Apple ID or not, chances are you'll find the right iPhone syncing method to get the job done quickly and efficiently. It is advisable to use MobileTrans as it's faster and it allows syncing of data between two iPhones without necessarily having the same Apple ID.
New Trendings

Top Stories
All Categories


Axel Nash
chief Editor