
Convert HEIC to JPG on PC, Mac, iPhone and Android: A Ultimate Guide

Written By Axel Nash |


 TL;DR:
You can natively convert HEIC to JPG using built-in tools like Microsoft Photos, Mac Preview, or the iPhone Files app, while batch processing on older operating systems or Android requires specific third-party applications.
● Windows 10/11 users can convert files individually via Microsoft Photos after installing HEIF Image Extensions, while batch conversion across Windows 7 to 11 requires the free MobileTrans tool.
● Mac devices on macOS High Sierra and above can export to JPEG natively using Preview, whereas older systems running at least macOS 10.10 must rely on iMazing Converter.
● iPhone users can instantly convert existing images by copying and pasting them into the native Files app, while Android users must use external tools like the Luma app for local batch processing.
Ask AI for a summary
 ChatGPT
 Perplexity
 Gemini
 Claude
 Grok
Grok
HEIC format is the default image format in iOS devices, but unlike JPG, it is not universally compatible with different platforms. So, for sharing photos, people may ask how to convert HEIC to JPG.
If unsure how to proceed, read ahead to learn the different methods to change HEIC to JPG on Windows PC, Mac, iPhone, and Android.
Part 1: How to Convert HEIC to JPG on Windows PC
As the most accessible platform, Windows is widely used by photographers, editors, and regular users. So, to start, let's first discuss how to convert the HEIC file to JPG on Windows.
Method 1: Convert HEIC to JPG in Batch on Windows
Supported OS versions: Windows 7/8/10/11
Supports a wide range of OS versions, MobileTrans is one of the best tools to convert HEIC files to JPG on Windows PC. In addition, it allows converting 100 HEIC photos simultaneously with fast processing. Besides converting from HEIC to JPG, you can also transfer images between devices.
MobileTrans - HEIC Converter
Convert HEIC Photos to JPG Format With a Few Clicks!
- • Access your HEIC photographs anywhere by converting them to the JPG format.
- • Convert multiple HEIC photos into JPG format simultaneously.
- • It comes with a user interface that is simple and easy to navigate.
- • Free to use.
 4.5/5 Excellent
How to do this?
Step 1: Download Mobile Trans on Windows and run it after completing the installation.
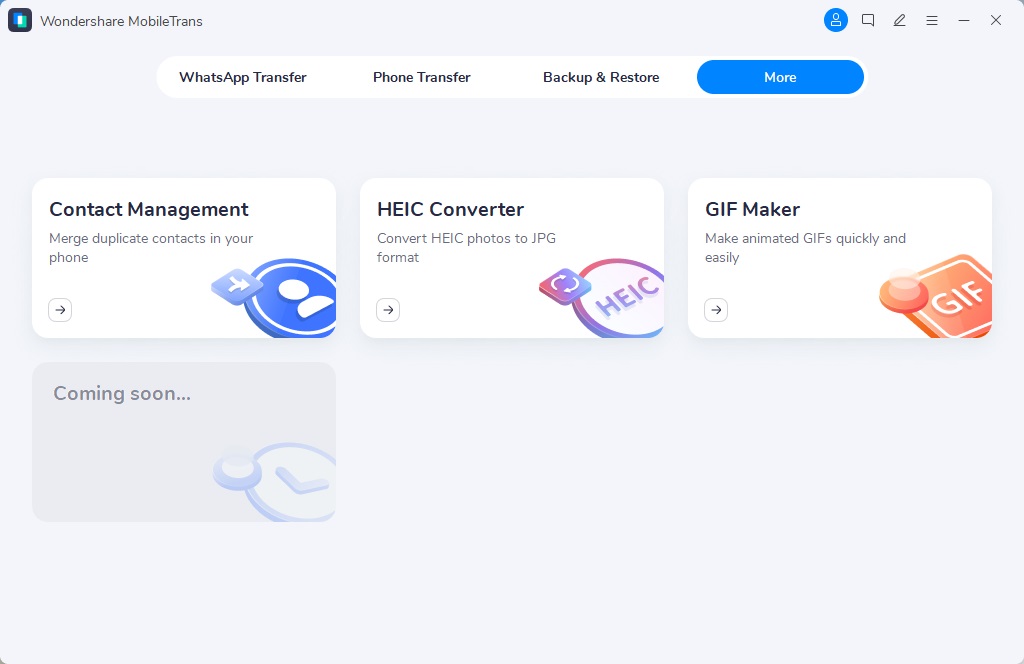
Step 2: Click on More Tools >HEIC Converter.
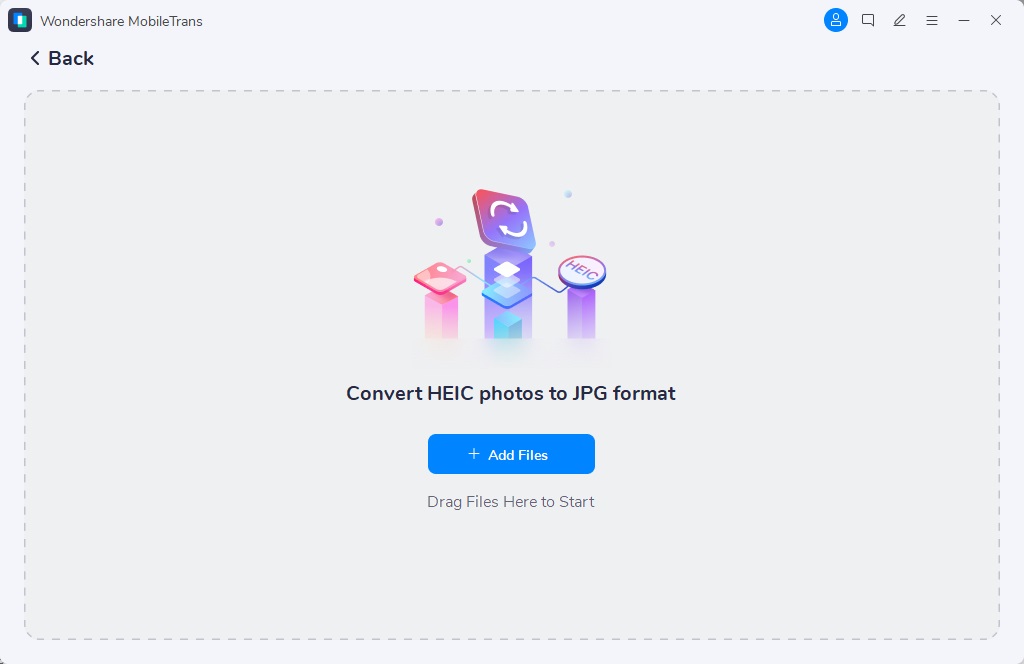
Step 3: Tap your cursor on the "Add Files" button. Enter the HEIC file on your device into the converter. Or, you can keep both windows open on your desktop, drag the image, and drop it in the converter.
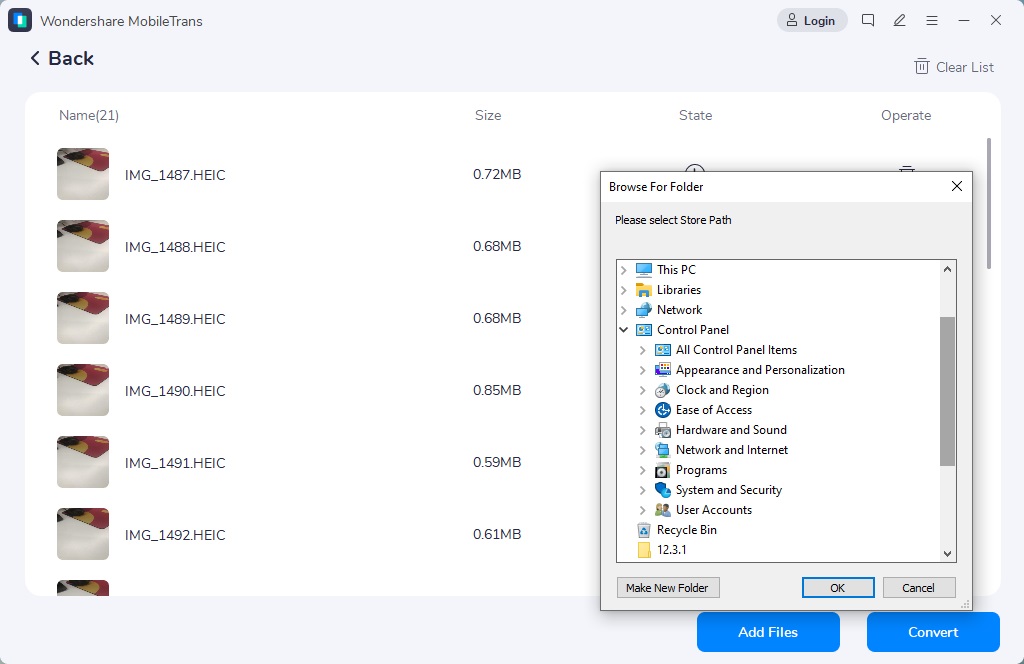
Step 4: Choose the HEIC files you want to convert to JPG and press the blue Convert button. A pop-up will appear for selecting the saving location. Make your choice and press OK.
Pros:
- The software is free to use.
- Simple to use for non-technical users.
- You can convert multiple image files at the same time.
Without a doubt, MobileTrans is an efficient tool for quick HEIC format to JPG conversion, so use it if you want a simple and faster converter.
Method 2: Convert HEIC Files to JPG One-by-one on Windows
Supported OS versions: Windows 10/11
While you can use a third-party tool like MobileTrans, an in-built photos tool on Windows allows users to turn HEIC to JPG as well. The conversion happens within the default app, Microsoft Photos.
You must install extensions to support HEIC file format first. Then, it can convert HEIC photos to JPG using Save as feature.
How to do this?
Step 1: Go to Microsoft Store > click on the page for HEIF Image Extensions.
Step 2: When the option appears, hit the Get choice beside it. This will start the extension download on your Windows PC.

Step 3: Go to the Microsoft Photos app > Open the HEIC file after the extensions fully installs.
Step 4: Head to File > Save as and choose to save the photos in JPG format.
Pros:
- Avoid installing any third-party app for this.
- Free to use completely.
Cons:
- You have to download a separate extension.
- Convert HEIC photos one by one.
Part 2: How to Change HEIC to JPG on Mac?
Although Mac that runs on macOS High Sierra or newer versions supports HEIC format now, JPGs are still more widely compatible with other platforms. And the old Mac still cannot view HEIC files unless you change HEIC to JPG first.
There are in-built tools for that, like the Preview feature. However, it is better to install a third-party app for Mac devices that are running on older macOS versions.
Method 1: Batch Convert from HEIC to JPG via Preview
Supported OS: macOS High Sierra and above
The Preview app helps change HEIC to JPG. However, it is available in newer macOS devices, like High Sierra and higher. To use it, you must upgrade your device to a newer version.
How to do this?
Step 1: Press the Apple logo on the left part of the screen and click on the "About this Mac" choice.
Step 2: On the next window, press Software Update. This will begin the conversion process.

Step 3: After completing the OS update, go to your HEIC file and right-click on it. Choose Open With > Preview.

Step 4: After opening the Preview app, choose File > Export. Start the conversion of your HEIC file to JPG.

Step 5: Choose JPEG as the output file type under Format. Click on Save.

The conversion process will start.
Pros:
- No app/extension installation is necessary.
- Easy to use for Mac users.
- Basic photo editing.
Cons:
- Not available on older macOS.
- Convert limited photos once.
Method 2: Convert HEIC Format to JPG via iMazing Converter
Supported OS: macOS 10.10 or later
iMazing Converter is a lightweight and free app that Mac users can opt for regarding how to convert HEIC to JPG. It allows users to convert their files on some Windows PCs as well. Besides the images, you can convert the videos to MP4 version here.
How to do this?
Step 1: Install the app on your Mac device. Launch it on your device.
Step 2: Drag your HEIC files or the whole folder and drop them into the iMazing Converter window.
Step 3: Press Most Compatible > Convert. Decide the location in Mac for the image storage. The saving process will start occurring. Make further iMazing preference changes.

Pros:
- You can modify the photo quality and resolution.
- Support wide-gamut for color vibrancy.
- Drag and drop functionality is available.
Cons:
- For more devices, you have to get the paid plan which has a high cost.
- Limited advanced or modern functions are available.
Part 3: How to Turn HEIC to JPG on iPhone?
Another point of concern here is if you are using iPhones. Here, users can avoid downloading any extra third-party application for HEIC to JPG conversion. Instead, you can use one of the two methods listed.
Method 1: Save Photos as JPG Format Instead
If you no longer want to save images taken by your iPhone in HEIC format, you can change the settings.
How to do this?
Step 1:Go to the Settings app from the iPhone home screen.
Step 2: Click on Camera > Format.
Step 3: Press the option "Most Compatible" out of the options. This will convert the HEIC file to JPG automatically from the next click.

Method 2: Change Photos from HEIC to JPG via Files
You can also convert HEIC to JPG on your iPhone device through the Files folder.
How to do this?
Step 1: Click on the photo you want to turn to JPG. Select multiple, if necessary.
Step 2: Copy them and paste them into Files.

Step 3: Click Save and keep them on your device in JPG format.
Part 4: How to Make HEIC to JPG on Android
Finally, in the context of how to turn HEIC to JPG, let's discuss the process for changing the formats in Android phones. For this, specific online tools are helpful.
Method 1: Convert HEIC to JPG Online
There is a simple online converter website, i.e., HEICtoJPG. You can access it via any browser, so this process also works on other OS types.
How to do this?
Step 1: Access the site on your preferred browser.
Step 2: Click on the Add (+) button to add the HEIC file from your device.

Step 3: The conversion will occur automatically. Press the Download Now button to get the files.
Method 2: Convert HEIC Photos to JPG via Luma
An Android app named Luma can quickly convert from HEIC to JPG. This is accessible through Google Play Store. The steps are simple and require limited technical skills to operate.
How to do this?
Step 1: Go to Google Play Store on the Android device, search and install Luma.
Step 2: Launch the app and select "HEIC to JPG".
Step 3: Press the plus (+) icon. Choose the files to convert. Add many files altogether by selecting the folder, if needed.

Step 4: Click the Save button and choose the desired saving location. The conversion process begins.

Step 5: For full-folder conversion, choose the folder and click the Convert option. Click the tick mark to confirm.

Conclusion
Indeed, multiple methods are available for effective HEIC to JPG conversion. Depending on your OS type, opt for the best solution that you want to try and carry out the conversion process. Then, follow the steps mentioned here accurately for the right results.
If you plan to convert HEIC images to JPG on Windows PC, we suggest giving MobileTrans a try.
MobileTrans - HEIC Converter
Convert HEIC files to JPG fast without losing quality on Windows
New Trendings

Top Stories
All Categories


Axel Nash
chief Editor