


 TL;DR:
Enable automatic syncing for all your iPhone notes by turning on the Notes toggle under the iCloud section of your Apple ID settings.
● For partial transfers, open the On My iPhone folder within the Notes app, select individual files, and manually use the Move option to relocate them to the iCloud folder.
● To bypass iCloud storage limitations, you can back up your notes locally to a Windows PC or Mac by connecting your device to Wondershare MobileTrans and using the Phone Backup and Restore module.
Ask AI for a summary
 ChatGPT
 Perplexity
 Gemini
 Claude
 Grok
Grok
Have you recently got a new iPhone or an Apple device (iPad or Mac)? If so, the next question you might be asking yourself is, "How can I move notes to iCloud?"
You might only have one iOS device in the past— let's say an iPad— and now got an iPhone or Mac as well, and it's time to transfer the important data, including notes to iCloud. Apart from pictures and videos, notes are integral parts of our lives. Moving notes to iCloud guarantees you to access your notes on all Apple devices (running on the same iCloud account)!
Wondering how to transfer notes to iCloud? In this article, we've all the methods you can follow to transfer notes to iCloud and keep them synced to access all your iOS devices. Keep on reading to know more!

Part 1: How to Move Notes to iCloud via iPhone Settings?
You can quickly sync all the notes on your iPhone to your iCloud account in a few taps. There is no need to download any third-party application for this method and even back up other data. You can sync the notes only from the iPhone Settings. Want to know how to move notes to iCloud via iPhone Settings? Here's the step-by-step guide:
- Step 1: Go to Settings of your iPhone and tap on the Apple ID

- Step 2: Tap on iCloud to access all the settings related to iCloud syncing.

- Step 3: Toggle to Turn ON the Notes. This way, you'll get the notes synced to the iCloud account.
Note:When the bar next to Notes turns green, it means that the option for Notes syncing is enabled.

Part 2: Transfer Notes to iCloud in Notes App
If you've experienced that all the notes are not synced from your iPhone to iCloud, or you don't want to sync all the notes to iCloud— you can manually sync them from the On My iPhone section. Are you curious about how to move notes to iCloud and how exactly this method works? Let's get started:
- Step 1: Ensure that the Notes syncing is enabled from the iCloud settings on your iPhone.
- Step 2: Tap on Notes to launch the notes app on your iPhone and open the Notes folder under the On My iPhone
Note: The Notes folder under the On My iPhone section contains the notes currently available on your iPhone device but are not synced to iCloud.

- Step 3: Tap on Edit in the top-right corner of the screen and manually select the notes you want to sync to iCloud. Once selected, tap on the Move option from the bottom.

- Step 4: Under the iCloud section, tap on the Notes folder, and your selected notes will be moved to the iCloud account.
Part 3: Back up iPhone Notes to Computer
Have you purchased a new iPhone device and want to sync all your data to iCloud so that the new device will have the images, videos, reminders, notes, etc.? If so, you'll see that most of the storage on iCloud will be consumed by the images and videos— leaving no space for the important notes section. Worry not! You can always back up the iPhone notes to a computer to have a record and save them for the future.
We recommend using the Wondershare MobileTrans, that'll help you back up the notes section from your iPhone to your PC. The software allows you to back up your phone contents, such as messages, photos, contacts, notes, etc., to your PC in a few clicks. Here's the best part: Wondershare MobileTrans works for both iPhone and Android devices to make a backup on Windows PC or Mac. The method is more convenient and user-friendly than iTunes or iCloud and won't take much time.
MobileTrans - Backup iPhone Notes
Backup iPhone Notes to PC for Free!
- • Backup iPhone notes, photos, messages, etc to computer.
- • Back WhatsApp messages, photos and more to computer.
- • Supports 6000+ mobile devices.
- • Free to use and easy to operate even for non-tech navvy.
- • Support the latest iOS and Android OS.
 4.5/5 Excellent
Here's a step-by-step guide on how to backup notes to a computer via MobileTrans:
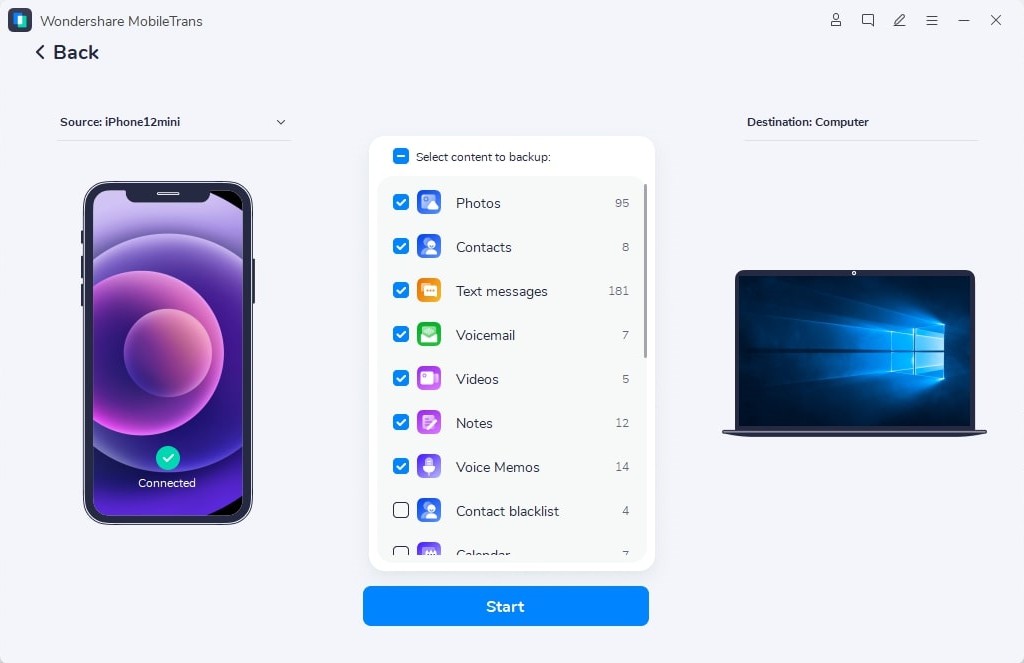
- Step 1: Launch the Wondershare MobileTrans and connect the iPhone device you want to transfer your notes.
- Step 2: Click on the Backup and Restore tab and from the Phone Backup and Restore option, choose the Backup.

- Step 3: From here, you can choose multiple data types that you can backup to your PC. Select Notes from the data type and click on Start to initiate the transfer process.
Now your iPhone notes is stored on computer instead of iCloud. If you want to restore it to your other iOS or Android devices, simply follow the instructions.
Conclusion
Notes might be the most important thing for you on your iPhone device and failing to sync them to iCloud is a nightmare. Worry not; you can easily sync notes to iCloud via Settings and On My iPhone. However, if you wish to backup your notes on a PC due to low storage on iCloud or to save them for the future, you can backup notes via MobileTrans.
New Trendings

Top Stories
All Categories


Axel Nash
chief Editor