6 Foolproof Solutions to Backup iPad and Avoid Any Data Loss

Written By Axel Nash |


 TL;DR:
To completely back up your iPad, use MobileTrans - Backup&Restore for a fast, single-click local computer backup, or opt for iCloud and Google Drive if you prefer accessible cloud storage.
● iCloud offers 5 GB of free, automatic native backup, while third-party cloud apps like Google Drive (15 GB free), OneDrive (5 GB free or 1 TB with Microsoft 365), and Dropbox (2 GB free) strictly require time-consuming manual file uploads.
● iTunes serves as Apple's free local alternative but involves a complicated interface and presents potential compatibility issues when attempting to restore the saved data.
● MobileTrans - Backup&Restore is the optimal choice for extensive offline backups because it safely maintains multiple separate backup versions on your computer without overwriting previous files and ensures seamless cross-device restoration.
Ask AI for a summary
 ChatGPT
 Perplexity
 Gemini
 Claude
 Grok
Grok
If you are also an iPad owner who doesn’t want to lose your data by mistake, then you have come to the right place. Since we store all kinds of media files and documents on our iPad, losing our data can be a nightmare. That’s why it is strongly recommended to backup iPad regularly to a reliable source. You might not know, but you can backup iPad to iCloud, iTunes, OneDrive, Google Drive, and even Dropbox easily. In this post, I will list 6 different methods to backup iPad like a pro.
Method 1: Backup iPad to iCloud
To start with, let’s have a look at the native solution to backup iPad to your iCloud account. You can easily link your iPad to an iCloud account and save its data in the cloud. Though, only 5 GB of storage is given to every iCloud account and if you have a lot of data to back up, then you can buy more space. Here’s how you can backup iPad to iCloud without much effort.
- Firstly, just unlock your iPad, go to its Settings, and tap on your Apple ID.
- Now, browse to its iCloud settings and make sure it is linked to an active iCloud account. You can turn on/off the feature to sync any data type with iCloud from here.
- Also, go to the iCloud Backup feature and turn it on. You can tap on the “Back up now” button to take an immediate backup of your iPad.

Pros
- • Easy to implement
Cons
- • Only 5 GB of space is for free
- • Takes a lot of time to backup large files
Method 2: Backup iPad to iTunes
Just like iCloud, you can backup your iPad data to iTunes as well. For this, we will first connect our iPad to the system and launch an updated iTunes version on it. Once the backup is saved, you can extract it and restore it to your iPad as well. Here’s how you can backup iPad to iTunes in no time.
- Launch an updated version of iTunes on your computer and connect your iPad to it using a working cable.
- Select the connected iPad from the devices icon and go to the Summary section on iTunes.
- Under the “Backups” field, click on the “Back up Now” button and make sure “This Computer” is marked as the location to save your backup.

Pros
- • Freely available
Cons
- • Compatibility issues while restoring the backup
- • A bit complicated to use
Method 3: Backup iPad to Google Drive
If you have already been using Google Drive, then you can also take its assistance to backup your data on iPad. Unlike iCloud, Google Drive users get 15 GB of free storage that can accommodate most of your files. Though, there is no native feature to backup iPad to Google Drive entirely (like iCloud). Therefore, you have to launch Google Drive and upload your important files to it manually.
- You can first launch the Google Drive application on your iPad or simply go to its website and log-in to your account.
- On your Google Drive home page, tap on the “+” icon, and choose to upload a file.
- This will let you browse your iPad storage and you can manually upload your data to Google Drive.

Pros
- • 15 GB of free storage
Cons
- • Extremely time-consuming
- • Can’t backup all data types automatically
Method 4: Backup iPad to a Computer with MobileTrans - Backup&Restore
Apart from cloud-based solutions like iCloud or Google Drive, you can backup iPad to your computer. To do this, you can just take the assistance of MobileTrans – Backup, which is an extremely fast and freely available application. With just a single click, you can backup all kinds of data from iPad to your system like its photos, videos, music, bookmarks, notes, documents, and so on.
Also, you can maintain different versions of your backup on your computer separately (without overwriting anything). Later, you can use MobileTrans – Restore to extract your saved backup to the same or any other device. Here’s a smart solution to backup iPad directly to your computer in minutes.
Step 1: Launch MobileTrans – Backup
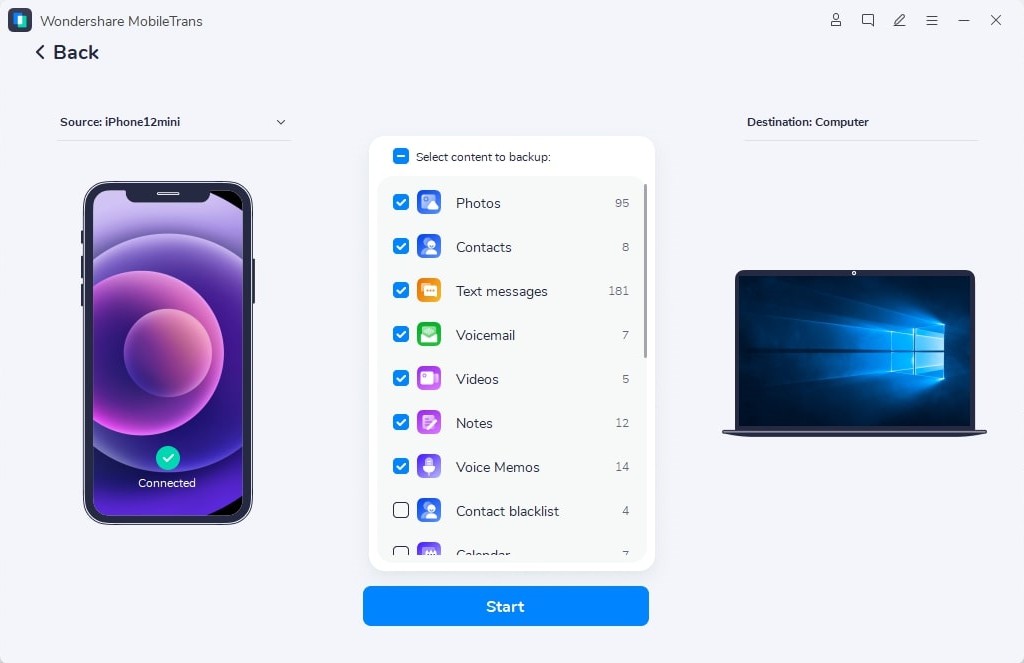
Just go to the official website of MobileTrans, install and launch MobileTrans. To back up iPad to your system, you can select the “Backup&Restore” module from the home screen.

Step 2: Choose what you want to back up
Now, you can connect your iPad to your computer using a lightning cable and wait for it to be detected. Later, the application would automatically display its snapshot with a list of various data types that it can back up. You can now just select what you wish to include in the backup, like your photos, videos, notes, etc.
Step 3: Wait for the process to be completed
After selecting what you wish to save, just click on the “Start” button and wait for a while. In no time, MobileTrans will back up iPad to your computer and will let you know when the process is completed.
Pros
- • Fast and extremely easy to use
- • No compatibility issues
- • Can maintain different versions of the backup
- • The application is available for free
Method 5: Backup iPad to OneDrive
OneDrive by Microsoft is another popular cloud-based solution that you can use to backup iPad, iPhone, and several other devices. By default, you would only get 5 GB of free space on OneDrive, but if you have Microsoft 365 subscription, then it would be extended to 1 TB. To take a backup of iPad to your OneDrive account, you can either use its website or iOS application.
- If you don’t have its app, then you can just go to the website of OneDrive and log-in to your account.
- Go to the Files option and choose the “Upload” feature from the toolbar. Here, you can choose to upload a file from your iPad storage.

- Alternatively, if you are using its app, then go to any folder in your OneDrive account, tap on the three-dot icon from the top.

- Now, select the option to “Add Items” so that you can browse the iPad storage and upload your files to OneDrive.

Pros
- • Will save your data in the cloud (that you can access on any device)
Cons
- • Takes a lot of time
- • Can’t backup all files together
Method 6: Backup iPad to Dropbox
Lastly, Dropbox can also be used to backup iPad data to the cloud, letting you access it on any other device. Since it only provides 2 GB of free storage, it is recommended to upload a handful of files to Dropbox instead. You can just use its application to backup iPad to Dropbox and can later go to its website/app to extract your data again.
- To begin with, just launch the Dropbox app on your iPad and log-in to your account.
- Now, tap on the “Create” or “+” button on its home and from the provided options, choose to upload files.
- You can now go to your iPad storage, select what you wish to upload, and choose a location to save it on your Dropbox account.

Pros
- • Cloud-based hassle-free storage
Cons
- • Only 2 GB space is for free
- • Takes a lot of time and effort
There you go! Now when you know 6 different ways to backup iPad data, you can easily keep your important files safe. If you wish to upload them to a cloud-based service, then iCloud or Google Drive would be the best option. Although to take an extensive backup of your iPad to your computer in one go, MobileTrans – Backup is recommended. MobileTrans lets us back up every leading iOS/Android model as well and you can later restore your data to the same or any other device.
New Trendings

Top Stories
All Categories


Axel Nash
chief Editor