Backup iPad to an External Hard Drive with/without a Computer

Written By Axel Nash |

“How to backup iPad photos to an external hard drive? I want to back up my iPad to an external hard drive, but I don’t know how to!”
If you also own an iPad and you would like to save its backup to an external hard drive, then you have come to the right place. We all know how simple it is to transfer iPad data to a Windows PC or Mac, but moving it to an external source can be tough. Don’t worry – if you follow a smart approach, then you can easily backup iPad to an external hard drive with/without a computer. In this post, I will let you know how to backup iPad to an external drive in a stepwise manner.

Part 1: The Best Alternative: Backup iPad to PC with MobileTrans
Most of people would like to backup iPad to an external hard drive to save their iCloud storage. Well, an ideal alternative for this would be MobileTrans. With just a single click, you can take an entire backup of your iPad to your computer. This would include your photos, videos, music, calendar, notes, voicemails, reminders, alarms, and almost every other kind of data.
Using MobileTrans – Backup, you can maintain different versions of the backup instead of overwriting them. Also, it is 100% free and will not harm your device in any way. You can follow these simple steps to backup your iPad to your computer using MobileTrans.
Step 1: Connect your iPad to the system
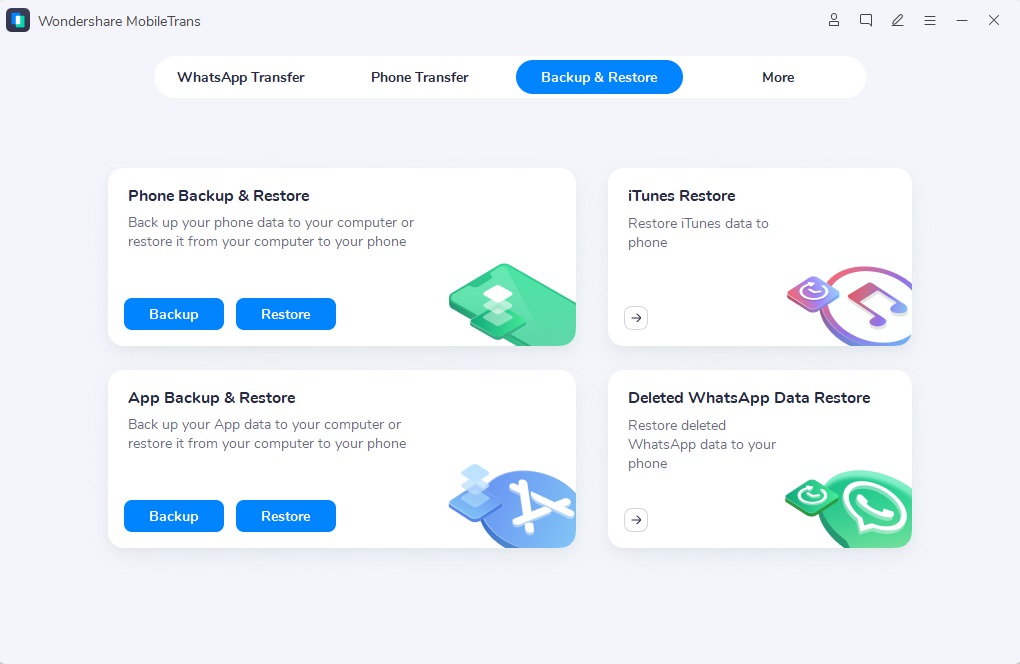
You can start by connecting your iPad to your computer using a working cable and launch MobileTrans on it. From the welcome screen of the application, you can select the “Backup & Restore” module, and then choose “Phone Backup & Restore”.

Step 2: Select what you wish to back up
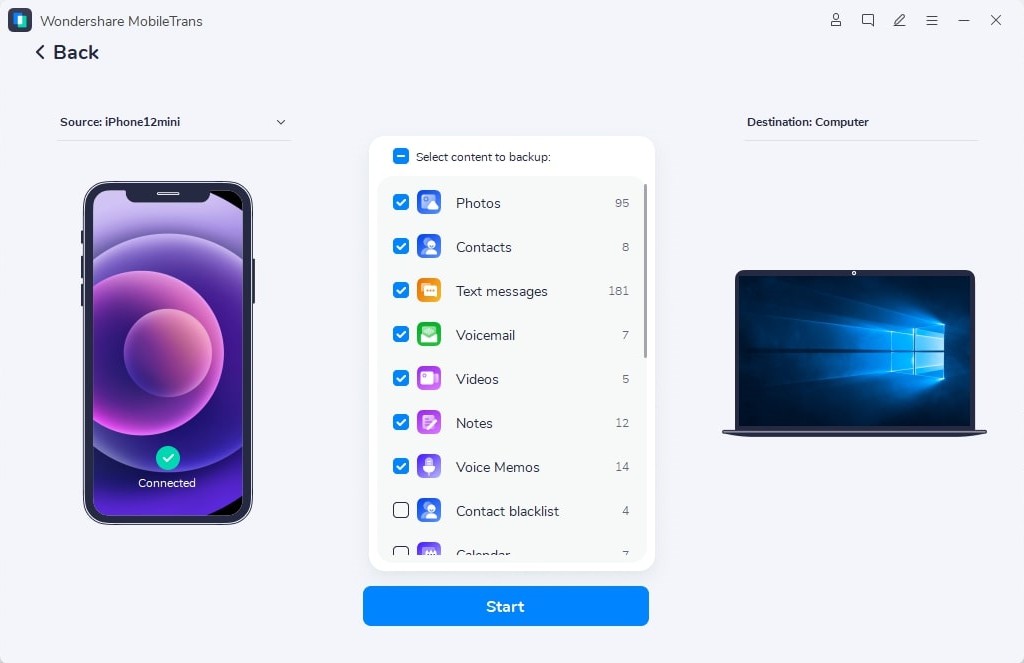
MobileTrans would automatically detect the connected iPad and will display its snapshot. You can now select the type of data you wish to back up from the available list and click on the “Start” button once you are done.

Step 3: Complete the backup process
Simply wait for a while as MobileTrans would maintain a dedicated backup of your iPad and would let you know once it is done. You can now safely remove your iPad from the computer and use it the way you like.
Part 2: How to Backup iPad to an External Hard Drive on a Computer
The easiest way to backup iPad to an external hard drive is by using iTunes and Command Prompt. In this, we will make a virtual link between the system storage (where iTunes backup is stored) and the external hard drive. This means you should know the location where the iTunes backup is stored on your computer. To learn how to backup iPad Pro to an external hard drive on Windows, follow these steps:
Step 1: Connect your iPad and the external hard drive
At first, you can just connect your iPad and the external hard drive to your computer using working cables. If you are connecting your iPad for the first time, then you need to trust the computer.

Step 2: Make a virtual link for your disk Now, you can go to the Start menu to launch Command Prompt as an administrator. You can also open the Run prompt and enter the “Cmd” command to launch it.

Once the Command Prompt is launched, you can enter the following command on it:
mklink /J “C:\Users\
Here, C and E are the driver letters for Windows and the connected external hard disk that you can change. Also, the location where the iTunes backup is stored would vary from one PC to another, but it is mostly the provided folder.
Step 3: Backup iPad data using iTunes
Now, you can just backup iPad to iTunes in the standard way. Simply connect iPad to your computer, launch iTunes, and select it from the devices tab. Go to the Summary section and click on the “Back up Now” button under the Backups section. Just make sure you take the backup on “This Computer” instead of iCloud.

That’s it! Once the iPad backup is completed, you can automatically find it stored on your external hard drive.
Tip: How to Backup iPad Photos to the External Hard Drive
If you simply wish to backup your iPad photos to an external hard drive, then you don’t need to use iTunes. Just connect your iPad to the system, go to the Explorer, and visit its DCIM folder. From here, you can manually copy your photos and take their backup to the connected external hard disk.

Part 3: Backup iPad to an External Hard Drive without a Computer
Even if you don’t have a computer, you can still backup iPad to an external drive. For this, you need to use a USB-to-lightning adapter so that you can easily connect your external hard drive directly to your iPad. Later, you can move your data (like your photos) from your iPad to your external hard drive. Here’s how to backup iPad photos to an external hard drive without a computer.
Step 1: Connect your hard drive to your iPad
To start with, just take the assistance of a USB-to-lightning cable adapter and connect your iPad to your computer.

You will be notified once your external drive is detected by your iPad. You can also go to the Files app (or any other File Explorer) on your iPad and view the connected external storage.

Step 2: Copy your data from iPad to your external drive
Afterward, go to the Photos app on your iPad and just select the pictures you wish to save. You can now tap on the Share icon and choose the feature to save your pictures to the Files app.

As the Files app would be launched, you can select the location of the connected external drive and save your photos here.

Part 4: FAQs
1. Can I back up my iPad directly to an external hard drive without a computer?
No, iPads do not natively support direct backups to external hard drives. However, you can transfer files manually using the Files app with a compatible drive (especially on iPadOS 13 or later). For full device backups, you’ll need a Mac or PC.
2. Can I use third-party apps to back up iPad data to an external drive?
Yes, apps like MobileTrans allow you to create full or partial iPad backups and store them directly on an external hard drive. These apps often offer more flexibility than Apple’s built-in tools.
3. What do I need to back up my iPad to an external hard drive using a Mac?
There you go! After following this guide, you would be able to backup iPad to an external hard drive. To make things easier for you, I have included various methods that can backup iPad to an external hard drive without a computer or with it. You can go with either of these solutions or even use MobileTrans to maintain an iPad backup directly on your computer’s storage.
New Trendings
Top Stories
All Categories


Axel Nash
staff Editor