Having a backup of your iPhone data is very essential for any iOS user. Some may ask how do I backup my iPhone? Well, it's pretty easy and there are several ways to perform iPhone data backup.
While some people prefer to use the iPhone's primary iCloud, others might want to backup their data to a computer or another cloud storage. Irrespective of what method you intend to use to backup iPhone, this article got you covered.
Here, we've briefly explained different trusted methods anyone can use to backup iPhone without compromising original data. So, keep reading.

Part 1: Why Backup iPhone Still Matters
Some may say they have synced their data to iCloud, there is no need to backup iPhone. Well, that's not true, because what if you forget the password to your iCloud account or you accidentally delete important data from your iCloud?
Without iPhone backup, app data on your previous iOS device can't be restored, and all settings will be gone. Plus, the data loss when your iOS device gets missing depends on how much data you've synced to the iCloud.
Besides, it's easier to wait a few minutes just to download a backup than to spend hours adjusting settings, installing apps, and uploading files. So, iPhone backup is absolutely important.
Part 2: How to Backup Your iPhone via iCloud
iPhone backup via iCloud is the popular and primary method iOS users use to back up their phone data.
As we all know, iCloud offers free 5GB cloud storage for users to save essential data. So, by using iCloud, you don't have to pay for extra space except the size of data you're looking to backup exceeds 5GB.
That being said, let's take a look at the steps to backup your iPhone via iCloud.
Make sure your iPhone is connected to a stable WiFi connection before you begin the backup process;
Step 1: Navigate to the Settings app on your iPhone > Tap your Apple ID banner displaying your name > Select iCloud from the new page.

Step 2: Scroll down and tap iCloud Backup, then tap on the toggle next to it to turn it ON.

Step 3: Tap on Backup Now to start iPhone backup to iCloud.
Your iPhone data will be backed up to iCloud within a few minutes.
Pros and Cons of Backup iPhone to iCloud
Pros
- The backup process using iCloud is simple.
- Automatically backup iPhone data once iPhone is connected to a WiFi network.
- Allows easy access to data from any device.
Cons
- The speed of your backup depends on your Wi-Fi connection.
- Free cloud storage space of only 5GB is pretty small.
If you lack enough iCloud storage space to backup your iPhone to iCloud, you should try out the other methods outlined on this page.
Part 3: How to Back up Your iPhone to Mac
Another reliable way to backup your iPhone is by using your Mac PC. However, the process of executing the operation varies depending on the version of your macOS. You can either backup your iPhone to your Mac via the Finder app or iTunes.
Method 1: Back up my iPhone to Mac via Finder
Supported OS: macOS Catalina 10.15 or later
The upgrade to Mac OS Catalina in 2019 removed iTunes and replaced it with different apps for podcasts, music, and TV. So, now users can only backup their iPhone data to Mac via Finder. With Finder, you can manage your folders and other drives, and the amazing thing is the steps using the Finder app are quite similar to iTunes.
Step 1: Connect your iPhone to the Mac computer using its USB cable. Then run the Finder app and locate your iPhone in the Sidebar.

Step 2: Click General and select ‘Backup all of the data on your iPhone to this Mac’.
Step 3: Select ‘Encrypt local backup’ if you want to encrypt your data and password protect it.

Step 4: Click on Backup Now to begin the backup process.
Pros
- Users can backup as much iPhone data, and you're only limited to the capacity of your Mac hard drive.
- Backups via Finder are always stored on the hard drive, and they'll be backed up by Time Machine.
- It allows offline backup.
Cons
- It needs a USB cable.
- Backup will be lost if computer hard drive gets damaged.
Method 2: Backup an iPhone to Mac via iTunes
Supported OS: macOS Mojave 10.14 or Earlier
The iTunes program allows users to back up different kinds of data ranging from books, films, songs, photos, videos, etc. Although the backup process using iTunes might be slow, the tool offers great functionality that simplifies iPhone backup operation.
Step 1: Connect your iPhone to your Mac PC and open iTunes.
Step 2: Click on the iPhone icon at the top bar of the page.
Step 3: Click on ‘Summary’ > Choose ‘Backup Now’ under Backup. By doing so, iTunes will backup your iPhone data to your Mac instantly.

Step 4: To encrypt the backup, click ‘Encrypt Backup’ and type in your password to confirm the operation.

Pros and Cons of Backing up iPhone to Mac
Pros
- Users can backup as much iPhone data, and you're only limited to the capacity of your Mac hard drive.
- Backups are always stored on the hard drive, and they'll be backed up by Time Machine.
- It allows offline backup.
Cons
- It needs a USB cable.
- Backup will be lost if computer hard drive gets damaged.
Part 4: How to Backup My iPhone to Windows PC via iTunes
The iTunes tool can also come in handy for users looking to backup iPhone to their Windows PC. All you just have to do to get the job done is to install the latest version of iTunes on your Windows PC and you're good to go.
The steps below will walk you through the process of backing iPhone to Windows via iTunes.
Step 1: Start the iTunes program and connect your iPhone to the PC using its USB cable.
Step 2: Trust the computer from your iOS device and enter your passcode to validate.

Step 3: Navigate to the top of the iTunes page and click on the iPhone icon, as shown in the screenshot below.

Step 4: On the new page, click ‘Summary’ from the left pane. Then select ‘This Computer’ and click ‘Backup Now’ to backup iPhone to Windows PC. You can also tick the ‘Encrypt iPhone Backup’ checkbox if you're looking to backup Health, Password, and Activity Data.

Pros and Cons of Backing up iPhone to Windows PC
Pros
- Allows users to backup iPhones without requiring Apple ID.
- Support iPhone backup to different PCs. Be it Mac or Windows.
- Enables easy creation of iPhone backup.
Cons
- It is quite hard to find where the backup files are stored. And you cannot view the backups.
- Backup will be lost if the computer's hard drive gets corrupted.
Part 5: How Do You Backup Your iPhone to Any Computer [Free to Use]
The methods mentioned prior can either help you backup iPhone to Mac or Windows computer, however, MobileTrans will allow you backup your iPhone to any computer for free.
MobileTrans is an advanced data sharing software that facilitates iPhone data transfer, backup, and restoration. The software offers users simple but powerful tools to execute different kinds of data sharing operations. It doesn't matter if you're looking to backup, transfer, or restore iPhone data.
Besides, MobileTrans has a highly-intuitive interface, making it very easy to navigate for all users including non-tech savvy. If you want a faster and seamless iPhone backup operation, MobileTrans is the perfect tool to help you get the job done like a pro!
MobileTrans - Backup iPhone
Free to Backup iPhone to Windows PC and Mac!
- Boast a clean and simple interface.
- Facilitate faster and seamless iPhone data backup to computer.
- Besides data backup, MobileTrans supports data transfer and restoration within over 6000 types of mobile devices.
- Support 100% data privacy.

 4.5/5 Excellent
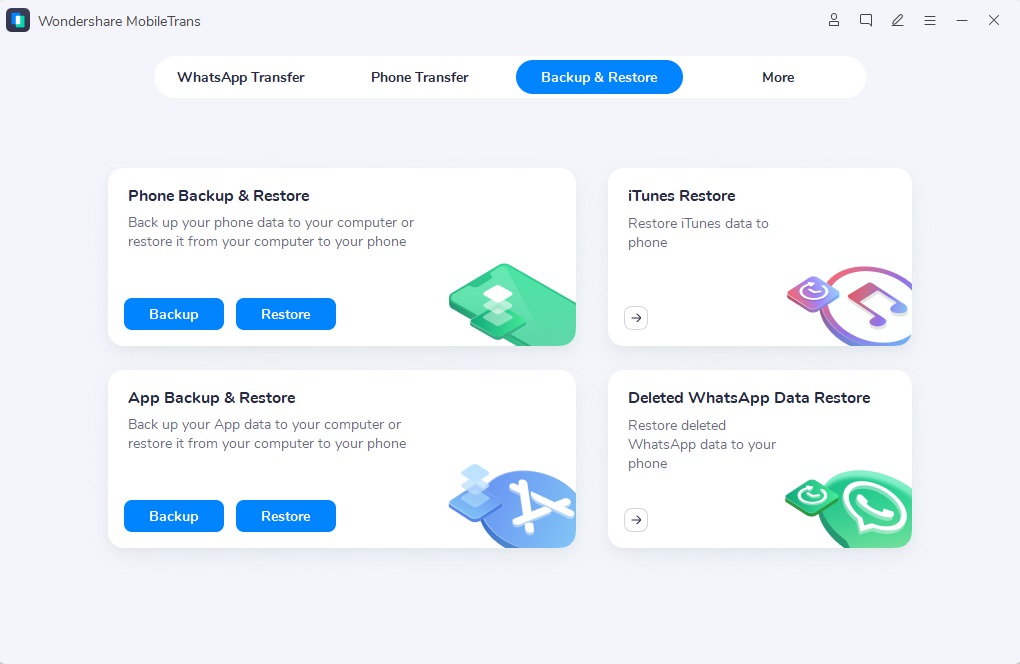
Step 1: Run the ‘MobileTrans’ on your Mac/Windows PC and connect your iPhone to the computer. Then click ‘Backup & Restore’ from the main interface and choose the ‘Backup’ option under ‘Phone Backup & Restore’.

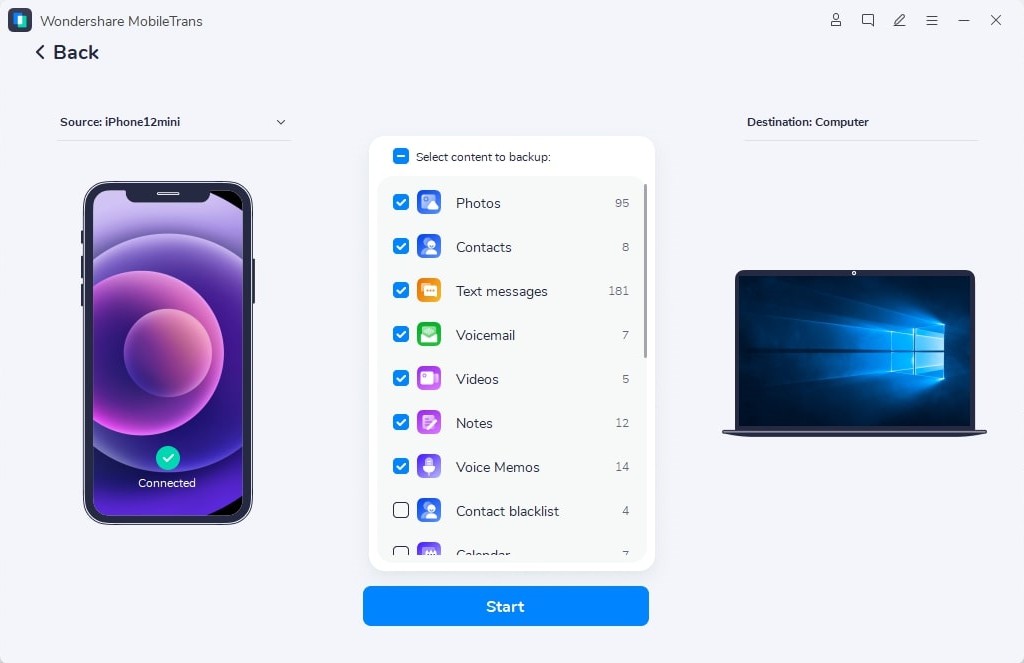
Step 2: Select the iPhone data you want to backup to your PC. You can do so by ticking the checkboxes next to the category of data. Then, click on the Start button

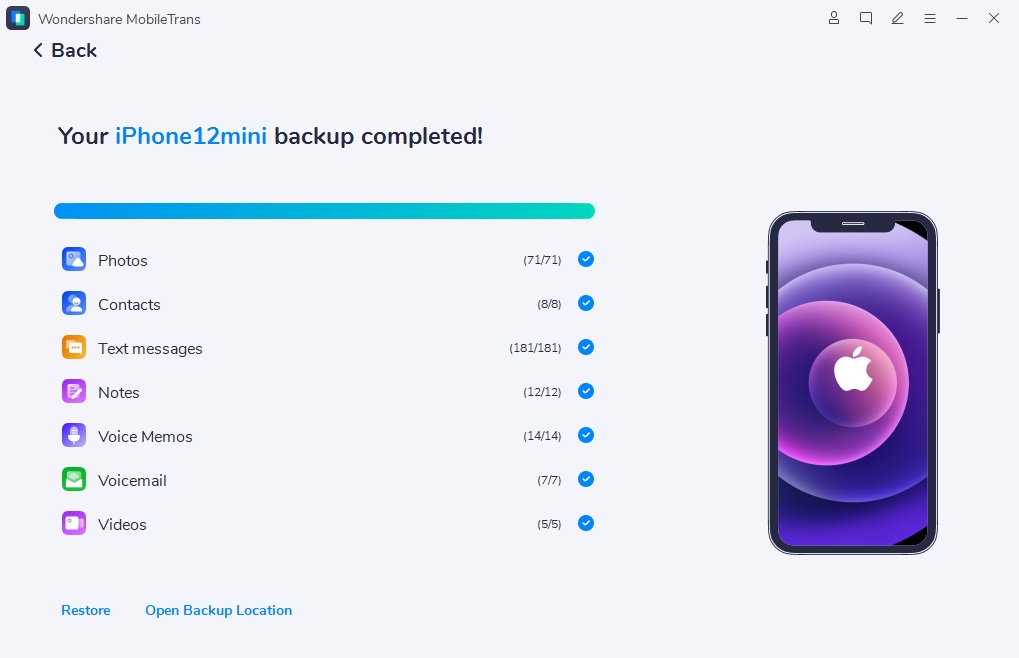
Step 3: MobileTrans will start the iPhone data backup process and will complete it within a few minutes. Afterward, disconnect the iPhone from the computer.

Part 6: FAQs
1. Where is the Backup on my iPhone?
If you think your iPhone backup can only be found on icloud.com, then you're wrong about that. You can locate backups on your iPhone device.
All you just have to do is;
- Open the Settings app on your iPhone > tap ‘Your Name’ > Select ‘iCloud’.

- Locate ‘Manage Storage’ and tap on it then select ‘Backups’.

- Tap on a backup to see more details about it. You can also select the one you want to delete.
2. How to Get an Old Backup on an iPhone?
You can locate all your iPhone old backups via settings app too. Just tap on your name, select iCloud, choose Manage Storage > then Backups.
You can either restore or delete anyone of your choice.
3. Do you need to Backup your iPhone?
Yes, it's important you backup iPhone prevent total data loss. Besides, backups make it easy for you to set up a new iPhone by enabling you just restore data within a few clicks.
Conclusion
There you have it! This article has covered all possible methods users at all levels can easily employ to perform iPhone backup. You can either backup iPhone to iCloud or computer. It all depends on the size of data you're looking to backup.
While iCloud is the primary storage to backup iPhone, it offers only limited free storage that might not be enough to backup iPhone data. Finder and iTunes, on the other hand, can be used to back up iPhone data to Mac computers but the process is quite slow.
For a faster and seamless iPhone data backup operation, we recommend using MobileTrans as it allows users to backup as much data as possible to computers without complications
New Trendings
Top Stories
All Categories


Navkiran Dhaliwal
staff Editor