Are you wondering how to share ringtones on iPhone? We're happy to help here! Ringtones are one of the most effective methods to customize your iPhone. You may set your favorite music to play when you get a call or a notification. However, when you try to share your customized ringtones to your new iPhone, you may discover that you are not permitted to do so, which can be quite annoying.
And if you wish to find out How to Transfer Ringtones from iPhone to iPhone, you've come to the right spot. In this article, we've listed the finest ways to transfer ringtones to iPhone. Let's get going!

Part 1: How to Share Ringtones on iPhone via Transfer Tool [Best Choice]
The most effective and easiest way to transfer ringtones from one iPhone to another is by using Wondershare MobileTrans. It is an easy-to-use tool that transfers nearly all types of data from one phone to another.
It provides 100% data security while transferring data between phones and phones to PC as well. Want to switch to a new phone or backup your data from phone to PC? Wonderhsare Mobiletrans can be the best bet!
MobileTrans - Phone Transfer
Share Ringtones o iPhone With a Few Clicks!
- • Transfer ringtones from your iOS to your iOS/Android device.
- • Transfer up to 18 types of data between phones on different platforms.
- • Supports over 6000 mobile devices running Android and iOS.
- • There is no need to factory reset or wipe existing data.
- • Designed for non-technologists, it is simple and quick.

 4.5/5 Excellent
To send ringtones to an iPhone using Wondershare MobileTrans, follow these steps:
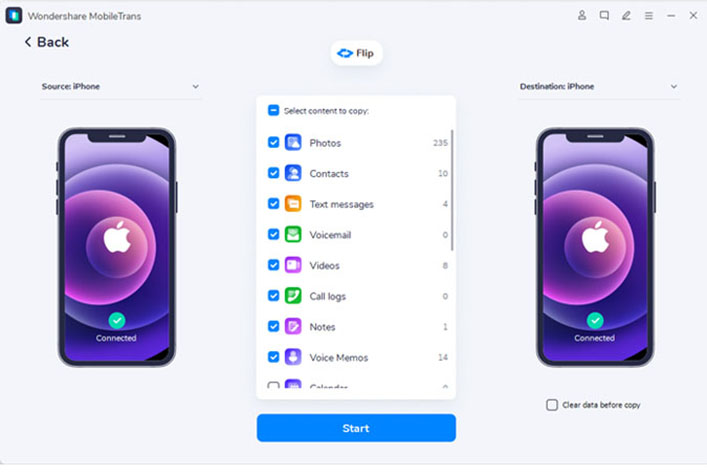
Step 1: Install Wondershare MobileTrans on your PC. After that, launch the tool. Now, click on Phone Transfer from the above bar, and go to Phone to Phone in the Phone Transfer window.
Note: Ensure that both iPhones are connected to the PC via USB cables.

Step 2: You'll see the Source and Destination phone on the interface. If they're not in the right order, click on Flip to change source phone to destination and vice versa.

Step 3: Now, tick the Ringtones checkbox from the menu in the middle, and click on Start to transfer ringtones from one iPhone to another.

Part 2: How to Transfer Ringtones from iPhone to iPhone via iTunes
iTunes, the standard backup and restore software for iOS devices, may assist you in sharing ringtones to the iPhone. However, your iTunes version must be 12.6 or below to sync your ringtones since the higher versions no longer support the feature.
To transfer ringtone from iPhone to iPhone, follow these steps:
Step 1: On your PC, download and install iTunes 12.6 or lower version, and launch it. After that, connect your old iPhone to your PC via a USB cable.
Step 2: Now, click on Files, and choose Devices from the menu. After that, select Transfer Purchases from iPhone from the drop-down menu, and click on Apply button.

Step 3: You need to connect the other iPhone to your computer via a USB cable. After that, click on the iPhone icon and select Tones.
Step 4: Tick the Sync Tones checkbox and fill either the All Tones or Selected Tones bubble. After that, click the Sync button to share ringtones from iPhone to iPhone.

Cons
- The outdated version can have security concerns
- Cannot sync only ringtones
- Only transfers purchased ringtones
Part 3: Send Ringtones to iPhone via E-mail
Email is another way to send ringtones to iPhones. If the ringtones are less than 50MB, you can easily send them through email. However, ringtones sent through email cannot be used immediately; they must first be played in GarageBand before being installed.
To send ringtones to iPhone via e-mail, follow the steps below:
Step 1: Go to the ringtone you wish to send and tap the Share icon. After that, choose the Mail app.
Step 2: Enter the email address of the account logged in on your other iPhone, and hit the Send button.

Step 3: On your other iPhone, open the mail app, and save the ringtone from the mail you just received.
Part 4: Transfer Ringtones from iPhone to iPhone via OneDrive
Another way to transfer ringtones to the iPhone wirelessly is through cloud services. Since iCloud doesn't support syncing ringtones, you can use OneDrive to perform the task. Besides that, you can also keep your files saved on OneDrive for future use.
To transfer ringtones from iPhone to iPhone, follow these steps:
Step 1: Install OneDrive on both iPhones through App Store. Launch it on your source iPhone.
Step 2: Now, tap the + icon, hit the Upload button from the menu, and upload the ringtones you wish to transfer.

Step 3: Launch OneDrive to your destination device after uploading the files and log in with the same account. Locate the ringtones and download them to your iPhone.
Part 5: FAQs
1. How to share ringtones on iPhone use family sharing?
No, using the family sharing feature, you cannot share ringtones on your iPhone. If you want ringtones on your other iPhone devices, copy them to the computer's iTunes library, where you sync your device and then pick and sync it.
2. How to transfer purchased ringtones to new iPhone without iTunes?
If you've an iPhone with iOS 26 or above, transferring purchased ringtones to a new iPhone is quite easy and simple. You are required to go to Settings, select Sounds & Haptics, Ringtones, and then Download All Purchased Tones.
3. How to transfer ringtones from iPhone to iPhone via Bluetooth?
No, you cannot use Bluetooth to send ringtones from one iPhone to another. Only audio streaming services are equipped with Bluetooth by default.
Conclusion
Apple only allows you to download purchased ringtones on our new iPhone. However, we hope that you know How to Transfer Ringtones from iPhone to iPhone after reading this article. Moreover, we recommend using Wondershare MobileTrans for the job because it is an all-in-one solution for iPhone data transfer.
New Trendings
Top Stories
All Categories


Axel Nash
staff Editor