iPhone to PC Transfer
- Transfer your photos from your iPhone to your PC in just a matter of minutes.
- Transfer your photos directly from your iPhone to your PC without the need for any additional software.
- Select specific albums, individual photos, or transfer all your photos at once.
- Keep the original resolution of your images, ensuring that you preserve the high-quality of your memories.


 TL;DR:
You can bypass iTunes to transfer photos from an iPhone to a PC by using USB connections via MobileTrans, the Windows Photos app, AutoPlay, and File Explorer, or through wireless alternatives including iCloud and Bluetooth.
● The Windows Photos app method is strictly limited to Windows 8 and Windows 10 operating systems, whereas Windows 7 users must rely on the AutoPlay dialogue box to import images.
● Wireless transfers require enabling the iCloud Photo Library on your iPhone to access files via the iCloud website, or authorizing a pairing code between your devices to send images directly over Bluetooth.
● USB transfers utilizing the third-party MobileTrans software support the latest device updates, specifically accommodating the iPhone 17 running iOS 26 and devices on Android 16.
Ask AI for a summary
 ChatGPT
 Perplexity
 Gemini
 Claude
 Grok
Grok
Holding an iPhone and backing up essential photos are two everyday tasks among iPhone users.
For most people, the only way to sync photos from iPhone to PC or Mac computer is through iTunes. But many people are annoyed with iTunes and its syncing process, which is slow, time-consuming, and especially in Windows 10.
So, what should you do?
Sit back and relax. We are here with this blog to guide you through some of the best ways to transfer your images without using iTunes within seconds quickly! And if you’re using the latest iPhone 17 with iOS 26, you’ll also discover updated wireless transfer options that make sharing photos across devices faster and more secure than ever.
Part 1: Transfer Photos From iPhone To PC Via USB Cable Without iTunes
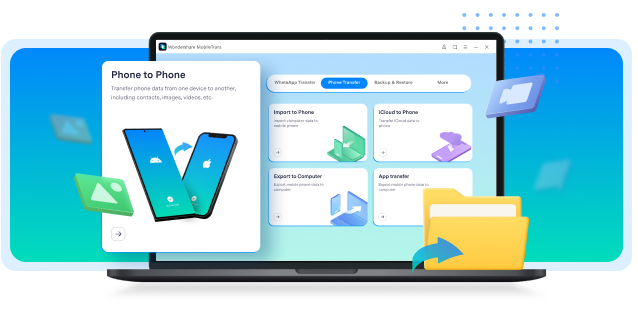
Method 1: Transfer Photos From iPhone To PC With MobileTrans
One of the easiest processes of transferring photos from your iPhone to your PC is using software like Mobiletrans.
MobileTrans - Transfer between Phone & Computer
Transfer photos from iPhone to PC With a few Clicks!
- • Export photos, music, videos, messages, and Apps from Phone to PC (Windows & Mac) and vice versa.
- • Backup 18+ types of data from Android and iPhone to PC (Windows & Mac).
- • Supports iOS 26 & Android 16
- • Support transfer of WhatsApp data between Android and iOS devices.
Here's how —
Step 1: First of all, install the software Mobiletrans on your PC.
Step 2: Next, get your PC connected with a USB cable to your device.
Step 3: Now, launch the Mobiletrans software you initially installed on your PC. The software will automatically detect your device since you already have your device connected.
Step 4: Once your device is detected, click on the Phone Transfer option, and choose Export to Computer feature.

Step 5: Now, simply choose the photos you want to transfer to your PC and click on that Start button.

All the selected photos will automatically get transferred to your PC.
There are yet other ways to transfer photos from your iPhone to your PC using the inbuilt settings in your computer.
Method 2: Transfer Photos From iPhone To PC With Windows 10 Photos App

Step 1: Again, first things first — connect your iPhone with your PC via USB cable to get started.
Step 2: Go to the Start menu, and scroll down to Photos.
Step 3: Now, launch the photos application and click on import on the upper-right corner.
Step 4: Next, select From a USB device from the dropdown menu.
Step 5: Now, simply select the photos you want to transfer on your PC and bang the Import selected button.
That's it! All the photos will automatically get transferred and you'll find them at: C:\Users\YOUR USERNAME\Pictures.
Note: The photos application is only available for Windows 8 and 10. If you're using Windows 7, you can still transfer your images with Autoplay.
Method 3: Move Photos From iPhone To PC With AutoPlay

Step 1: Link your iPhone with your PC via USB cable.
Step 2: As soon as your PC detects your device, an Autoplay dialogue box will pop up.
Step 3: Now click on the Import and Videos option.
Now all your photos will automatically get imported to your PC. You can find them at: C:\Users\YOUR USERNAME\Pictures.
Method 4: Copy Photos From iPhone To PC With File Explorer

Step 1: Connect your PC and your iPhone with a USB cable.
Step 2: Now launch the File Explorer application or use the Windows key + E shortcut keys.
Step 3: Next, select This PC from the sidebar options.
Now, you'll find your device under 'Devices and Drives.
Step 4: Now, click on the icon with your device name.
Step 5: Next, open the internal storage, scroll down, and click on DCIM.
Step 6: Now, simply find the folders containing your photos and merely select, copy and paste to the location you want to store them.
But wait! What if you don't have your USB at the moment and quickly want to transfer some important images?
Don't worry. Continue reading the following steps!
Part 2: Transfer Photos from iPhone to PC Wirelessly without iTunes
Method 4: Download iPhone Photos To PC With iCloud
Another way to get your photos off iPhone is by uploading them on iCloud.

Here's how you can upload your images to iCloud:
Step 1: First of all, you'll need to go to your iPhone's settings, tap on your profile photo, and select the 'iCloud Settings.’
Step 2: Make sure you have signed in to your iCloud ID. Now, just go to iCloud > photos and make sure to turn on the 'iCloud Photo Library.’
Doing so will automatically upload all the images from your iPhone to your iCloud account.
Step 3: Once the upload is complete, you can visit the iCloud website from any other device(iPhone, PC, or MAC), log in with your iCloud ID, and click on the 'Photos' option. Here, you can simply access all the images or download them.
Method 5: Get Photos From iPhone To PC With Bluetooth

Step 1: First, launch the Settings app on your iPhone, go to Bluetooth settings and turn on Bluetooth.
Step 2: Next, on your PC, click on the Windows icon > Settings > Devices > Add Bluetooth & other devices.
Step 3: Now, click on Bluetooth in the Add a device box. Then, your PC will start scanning the nearby Bluetooth devices, and your iPhone will be listed in the results window.
Note: If your iPhone doesn't appear in the results, try turning on the visibility option in your iPhone's Bluetooth settings.
Step 4: Now, click on the icon with your iPhone's name and click on Pair. Then, you'll get an authorization code you'll need to enter to confirm the pair.
Step 5: Finally, open the Photos application on your iPhone, choose the photos you want to send, and click the Send button using Bluetooth.
That's it! All the photos will automatically get transferred to your PC within a moment.
Wrapping Up!
So here are the best ways how you can transfer your photos quickly from your iPhone to your Windows computer.
We hope this blog was helpful and you successfully got what you are looking for.
Furthermore, if you find any issue regarding any of the above methods, feel free to reach out in the comment section below!
New Trendings

Top Stories
All Categories


Axel Nash
chief Editor