PC to iPhone Transfer
- Ensuring compatibility with a wide range of files.
- Transfer photos, videos and more from iOS to Computer.
- Easy and intuitive interface for a hassle-free transfer experience.
How to Transfer Files from a Windows PC/Laptop to iPhone

Written By Navkiran Dhaliwal |


 TL;DR:
Transferring files from a Windows PC to any Apple smartphone, including the latest iPhone 17 running iOS 26, requires dedicated software or cloud platforms because Windows does not support direct USB drag-and-drop importing to iOS devices.
● MobileTrans provides the fastest wired transfer for large files across all data types, while the classic iTunes method is best for full library syncing but restricts direct file sharing to compatible apps like Pages, Keynote, and Numbers.
● Microsoft Phone Link offers seamless wireless file sharing specifically for Windows 10 and 11 users, requiring the PC and iPhone to be paired via the Link to Windows app using the same Microsoft account.
● Cloud services like iCloud Drive and Dropbox are optimal for wirelessly moving smaller documents, whereas using a USB cable without iTunes only allows you to export media from the iPhone's DCIM folder rather than transfer files to it.
Ask AI for a summary
 ChatGPT
 Perplexity
 Gemini
 Claude
 Grok
Grok
Do you have some files, images, videos, and music on your PC that you want to transfer to your iPhone, including the latest iPhone 17 running iOS 26? iTunes is the standard choice for sharing data in this way. Yet, various people find it challenging because it's not ideal and contains specific issues, such as it has crashed several times and running slow.
This has confused many users about how to transfer files from PC to iPhone, no matter which model or iOS version they are using, from older devices to the newest iPhone 17 running iOS 26. For Mac users, you can move data via AirDrop. This article will review the solutions as follows! All 7 methods in this guide also work perfectly for transferring files from a Windows laptop to an iPhone. The term "PC" (Personal Computer) includes both desktop PCs and laptops. Whether you are using a Dell, HP, Lenovo, or any other laptop, the steps are the same.
This guide covers PC to iPhone. For the reverse, please read our complete guide: How to Transfer Files from iPhone to PC (Top 8 Ways).

Which PC to iPhone Transfer Method Is Best for You? (A Quick Comparison)
| Method | Best For | Speed | Requires iTunes? | Wireless? |
|---|---|---|---|---|
| MobileTrans | Large files, all data types | Fastest | No | No |
| Microsoft Phone Link | Quick share, ecosystem integration | Fast | No | Yes |
| iTunes | Full library sync, backups | Fast | Yes | No (Wi-Fi sync option) |
| Cloud Services | Accessibility, small files | Varies | No | Yes |
| USB Cable | Photos & videos (via iTunes) | Fast | Yes | No |
Part 1: How to Transfer Files from PC to iPhone Without iTunes (Easiest Method)
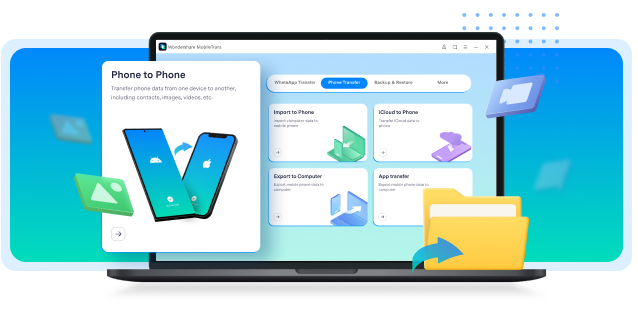
MobileTrans is a trending phone-to-phone transfer and phone-to-computer software designed for systems running on Mac and Windows. The purpose is to ensure smooth data transfer without wasting time and tiring your nerves. Besides data transfer, it also serves as an efficient mobile device manager that you can use either for iPhone or Android. It allows backing up and then restoring the data as you like and when you like.


Here's how to transfer files from your PC to your iPhone using MobileTrans:
Step 1: Launch MobileTrans
Go to the official website of the MobileTrans software from Wondershare and hit the Download tab to launch the software within your Windows PC.
Step 2: Connect the iPhone to a Windows PC
Connect your phone to the computer and keep them connected during the whole transfer process.

Note: iPhone needs to trust the computer first
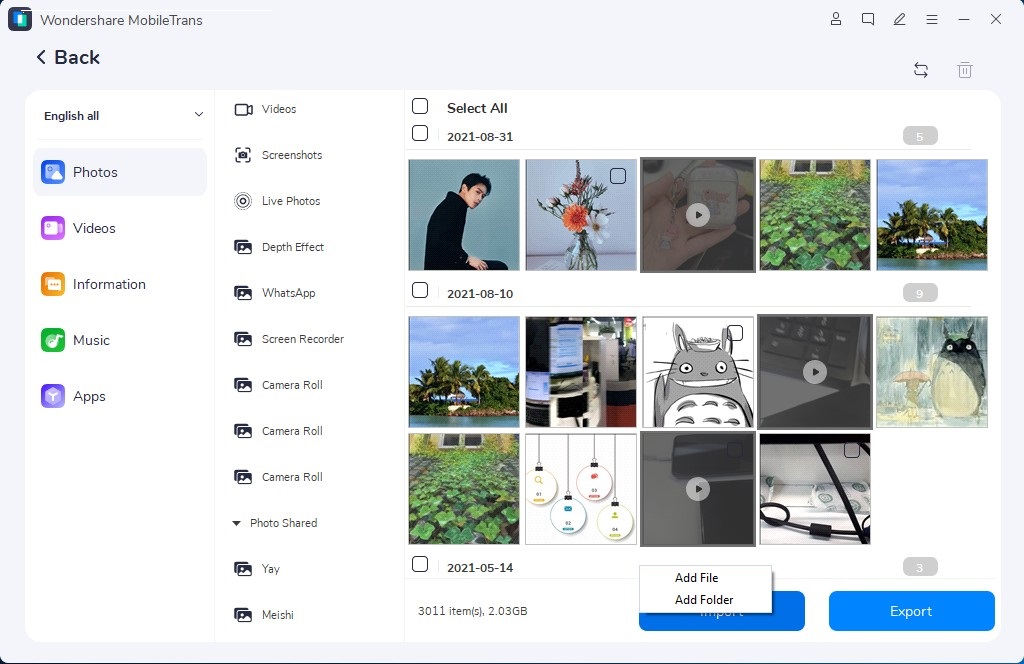
Step 3: Select files on your computer
Go to FileTransfer > Import to phone. You can hit the Import tab to add a file to your phone. There are five different data types supported.
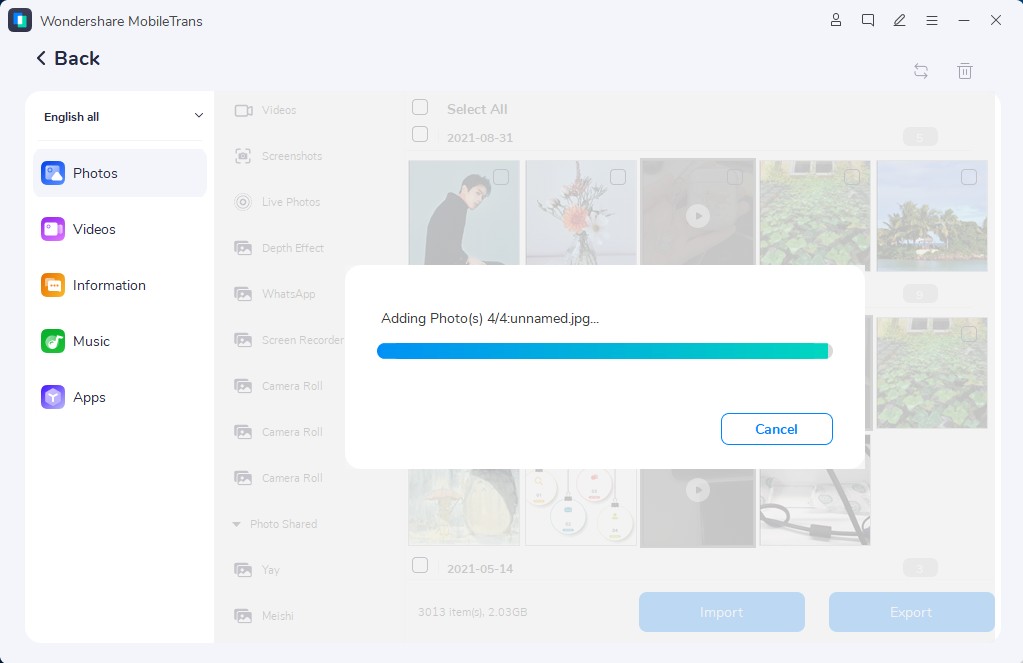
Step 4: Import data to your phone
When the import is over, you can view this data on your phone.
Part 2: How to Wirelessly Transfer Files from Windows to iPhone (Phone Link)
Transferring files between a Windows PC and an iPhone has historically been a challenge due to differing operating systems. However, with Microsoft's Phone Link app, this process has become more straightforward, allowing users to share files seamlessly between their devices.
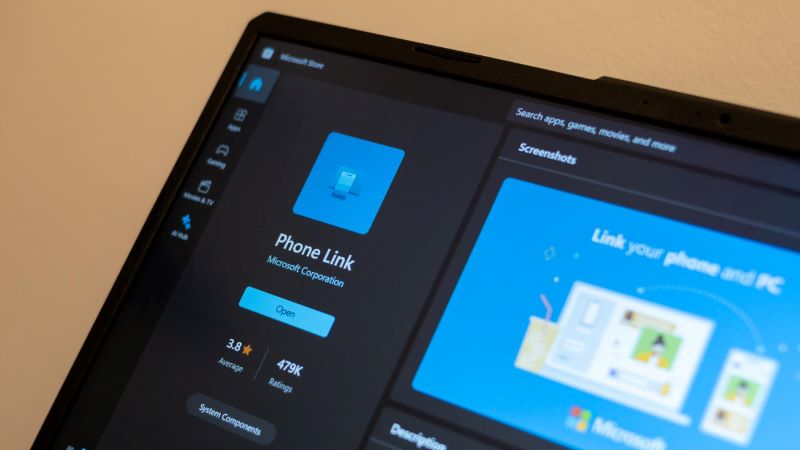
Setting Up Microsoft Phone Link
To begin transferring files, ensure that both your Windows PC and iPhone are set up correctly:
Step 1: Install Phone Link on Windows PC: The Phone Link app is typically pre-installed on Windows 10 and Windows 11. If it's not available, download it from the Microsoft Store.
Step 2: Install Link to Windows on iPhone: Download and install the 'Link to Windows'app from the Apple App Store on your iPhone.
Step 3: Sign In with Microsoft Account: Ensure you're signed in with the same Microsoft account on both devices.
Step 4: Pair Devices: Open the Phone Link app on your PC and follow the on-screen instructions to pair your iPhone. This may involve scanning a QR code or entering a code manually.
Transferring Files from PC to iPhone: Once the devices are paired, follow these steps to transfer files:
Step 1: Select Files on PC: Navigate to the files you wish to transfer.
Step 2: Share via Phone Link: Right-click the selected file(s) and choose 'Share'.
In the share window, select 'Phone Link' or 'My Phone'.
Step 3: Receive Files on iPhone: A notification will appear on your iPhone from the 'Link to Windows' app.
Tap the notification to view or save the received files.
Part 3: How to Transfer Files to iPhone Using iTunes (The Classic Way)
iTunes is the simplest way to enjoy everything you need for entertainment - movies, music, and TV shows - and it is all organized well. Despite these features, iTunes offers us file transferring options to transfer files from PC to iPhone.
Method 1: Transfer data from PC to iPhone via iTunes file sharing.
It is compatible with files created by apps that work with File Sharing.
It contains a "File Sharing" option in iTunes. This feature will assist you in sharing files between your PC system and a supported app on your iPad/iPhone.
Thus, if you are required to transfer files between iPhone and PC by apps such as Pages, Keynote, and Numbers between your computer and your iOS device, it is advisable to use File Sharing.

To copy files between your iOS apps and PC:
Step 1: Firstly, install the latest version of iTunes on your PC.
Step 2: Now, connect or sync your iPhone to the PC system and launch iTunes.
Step 3: Tap the device icon and select "File Sharing."
Step 4: Choose the app that works with File Sharing and hit the "Add" in iTunes.
Step 5: Choose the files you want to transfer to your PC and then hit the "Add" tab.
Step 6: Open the app you choose on your iPhone to check the transferred files.
Method 2: Transfer data from PC to iPhone via iTunes Sync.
If you have iOS 5 (or later) installed on your iPhone and are on a Wi-Fi network, you can easily sync your device without connecting it to your PC.
When you sync automatically over Wi-Fi, your device uses the same sync settings you chose for syncing using a cable.
To add items on your PC to your iPhone, you can use iTunes to sync them. You can have iTunes automatically sync items (which is the fastest option) or manually drag items to your device (which gives access to more control) — or you can do both. These items can also be removed from your device automatically or manually.
Step 1: Connect your iPhone to the PC.
Step 2: Select your device in the iTunes app.
Step 3: Choose the content type you want to sync.
Step 4: Check the "Sync" box and select your items.
Step 5: Repeat for all other content types.
Step 6: Adjust auto-sync settings in "Summary" or "Preferences".
- Require a prompt before syncing this device: Click Summary, then deselect “Automatically sync when this [device] is connected.”
- Require a prompt before syncing all devices: Choose Edit > Preferences, click Devices, then select “Prevent iPods, iPhones and iPads from syncing automatically.”
Step 7: Click "Apply" to start syncing your files.
Part 4: How to Transfer Files Wirelessly Using Cloud Services (iCloud/Dropbox)
This section will define two ways to transfer files from a Windows PC to an iPhone or laptop via Cloud services. Even though the Cloud has some storage limitations, it still offers one of the convenient options worth considering.
Method 1: Transfer Files from PC to iPhone for Free Using iCloud Drive
It is compatible with all kinds of content.
The iCloud Drive is almost Apple's version of Dropbox. It's pretty different from iCloud Backup since it's a document-oriented file-sharing service. You can easily store your files in iCloud and access these items on iCloud.com after enabling iCloud Drive on your computers, iOS devices, and iPadOS devices. Thus, by activating iCloud Drive, you can transfer files from a Windows PC to iPhoneor iPad without iTunes. If you want to share the files like documents, using iCloud Drive is pretty perfect for you.
Whether you have launched iCloud for Windows or not, the steps to transfer files to your iPhone or iPad are pretty different.

Step 1: Open the iCloud control panel on your PC and log in with the Apple ID on your iPhone.
Step 2: Hit the checkbox next to "iCloud Drive" to activate the option.
Step 3: Visit the "This PC" option, and you can check a folder called "iCloud Drive." You can expand "Quick Access" if you don't see it in Windows.
Step 4: Copy and paste the data or files you wish to transfer files between iPhone and your Windows PC within the iCloud Drive folder.
Step 5: Click the "Settings" tab on your iDevice and hit the [your name] > "iCloud" > "iCloud Drive" option.
Step 6: Visit the "Files" app and select the "Browse" > "iCloud Drive" option. Now you can preview the items from your PC existing on your iPad or iPhone.
Method 2: Transfer Files from Computer to iPhone with Dropbox
It supports images, PowerPoint, Word Excel, PDFs, HTML, Text, etc.
In addition to iCloud aforementioned, various types of cloud services can be helpful, such as Google Drive and Dropbox. Most of these cloud drives offer free space or free trials, and the limitations for the free versions are generally acceptable. So, this could be another good selection for Windows 10 to iPhone file transfer.

To transfer files from PC to iPad/iPhone with Dropbox:
Step 1: Install Dropbox on both your iPhone and computer. Then log in with the same account.
Step 2: Open Dropbox on your PC and upload the files you wish to copy to your iDevice.
Step 3: Open Dropbox to check and download the items to your mobile device on your iPhone.
Part 5: How to Transfer Files from PC to iPhone Using a USB Cable (Photos & Videos)
While Windows doesn't allow direct drag-and-drop *to* your iPhone via USB (like Android), you can use the USB cable with iTunes or MobileTrans for the fastest, most reliable transfer, especially for large videos.
Note: This method does not work for other file types like documents or music. For those, you must use one of the other methods like MobileTrans or iTunes.
To transfer photos and videos from your PC to your iPhone using a USB cable, you'll need to use iTunes. This method syncs a specific folder from your computer to your iPhone's Photos app.
Step 1: Connect your iPhone to your PC with a USB cable and open iTunes.
Step 2: Click the device icon in the upper-left corner of the iTunes window.
Step 3: In the left sidebar, click on "Photos".
Step 4: Check the box next to "Sync Photos".
Step 5: From the "Copy photos from" dropdown menu, select "Choose folder..." and navigate to the folder on your PC containing the photos and videos you want to transfer.
Step 6: You can choose to sync all folders or only selected ones. Ensure "Include videos" is checked if you want to transfer videos as well.
Step 7: Click "Apply" or "Sync" in the bottom-right corner to begin transferring the files to your iPhone.
FAQs About Transferring Files from PC to iPhone
1. What is the fastest way to transfer files from PC to iPhone?
According to our comparison, MobileTrans is the fastest method, especially for transferring large files or multiple file types at once. Using a USB cable with iTunes Sync is also a very fast and reliable option.
2. Can I transfer files from PC to iPhone without iTunes?
Yes, you can. The article details several methods that don't require iTunes, such as using MobileTrans, Microsoft Phone Link, or cloud services like iCloud Drive and Dropbox. These alternatives offer more flexibility and can be easier to use.
3. How can I transfer files wirelessly from my PC to my iPhone?
For wireless transfers, you can use Microsoft Phone Link, which integrates your iPhone with your Windows PC. Cloud services like iCloud Drive and Dropbox are also excellent wireless options. Additionally, iTunes has a Wi-Fi sync feature that allows you to sync your devices without a cable.
4. Is it possible to transfer only photos and videos with a USB cable?
When you connect your iPhone to a Windows PC via USB, it appears in File Explorer like a digital camera. This allows you to directly copy photos and videos from the iPhone's DCIM folder to your PC. To transfer other file types or to move files *to* the iPhone, you need to use software like iTunes or MobileTrans.
Conclusion
So, we’ve almost tested four different ways to find the fastest way to transfer files from Windows to iPhone. Whether you're using a desktop PC or a Windows laptop, these methods will help you transfer data to your iPhone.
In conclusion, we'd like to mention that you must not ignore the specialties of software. If a program or software explicitly focuses on particular requirements for moving data, it undoubtedly presents more merits than other standard processes. Thus, we've chosen Wondershare MobileTrans as one of the quickest, reliable, and dedicated ways to quickly transfer files between iPhone and PC.
That said, we hope that this tutorial guide was valuable. Feel free to chip in your suggestions or ask any queries.
New Trendings

Top Stories
All Categories


Navkiran Dhaliwal
staff Editor