iPhone to PC Transfer
- Transfer photos from iPhone to PC seamlessly and efficiently.
- Transfer multiple photos at once, saving you time and effort.
- Ensure that the quality of your images remains intact.
How to Transfer Photos from iPhone to PC Wirelessly [2026 Guide]

Written By Navkiran Dhaliwal |


 TL;DR:
You can wirelessly transfer photos from an iPhone, including the iPhone 17 running iOS 26, to a computer using native tools like iCloud and AirDrop for Macs, or cross-platform solutions like Google Photos, email, and Bluetooth for Windows PCs.
● Cloud syncing requires a stable internet connection, with Google Photos offering 15 GB of free storage but compressing high-quality uploads, while iCloud provides only 5 GB of free space and requires a dedicated app download on Windows.
● AirDrop provides fast, offline wireless transfers exclusively for Apple devices and is strictly incompatible with Windows PCs, making Bluetooth or email the default app-less choices for Windows despite their slow transfer speeds and attachment size limitations.
● For users moving thousands of images or lacking reliable internet, the MobileTrans software offers a faster, offline alternative to wireless methods, though it requires a physical USB cable connection and local installation on the computer.
Ask AI for a summary
 ChatGPT
 Perplexity
 Gemini
 Claude
 Grok
Grok
Looking for a way to transfer photos from your iPhone to a PC without a cable? Whether you want to free up phone storage, back up precious memories, or edit photos on a bigger screen, moving pictures wirelessly is the most convenient option. This guide will walk you through 6 simple and effective methods to get the job done. We'll cover everything from Apple's native solutions to popular cloud services, helping you choose the best way to transfer photos from your iPhone to your Windows or Mac computer.
And if you're using the latest iPhone 17 with iOS 26, you'll also discover updated wireless transfer options that make sharing photos across devices faster and more secure than ever.

Method 1: Use iCloud Photos to Sync iPhone Photos to PC
One of the well-known methods to transfer photos from iPhone to PC wireless format is through the iCloud drive.
Apple offers a cloud drive to all its users. You can save up to 5 GB of data on this drive without paying for the storage. If you need more storage, you can pay for iCloud and save data on the drive.

How to transfer photos from iPhone to computer without cable?
For iPhone and Mac
If you have a Mac, then using iCloud is a simple option.
- In your phone, go to iCloud under Settings.
- Enable iCloud.
- Under it, you will find many options, you need to enable Images.
This will sync your images with all your Apple devices, including Mac and iPhone. Now, you can simply visit your Mac and download all the images in the computer’s storage.
For iPhone and Windows
If you have Windows, then you may need to follow a series of extra steps.
- In your phone, go to iCloud under Settings.
- Enable iCloud.
- Now, similar to above, enable Images under iCloud.
- On your computer, download iCloud.
- Sign in to your Apple ID.
- Go to Gallery and download images to your computer.
The cloud services are convinient. If you open the sync button, it could automatically sync your photos to your cloud drive. But it costs Cellular data if you have no Wi-Fi or other internet connection. And it cloud be slow depending on the file size and net speed. Read more and learn other methods to transfer pictures from iPhone to computer wirelessly!
- Pros:
- Automatic Sync: Photos and videos automatically sync across all your Apple devices.
- Easy to Use: Simple to set up and use, especially if you are already in the Apple ecosystem.
- Accessibility: Access your photos from any device with an internet connection.
- Cons:
- Limited Free Storage: Only 5GB of free storage, which may not be enough for many users.
- Cost for Additional Storage: Requires a paid subscription for more storage.
- Privacy Concerns: Some users may have concerns about storing their photos in the cloud due to privacy issues.
- Internet Dependency: Requires a stable internet connection for syncing and accessing photos.
Method 2: Send Photos from iPhone to PC Wirelessly via Bluetooth
The second method to transfer pictures from iPhone to PC without cable is Bluetooth. This method is ideal if you need to quickly share a few photos from your iPhone to your laptop wirelessly without installing any apps. Enable Bluetooth on both devices and keep your iPhone and PC nearby for better connectivity.

- In your phone, go to Settings and enable Bluetooth.
- Now, achieve the same on your PC. Make both devices discoverable.
- On your phone, go to the Bluetooth menu and search for nearby devices.
- Click on the name of your Windows PC.
- This will connect your PC to your iPhone via Bluetooth.
- Go to your Gallery, select pictures to transfer.
- Share these pictures over Bluetooth.
On your PC, you need to approve this transfer.
This method would be extremely uncomfortable when you need to send hundreds of pictures to your PC. It will take too much time and you need to select all the pictures manually.
- Pros:
- No internet required: Transfer photos without needing an internet connection.
- Simple for small transfers: Quick and easy for sending a few photos.
- No extra software: Doesn't require installing additional apps.
- Cons:
- Slow transfer speed: Significantly slower than other methods, especially for large files.
- Limited range: Devices need to be close to each other.
- Pairing required: Needs pairing of devices which can sometimes be problematic.
- Not suitable for large transfers: Impractical for transferring many photos due to the slow speed and manual selection.
Method 3: Sync Photos from iPhone to Computer Using E-mail
How to transfer photos from iPhone to PC without cable?
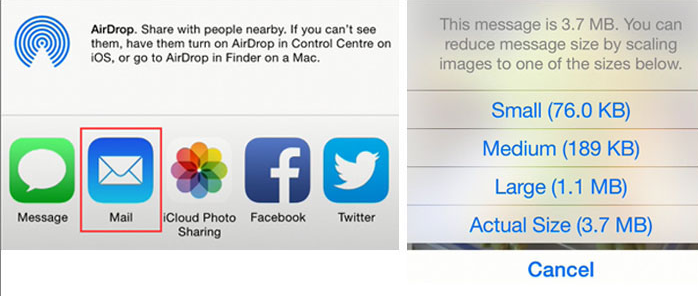
Another method to transfer photos from iPhone to PC wirelessly is through email. You have to use the same email ID on both your PC and iPhone to transfer images seamlessly.
- In your Gallery, select the images that you need to send to PC.
- After this, click on Share.
- Select Email or Mail.
- Add your own email ID and wait for images to attach.
- Now, send the email.
- On your computer, open the browser and this same email ID.
- Open the mail, and Download All the images.
The reason why this method may be hectic is that it may take a lot of time to attach images and download them again on the PC.
- Pros:
- Simple and Accessible: Easy to use and accessible on any device with email access.
- No Additional Software: Doesn't require any additional software or apps.
- Cons:
- Low image quality: Email services often compress images, which reduces their quality.
- Attachment Size Limits: Most email providers have attachment size limits, making it unsuitable for large files or numerous photos.
- Time-Consuming: Can be time-consuming to attach and download multiple photos.
Method 4: Share Photos from iPhone to PC Wirelessly Using Google Photos
Transferring photos from iPhone to PC wirelessly is a simple and efficient process, especially when using Google Photos. This cloud-based photo backup service allows you to move your photos without cables, making it a convenient option for backing up memories or organizing your gallery. Here’s how to do it:
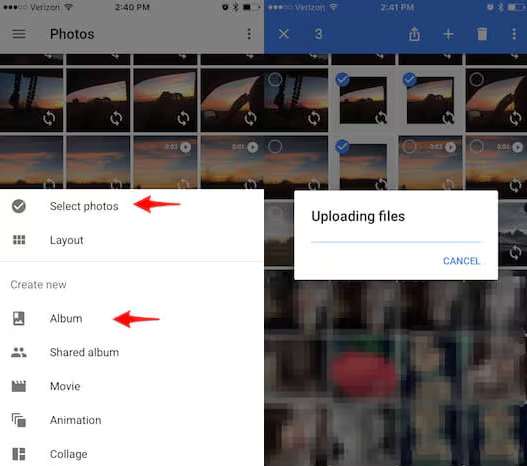
Steps to Transfer Photos Wirelessly
Step 1: Backup Photos on iPhone
- Open the Google Photos app on your iPhone..
- Tap your profile picture and select “Turn on backup.”
- Ensure you're connected to Wi-Fi, and wait for the backup to complete.
Step 2: Download Photos on PC
- On your PC, visit the Google Photos website and log in with the same Google account.
- Select the photos you want to download and click the download button.
- Your photos will be saved to your PC in a compressed folder.
- Pros:
- Free Storage: Google Photos offers 15 GB of free storage shared across your Google account, which is ample for many users.
- Automatic Backup: Automatically backs up photos and videos, ensuring they are safe even if your device is lost or damaged.
- Cross-Platform Compatibility: Works seamlessly on iOS, Android, and web browsers.
- Easy Sharing: Simplifies sharing photos and albums with others.
- Cons:
- Storage Limits: Free storage is capped at 15 GB, and you may need to pay for additional storage.
- Privacy Concerns: Some users may have concerns about storing personal photos on Google's servers.
- Image Compression: High-quality uploads are compressed, which may reduce image quality.
- Internet Dependency: Requires a stable internet connection for backing up and accessing photos.
Method 5: Use AirDrop to Transfer Photos from iPhone to PC
How to AirDrop photos from iPhone to PC?
Actually, AirDrop is an exclusive feature for Apple devices, designed to share files seamlessly between iPhones, iPads, and Macs. Unfortunately, AirDrop is not compatible with Windows PCs, so you can’t directly AirDrop photos from your iPhone to your PC.
But don't worry! There are still alternative methods available to transfer your photos wirelessly from your iPhone to your PC. You can use iCloud, Google Photos, Email or Bluetooth to transfer your photos from iPhone to PC wirelessly.
- Pros:
- Fast Transfer Speed: Quick and efficient for sending photos between Apple devices.
- No Internet Required: Transfers photos without needing an internet connection.
- Easy to Use: Simple and intuitive interface for quick sharing.
- Cons:
- Apple Ecosystem Only: Only works between Apple devices, not compatible with Windows PCs.
- Limited Range: Devices need to be close to each other.
- Pairing required: Needs pairing of devices which can sometimes be problematic.
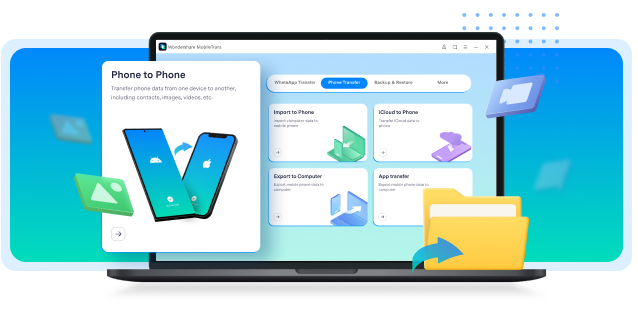
Alternative: The Fastest & Most Reliable Wired Method (MobileTrans)
The last method on our list is to transfer photos from iPhone to PC using MobileTrans. Although this method is not wireless to move data, it still works like a charm. You don’t need to go through hassle like other wired methods. While wireless methods offer convenience, they can be slow for large libraries or dependent on a strong internet connection. If you need to transfer thousands of photos quickly and reliably, a wired solution like MobileTrans is the superior choice. Here's how it works:
MobileTrans - Transfer between Phone & Computer
Transfer Photos from iPhone to PC with a Click!
- • Transfer photos, music, videos, and more between mobile devices and PC.
- • Backup 18+ types of data from Android and iPhone to the computer.
- • Supports transfer of 18+ types of data between 6000+ mobile devices.
- • Support transfer of WhatsApp data between Android and iOS devices.
- • Support the latest iPhone OS and Android OS.
 4.5/5 Excellent


Here are the exact steps to follow to transfer photos from iPhone to PC:
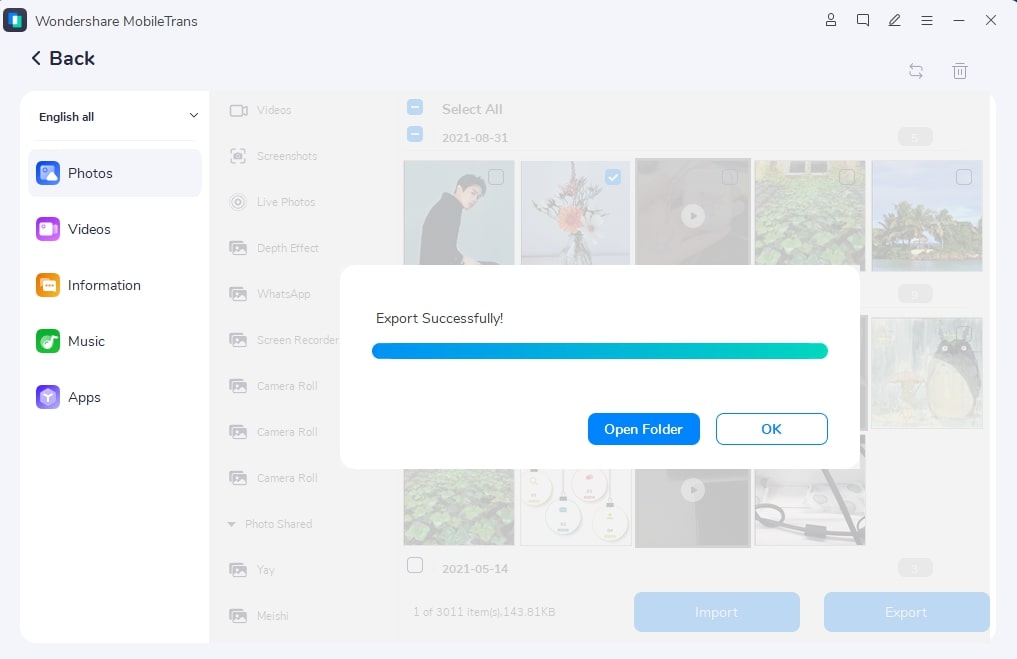
Step 1: Connect iPhone to PC
Take the USB cable from which you charge your iPhone and use it to connect your PC and phone. You may need to Trust the device on your phone for this.
Here, go to Phone Transfer and select Export to Computer.

Step 2: Select Files To Transfer
You will now get options to transfer photos from iPhone to PC. Select pictures and Start the transfer process.

Step 3: Transfer Data
Finally, you need to wait till the pictures move from your iPhone to your PC. During this time period, you need to keep your connection stable. Don’t move your USB cable or break the connection, as that may only transfer half the images and you may need to start the process all over again.
- Pros:
- Fast Transfer Speed: Transfers photos and other data much faster than wireless methods.
- Reliable Connection: A Stable connection ensures all photos are transferred without interruption.
- Large File Support: Handles large photo libraries and high-resolution images without issue.
- No Internet Required: Works offline, so you don't need an internet connection.
- Selective Transfer: Allows you to choose specific photos or albums to transfer.
- Cons:
- Wired Connection: Requires a USB cable and a physical connection between devices.
- Requires Software Installation: You need to download and install the MobileTrans software on your computer.
FAQs
1. Is there a way to transfer photos selectively?
Most cloud services, like Google Photos and iCloud, back up your entire gallery. However, you can manually select and download specific photos from the cloud on your PC. And you can use MobileTrans to transfer photos selectively.
2. Are there any free options for wireless photo transfer?
Yes, Google Photos offers 5GB of free storage, and iCloud provides 5GB for free. Both allow you to transfer photos wirelessly without additional costs.
3. Can I transfer Live Photos wirelessly?
Yes, services like iCloud and Google Photos support Live Photos. Ensure the backup settings are configured to include Live Photos.
4. What should I do if the wireless transfer fails?
Check your internet connection, ensure you have enough cloud storage, and restart the process. If issues persist, consider using a cable or local Wi-Fi transfer method.
Wrap up!
So, these were all the methods to transfer photos from iPhone to PC wirelessly.
You can use the first three methods for anybody who needs to transfer just one or two pictures. However, when you need to transfer the entire gallery to your computer, MobileTrans is the best tool. This is because MobileTrans has so many other features, and it takes only 10 minutes to set up. Download the solution on your computer, connect your phone, and you are done. You can even transfer data from your PC to another phone without issues.
Explore more about the MobileTrans tool on our website and understand its features.
New Trendings

Top Stories
All Categories


Navkiran Dhaliwal
staff Editor