


 TL;DR:
You can transfer videos from an iPhone to a Windows PC or Mac using native USB applications like File Explorer, wireless syncing via iCloud and AirDrop, or third-party software like MobileTrans for uncompressed, large batch transfers.
● Windows users can manually extract videos directly from the connected iPhone's DCIM folder using File Explorer without installing extra software, or use the Windows Photos app for automated imports that retain original quality.
● Mac users, including those utilizing updated wireless options on the latest iPhone 17 with iOS 26, can share files instantly via AirDrop or use built-in USB tools like Image Capture and the Mac Photos app for organized extraction.
● Wireless cloud transfers require both devices to share the exact same Apple ID with the "Sync This iPhone" setting enabled in iCloud, while exporting exceptionally large HD videos without splitting is best managed through the MobileTrans application.
Ask AI for a summary
 ChatGPT
 Perplexity
 Gemini
 Claude
 Grok
Grok
A lot of people usually struggle to move their important video files from their phones to a computer, especially when storage runs low. They basically want this to free up storage and make it easier to manage, edit, and back them up safely.
Fortunately, various solutions are available that can help you move videos from your iPhone to both Windows PC and Mac. Thus, this article explores multiple ways to learn how to transfer videos from an iPhone to a computer effortlessly. And if you’re using the latest iPhone 17 with iOS 26, you’ll also discover updated wireless transfer options that make sharing videos across devices faster and more secure than ever.
In this article
Part 1. Send Large Videos from iPhone to Any Device/PC/Mac
For an effortless large iPhone video transfer, we highly recommend using MobileTrans. This platform offers a dedicated Export to PC feature that supports sending 6 data types, including photos, videos, and documents. Users can even move HD videos and large media files without compression or splitting, which preserves original quality completely. When sending large videos from an iPhone, MobileTrans stands out as the best choice.
Key Features:
- Fastest Tool for Transferring Large Files: Industry-leading data transfer speed and even faster when transferring larger files. Perfect for large video transfers or batch transfers.
- Preview Media and Selective Transfer: Lets you view and organize files on your device in clear categories before choosing what to transfer or export.
- Enhanced Compatibility: Supports cross-platform transfer and is compatible with 6000+ devices, and even the latest models.
- Keep Video Resolution: Ensure transferring videos with their full resolution, keeping videos nice and clear.
- Flexible Transfer Directions: Available on both computers and phones, supports transferring videos from phone to phone or between phone and PCs.
Take guidance from the given steps to find out how to transfer video from iPhone to desktop without hassle:
Step 1. Run MobileTrans, head to the Phone to PC section to connect your iPhone to PC/Mac via USB cable.

Step 2. Choose the required videos and press the Export button. After a while, you will see a confirmation screen.

Part 2. Transfer Videos to a PC: 3 Ways
Apart from the above effortless solution, multiple simple ways exist that can cater to this need without downloading anything. Hence, this section gives you 3 solutions to transfer videos from iPhone to PC when you are a Windows user:
Way 1. USB Transfer via Windows Photos App
The Windows Photos app helps you import videos easily while keeping the original quality fully intact. It automatically detects your connected smartphone, so you can pick exactly what to transfer. Plus, you can move selected videos or import them all at once without any data loss or file compression. Anyhow, follow the steps to understand how to transfer videos from an iPhone to a laptop without much hassle:
Step 1. Connect your iPhone to the PC through a USB cable and press the Trust button.

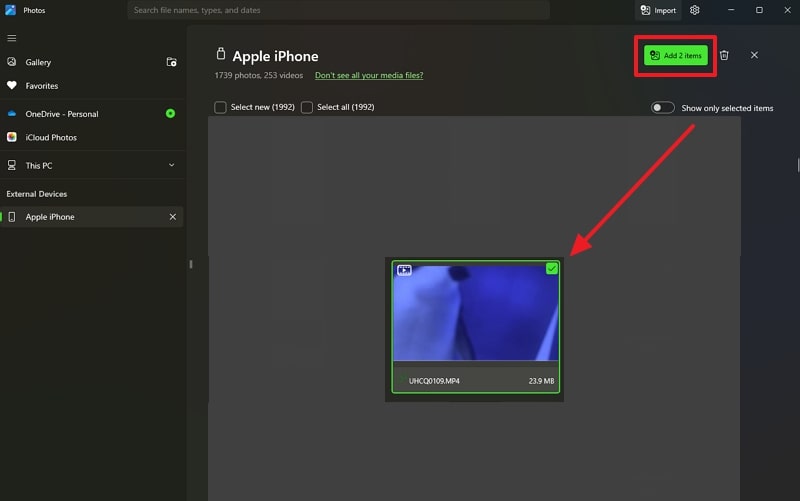
Step 2. Launch the Photos app and choose the Import > Apple iPhone option.

Step 3. Select the videos and hit the Add Items button to import them.
Way 2. Manual Copy Using File Explorer
File Explorer lets you copy videos from your phone without needing any extra tools or apps installed. Besides, it allows you to open the DCIM folder and manually pick specific videos you want to copy to your laptop. As it's a manual copy method, there's little risk of deleting or losing files during transfer. Yet, go through the guide and learn how to download video from an iPhone to a computer:
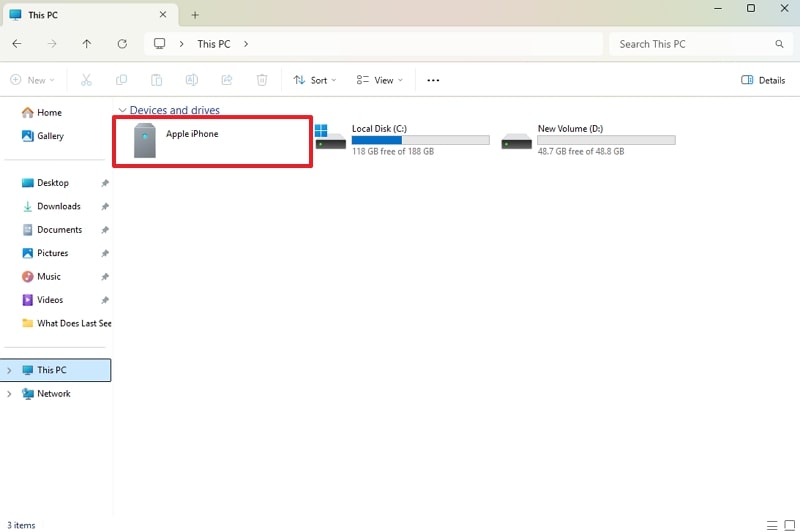
Step 1. Link your iPhone to the computer and head to This PC > Apple iPhone.
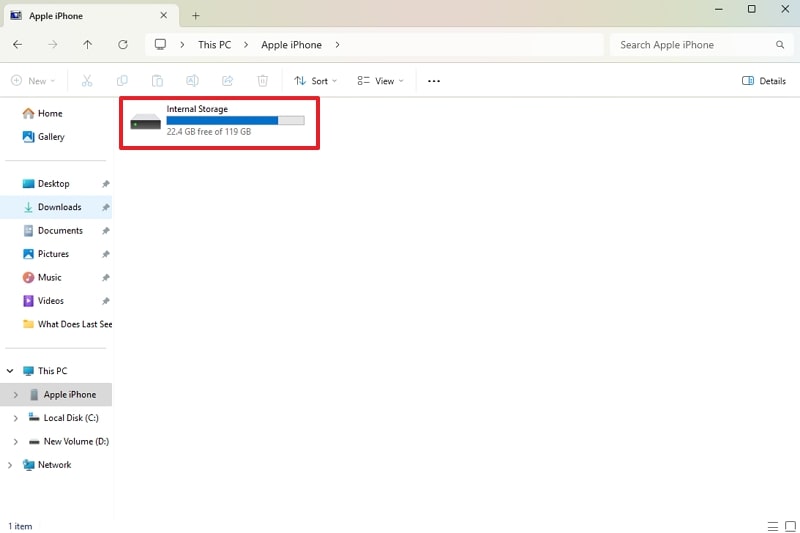
Step 2. Afterward, click the Internal Storage folder.
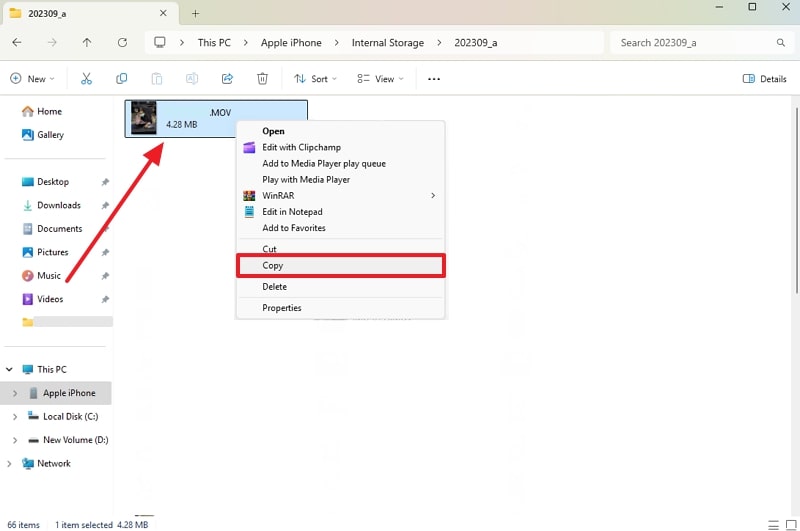
Step 3. After accessing the video file, right-click on it to choose the Copy option.
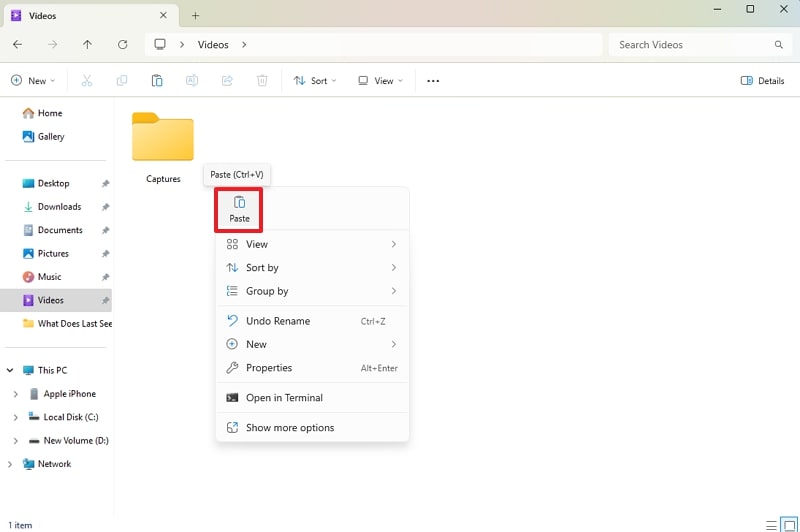
Step 4. Later, go to your computer's storage folder, right-click on an empty area, and select the Paste option.
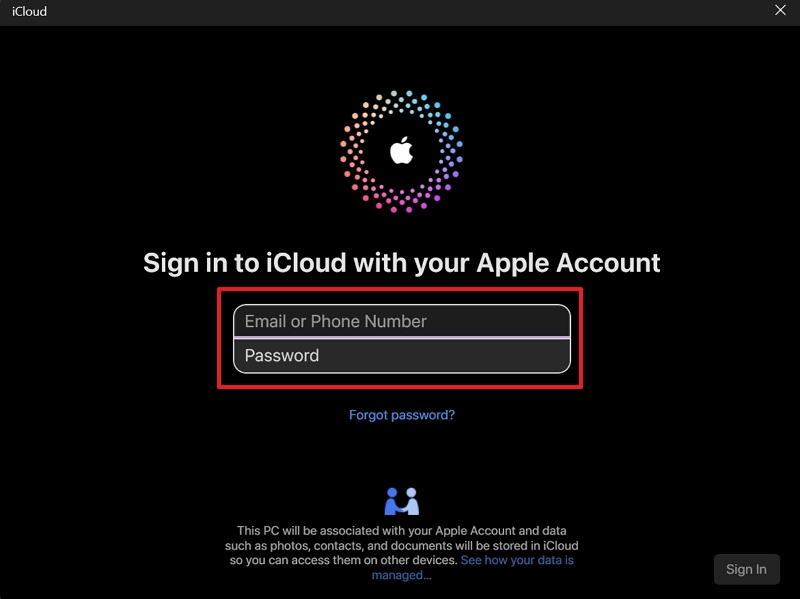
Way 3. iCloud App for Windows
The iCloud app for Windows offers an effortless way to access your iPhone videos directly from your computer. It automatically syncs your videos across devices by saving users' effort for learning how to transfer videos from an iPhone. Besides, you can choose specific folders, organize files neatly, and download them anytime without needing a cable. Thus, let's explore how you can perform this task to overcome this need:
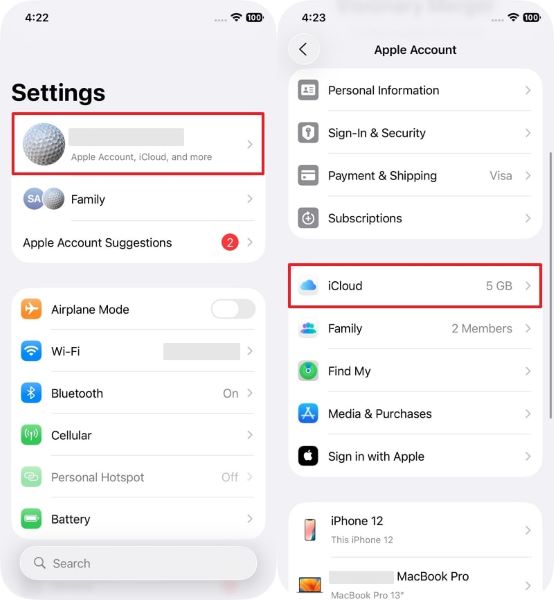
Step 1. Open iPhone settings, tap the Apple Account > iCloud option.
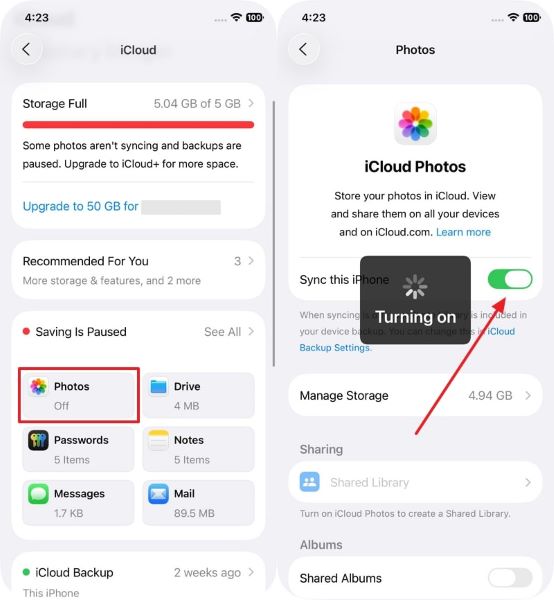
Step 2. Later, head to Photos and enable the Sync This iPhone toggle.
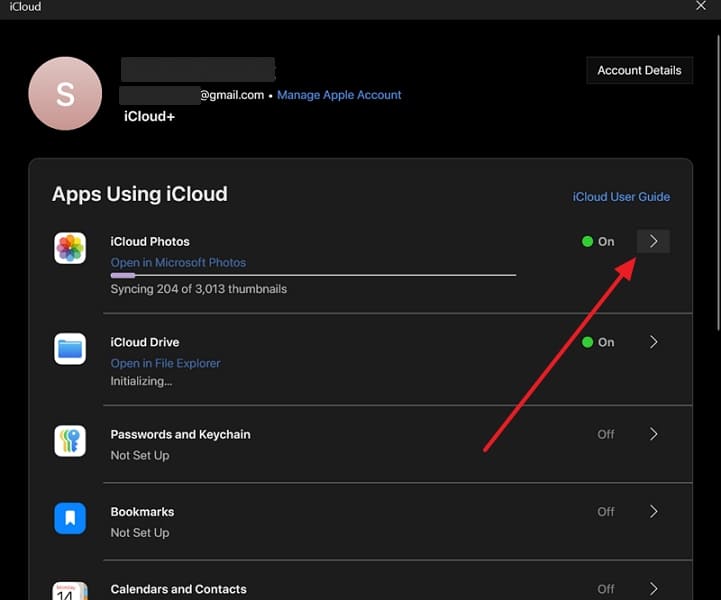
Step 3. Access the iCloud app on your Windows PC and sign in with the same Apple ID.
Step 4. Click the Forward icon beside iCloud Photos.
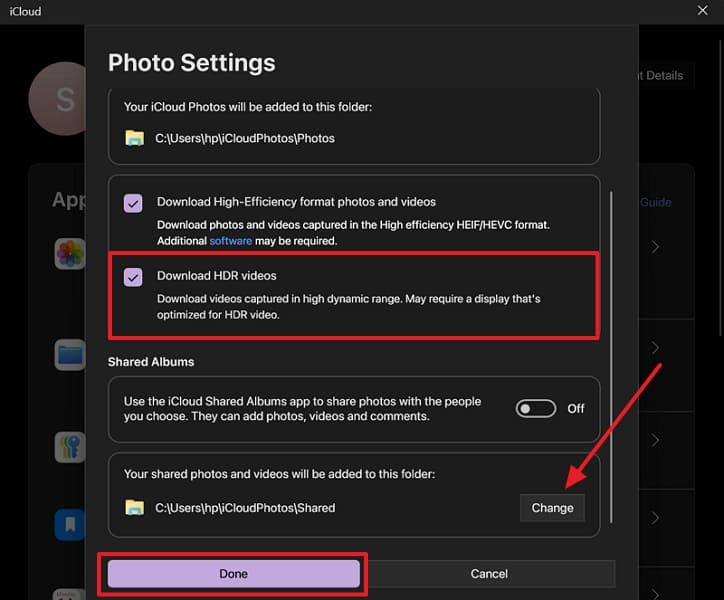
Step 5. Enable Download HDR Video option > Press Change location > Click the Done button. Locate synced videos in your assigned location.
Part 3. Transfer Videos to Mac: 4 Methods
For Mac users, various native methods exist to migrate video files without requiring external tools. Thus, this section provides 4 ways to understand how to transfer videos from iPhone to Mac without much hassle:
Method 1. Use AirDrop
Airdrop is an Apple native feature that lets you quickly transfer your data file without any cable. It works through Bluetooth and Wi-Fi by enabling you to move videos between Apple devices. Moreover, you don't need any external apps, so just keep both devices close and turn on AirDrop. Hence, follow the process below to learn how to transfer videos from an iPhone in this way:
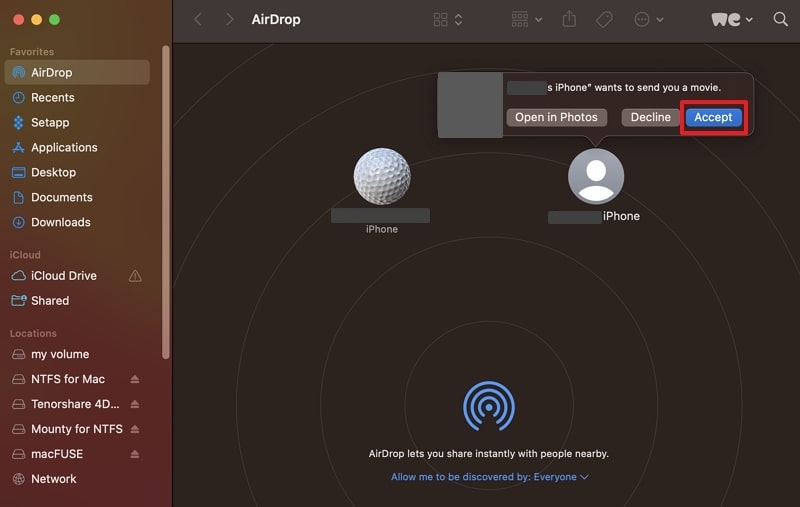
Step 1. Open the AirDrop app on your Mac and choose Everyone from the Allow Me To Be Discovered By section.
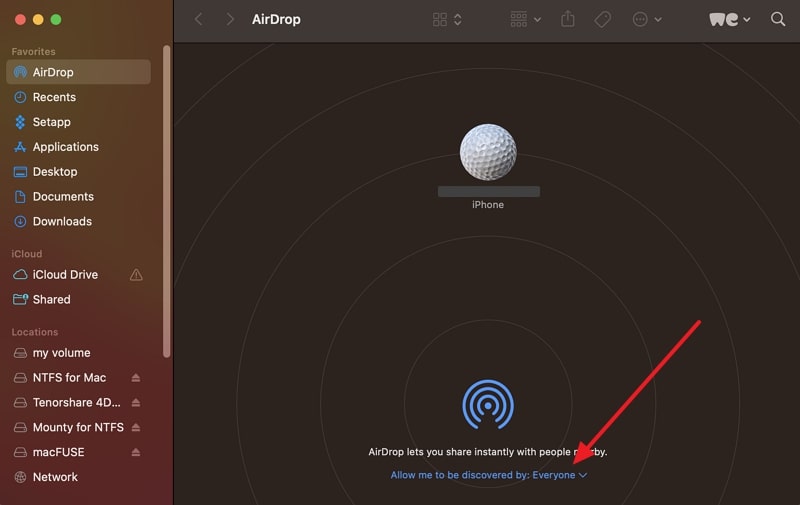
Step 2. On your iPhone, open the video and tap the Share icon > AirDrop > Mac.
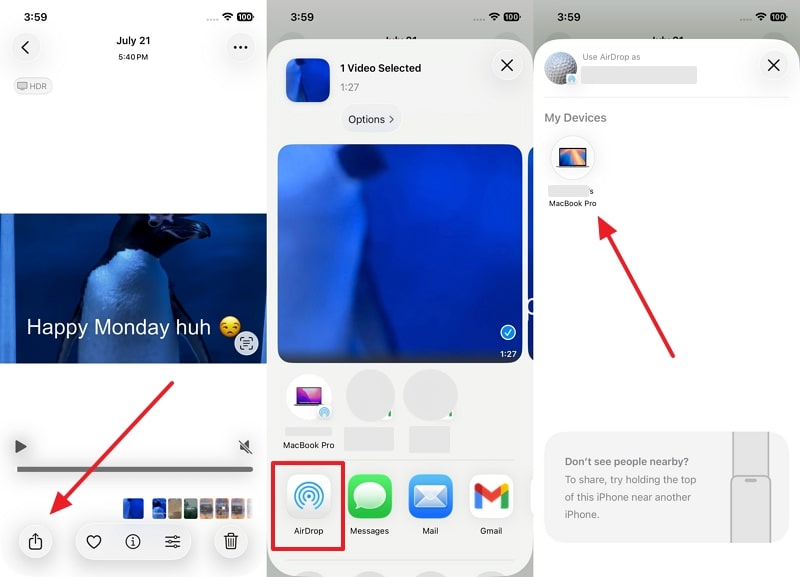
Step 3. When your Mac detects, press the Accept button to download the video.
Method 2. Use Photos App on Mac
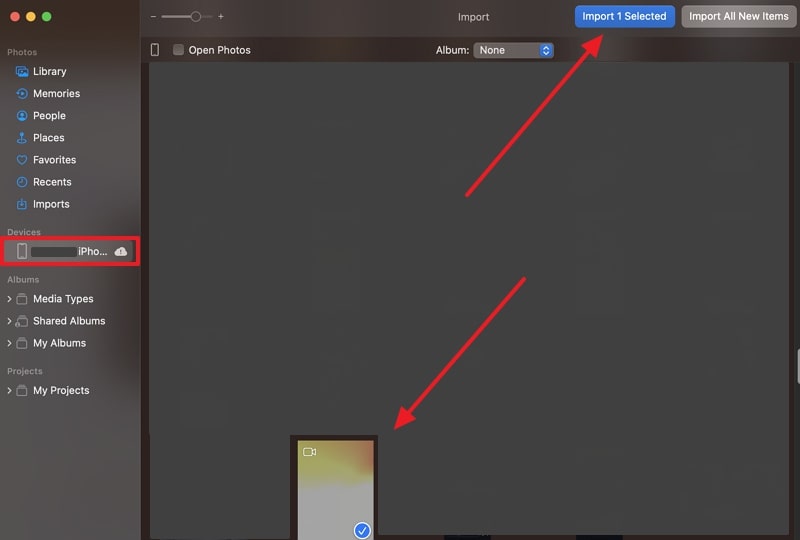
When you wonder how to transfer videos from iPhone to Mac, the Photos app provides a smooth and built-in solution. It recognizes your phone instantly by letting you preview videos and supports direct import without needing complex steps. Also, this method maintains full video quality and sorts your files automatically upon connecting. So, you can perform this task by following the process below:
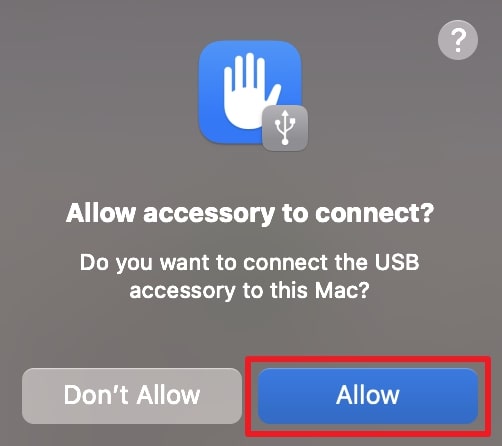
Step 1. Connect your iPhone to the Mac and press Allow on your Mac's screen.
Step 2. Launch the Photos app and go to the iPhone tab > Choose Video and press the Import Selected button.
Method 3. Utilize Image Capture
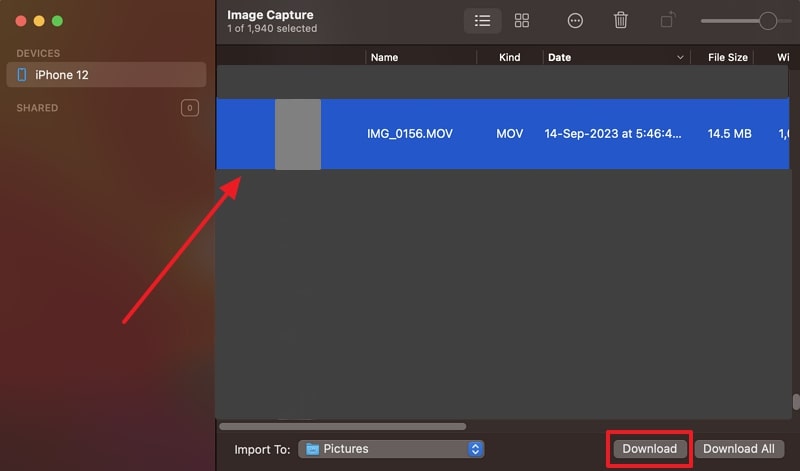
Image Capture is a native tool that allows fast media transfers from iPhone to Mac. It shows all your smartphone videos clearly after connecting and lets you pick only the ones you want to move. Notably, this method offers quick import, file preview, and easy storage selection to save the media file. So, adhere to the following steps to find out how to send videos from iPhone to Mac:
Instructions. Connect iPhone and Mac, and click the Allow button. Run the Image Capture app, choose videos, and press the Download button.
Method 4. iCloud Photos (Cloud Sync)
This method lets you sync your videos across all Apple devices automatically using your Apple ID account. Users can store their videos safely in the cloud and sync them to their Mac without using extra tools. Moreover, you can access your media anytime on any device by signing in with the same Apple ID. Anyway, let's explore how to transfer video from an iPhone to a Mac computer through syncing:
Step 1. Open settings and navigate to the Apple Account > iCloud section.

Step 2. Tap the Photos App > Sync This iPhone toggle. After this, all media files will start appearing on the Mac if it's logged in with the same Apple ID.

Conclusion
In conclusion, migrating videos from an iPhone to a computer helps save space and keep backups safe. This article has explored several quick ways to transfer videos from an iPhone to a computer. However, for users who want an effortless way to send large video files, MobileTrans is the best choice. It makes large file transfers smooth without loss, compression, or complicated steps.


