An Ultimate Guide to Perform Vivo Backup and Restore in 2 Different Ways

Written By Axel Nash |


 TL;DR:
To back up and restore a Vivo smartphone, use the native VivoCloud app for basic syncing, or use the Wondershare MobileTrans desktop software for comprehensive media and cross-device backups.
● VivoCloud provides 5 GB of free storage restricted to contacts, messages, bookmarks, blacklists, and notes, and it cannot back up photos or documents.
● Wondershare MobileTrans requires a USB connection to a computer to back up unrestricted amounts of data, including photos, videos, and music, without overwriting previous backup files.
● Data restored via VivoCloud is locked strictly to Vivo hardware, whereas MobileTrans backups can be recovered to the same device or thousands of other smartphone models without compatibility issues.
Ask AI for a summary
 ChatGPT
 Perplexity
 Gemini
 Claude
 Grok
Grok
“Can someone tell me is the Vivo backup and restore feature still available and how can I use it to maintain a backup of my photos and videos?”
As I stumbled upon this question posted on a leading online forum, I realized that so many people still don’t know about this Vivo feature. Just like all the other major smartphone manufacturers, Vivo also provides a free cloud-based service. Therefore, you can easily use the Vivo backup and restore service to keep your data safe or transfer it between different devices. In this post, I will provide a stepwise guide to use the Vivo backup and restore service with its best alternative.

Part 1: How to Do Vivo Backup and Restore with VivoCloud?
To make it easier for users to backup and restore their data, Vivo offers a dedicated cloud-based service. Ideally, if you use a Vivo phone, then you can access the VivoCloud service for free. As of now, only 5 GB of space is allocated for free on every account, but you can later buy more space if you want to.
Once you have set up VivoCloud on your phone, you can take a backup of your contacts, messages, bookmarks, blacklists, and notes. Later, you can log-in to your VivoCloud account on the same or any other Vivo device to restore your data. Here’s how you can also use the Vivo backup and restore features.
Step 1: Backup your Data on VivoCloud
To perform the Vivo backup and restore operations, you need to first launch the VivoCloud application on your device. If you have not logged in already, then just tap on the “Log in” button to do it.

In case you already have a VivoCloud account, then you can enter its credentials here. Otherwise, you can just choose to create a new account by entering your email id, setting up a password, and verifying a one-time generated code.

Once you log-in to your VivoCloud account, you can just go to the app and check the different data types it can save. Here, you can just tap on any data type (like contacts or messages) and choose to sync them with your VivoCloud account.
Step 2: Restore your VivoCloud backup
If you have lost your data or would have got a new Vivo phone, then you can simply restore the existing VivoCloud backup. For this, launch the VivoCloud app on your phone first and log-in to your account by entering your credentials.

After logging in, you can access your VivoCloud account, and check the type of data that is synced. You can now choose to sync any data type from your VivoCloud account to your device and restore it easily.

Limitations
- • Only a limited amount of storage is allocated for free on VivoCloud
- • It can only sync a few data types like your contacts and messages
- • Most of the important files like your photos or documents can’t be synced
- • The Vivo backup and restore process consumes a lot of time
- • It only supports Vivo devices (no other smartphone model is supported)
Part 2: Wondershare MobileTrans: The Best Vivo Backup and Restore Alternative
As you can see, the Vivo backup and restore service only provides limited storage and can be pretty time-consuming. Therefore, you can consider using MobileTrans, which is one of its best alternatives. Using the desktop application, you can take a dedicated backup of your device on the computer and can later restore it to the same or any other phone.
- • With just a single click, you can maintain an extensive backup of your Vivo phone’s data to your computer.
- • On the MobileTrans – Backup interface, you can select what you wish to save. It supports all the major data types such as photos, videos, messages, contacts, call logs, music, and more.
- • Instead of deleting the previous backup, MobileTrans can maintain dedicated backup files of your data (without overwriting anything).
- • Using the MobileTrans – Restore application, you can restore an existing backup file to the same or any other device (without any compatibility issue).
- • The application is extremely easy to use, supports thousands of smartphone models, and has no restrictions on the amount of data you can backup/restore.
If you want to backup and restore your phone’s data with the help of MobileTrans, then you can follow these easy steps:
Step 1: Back up your Data using MobileTrans
To begin with, just launch the MobileTrans application on your computer, and open the “Backup” module from its home.

Now, using a working USB cable, just connect your Vivo phone to your computer and let the application detect it. In no time, the snapshot of the phone would be displayed along with the list of the supported data types. You can now select what you wish to save and click on the “Backup” button.
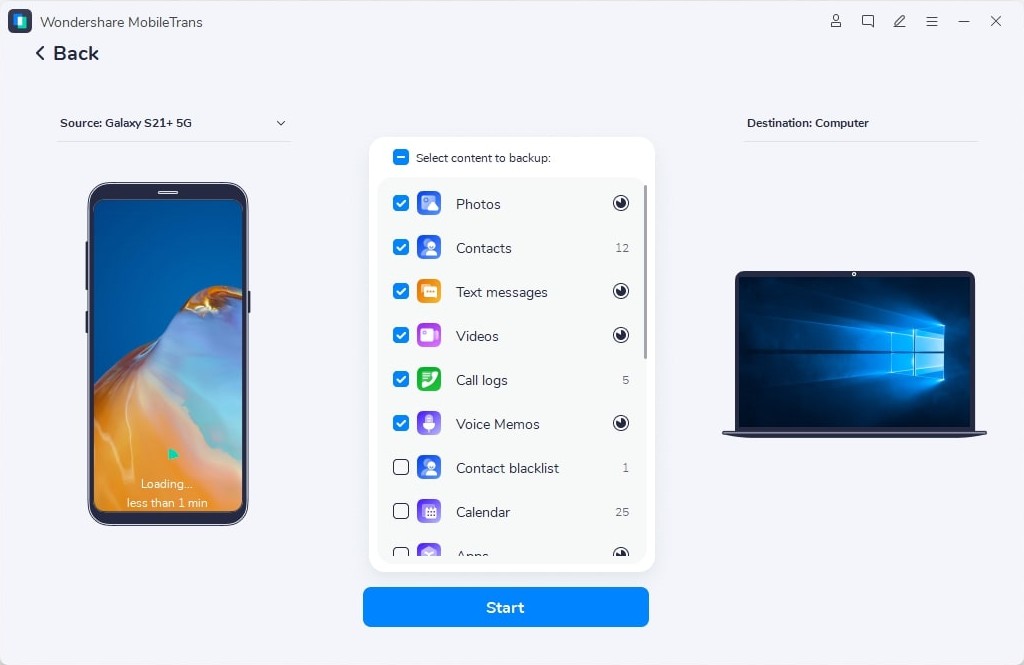
This will start the backup process and you can wait for a few minutes for the process to be completed.
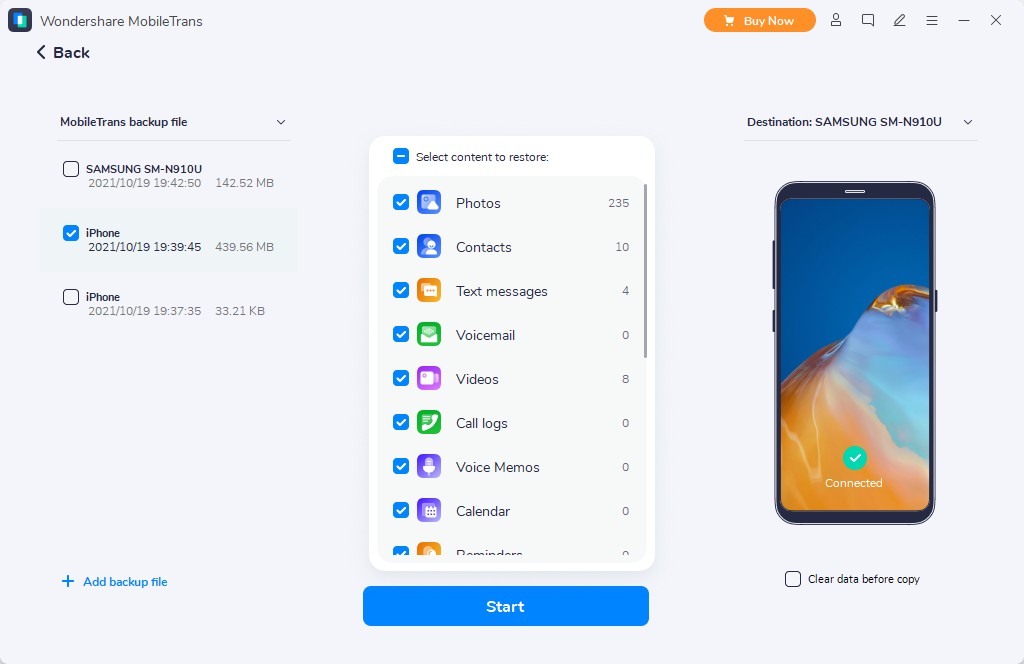
Step 2: Restore your Backup from MobileTrans
Whenever you wish to get your data back, just connect the target device, and click on the “Restore” option from MobileTrans home. From the available option, choose to restore a MobileTrans backup.

Subsequently, the application will list all the available backup files that are present. You can now select a preferred backup file and even select the type of data you wish to restore. In the end, click on the “Start” button and wait for your data to be restored to your connected device.
After reading this informative post, you would be able to use the Vivo backup and restore feature pretty easily. Since the VivoCloud can only sync a handful of data, you can consider using a better solution instead. For instance, MobileTrans has dedicated backup and restore tools that can maintain backups of your Vivo device’s data and can even restore it to the same or any other phone of your choice.
New Trendings

Top Stories
All Categories


Axel Nash
chief Editor