


 TL;DR:
You can directly transfer an eSIM to a new phone using built-in system settings when upgrading on the same carrier, but switching between an iPhone and Android, changing providers, or replacing a broken device requires a completely new eSIM or QR code.
● Direct operating system transfers like the Apple Transfer from Nearby iPhone or Android Transfer a SIM from Another Device options require both phones to have sufficient battery, a stable internet connection, and active logins for the respective Apple ID or Google account.
● If the newly moved eSIM displays a No Service network status or experiences an infinite spinning activation loop, you must delete the pending eSIM profile from your cellular settings, perform a network settings reset, and manually reinstall the line.
● Because the eSIM setup only migrates your carrier line, copying local device files or merging cross-platform WhatsApp chat history between an iOS and Android device requires a separate migration utility like the MobileTrans App.
Ask AI for a summary
 ChatGPT
 Perplexity
 Gemini
 Claude
 Grok
Grok
Moving to a new phone can feel stressful when you are unsure about how eSIM actually works. You might worry about losing your data and important messages during this change. Many beginners search for how to transfer an eSIM to a new phone and still feel unsure and nervous.
Different brands and carriers use different steps, which makes everything feel harder for regular users. This guide explains clear, safe methods that work on both iPhone and Android phones in detail. You will also learn what to prepare, how to move your eSIM, and how to resolve common issues quickly.
In this article

Part 1. Understanding eSIM Transfer: What It Means to Move Your Line
An eSIM is a digital tool built inside your phone, not a removable plastic card. It stores mobile plan details electronically and lets your carrier activate service without inserting a SIM card. Unlike a physical SIM, you cannot remove it, but you can still change plans and numbers. As it is built in, it gives more flexibility for multiple lines and easier international travel setups.
With eSIM, many modern phones support multiple lines at once, and physical SIM slots often restrict you. You can also manage eSIM settings directly in your phone, instead of handling any removable plastic card. Physical SIM cards can be lost or stolen, but eSIMs remain protected within the device.
Why Transferring eSIM is Important During Phone Upgrades?
Transferring your eSIM correctly keeps your number, data, and services working smoothly on the new device. Now, we will explain why eSIM transfer to a new phone matters during every upgrade.
- Keep Your Existing Number: Transferring your eSIM lets you keep the same phone number your contacts already recognize and trust.
- Avoid Service Gaps and Downtime: A proper transfer prevents call and data gaps when you start using your upgraded phone.
- Protect Access to Apps and Accounts: Many banking and social apps depend on your number, and losing it can block important logins.
- Save Time Compared to a New Setup: Moving your existing eSIM is usually quicker than setting up a new mobile line.


When You Can Transfer vs When a New eSIM/QR is Required
Sometimes you can move your eSIM in a few taps, and other times you must start fresh. You might see different options on screen depending on your phone brand and mobile carrier. These choices can feel confusing if you are changing platforms or upgrading after a long time. To see when you can transfer eSIM to a new phone and when you need a new setup, look at the table below:
|
Situation |
What You Usually Need |
|
Upgrading to a newer phone on the same carrier |
Direct eSIM transfer |
|
Moving between recent iPhones or Android phones |
Direct eSIM transfer |
|
Switching between an iPhone and an Android on the same number |
Often, a new eSIM or QR code |
|
Changing mobile carriers altogether |
New eSIM or QR code |
|
Reusing an old QR code that already hit its limit |
New eSIM or QR code |
|
Old phone lost or broken |
New eSIM or QR code |
Part 2. Step-by-Step Guide: eSIM Transfer to New Phone
Many people feel confused when they first try to move their eSIM to a new phone. This part breaks everything into clear parts based on your current and new devices. Next, we’ll share multiple methods that match your exact phone combination and confirm level.
1. For Old iPhone Users
If your current phone is an iPhone, you usually get the simplest transfer options. You should confirm your Apple ID password because some transfer tools require a signed‑in account. Make sure your old and new iPhones both have enough battery and a stable internet connection. Let’s explore how iPhone users can move their line without stress and confusion.
iPhone to iPhone
This path is best when you want everything to stay inside the Apple ecosystem with minimal changes. It keeps your existing number and plan active while lowering the risk of sudden service interruptions. Now, look at the steps below to move your eSIM between iPhones in a safe, controlled way.
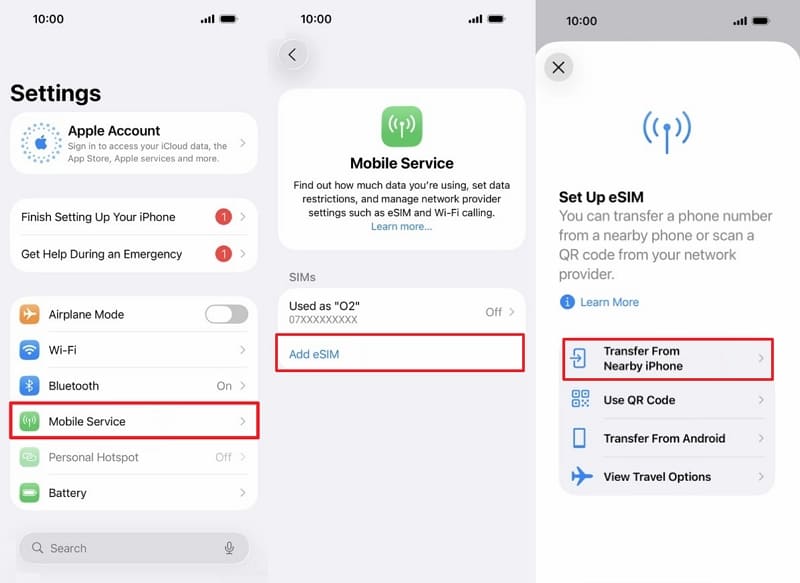
Step 1. On the new iPhone settings, tap on Mobile Services > Add eSIM > Transfer from Nearby iPhone.
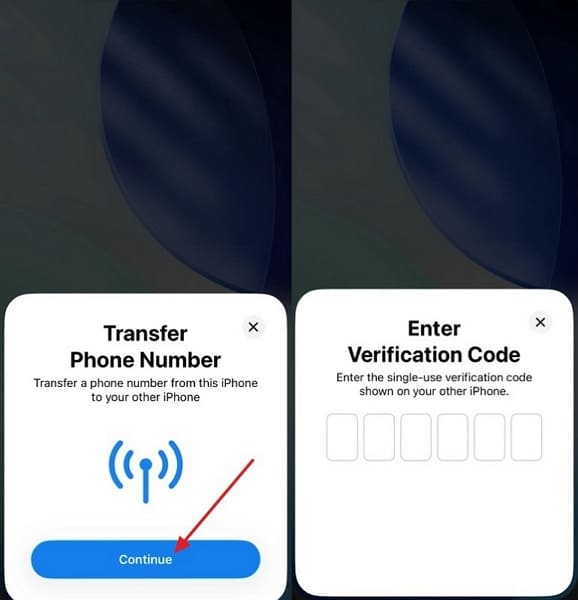
Step 2. Upon getting a pop-up on your old phone. Select Continue and enter the received verification code.
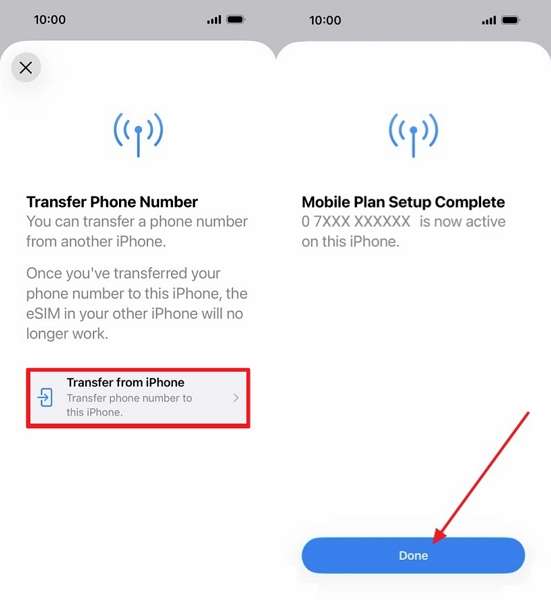
Step 3. Next, tap Transfer From iPhone, then tap Done.
iPhone to Android
This option suits people who want Android features but still need their current line and identity. Follow the steps below to complete an eSIM transfer to a new phone (Android) without losing important services.
Step 1. First, open Android Settings and tap Navigate & Internet > SIMs.
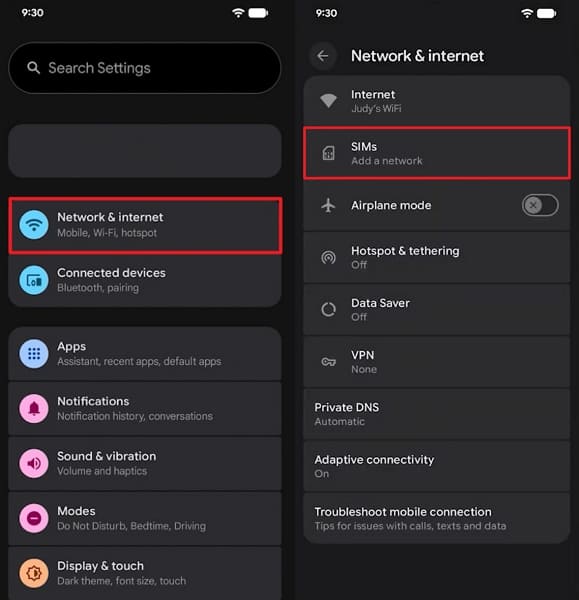
Step 2. Afterwards, tap Transfer a SIM from Another Device and select iPhone.

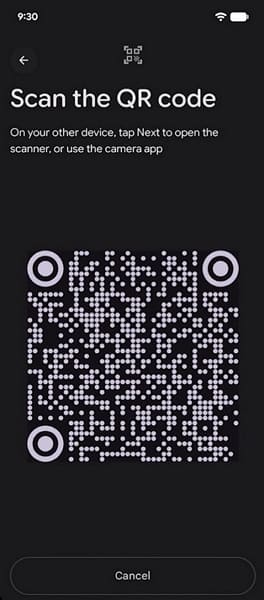
Step 3. Next, pair both phones by scanning the QR code using your old iPhone.
2. For Old Android Users
Android phones offer different eSIM options depending on the brand and the Android version installed on each device. You should confirm your Google account login because some setup tools rely on it during the process. Check that both Android phones have enough battery and a stable internet connection before starting any transfer. Let's explore how Android owners can move their eSIM while keeping service steady and reliable.
Android to Android
It helps maintain stable service for calls, texts, and data as you move to the new device. Now, follow the steps below to transfer your eSIM between Android phones in a controlled way.
Step 1. First, tap Network and Internet and choose SIMs.
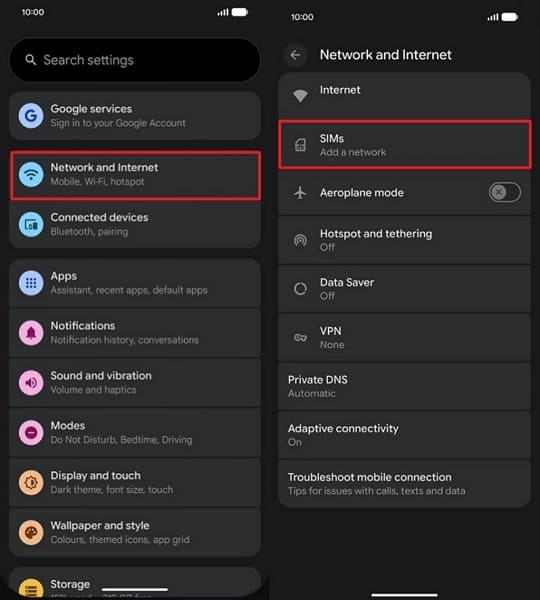
Step 2. Next, tap Add SIM, then tap Transfer a SIM from Another Device.
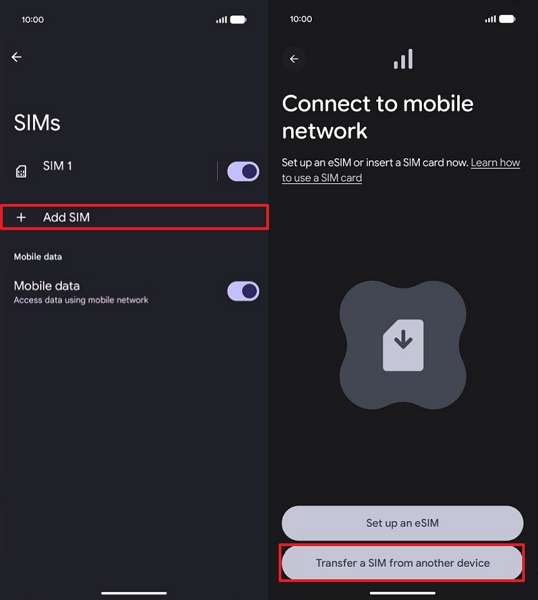
Step 3. Now, choose Pixel or Android Device. Tap Next on the older phone.
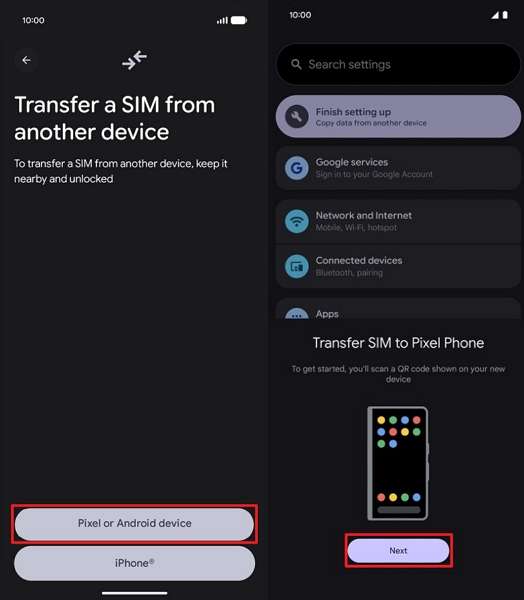
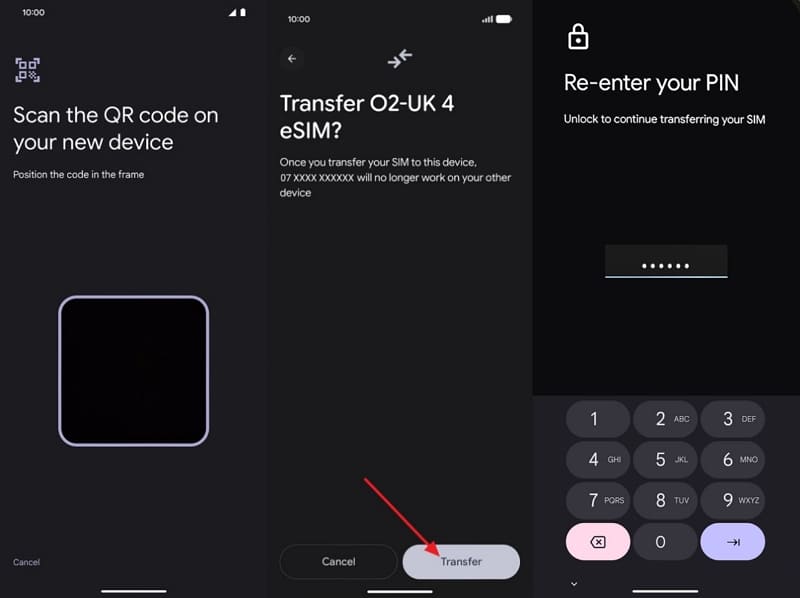
Step 4. Next, scan the QR code using your old Android device. Tap Transfer and enter the verification code.
Android to iPhone
This choice fits people who want to join the Apple ecosystem and learn new features. It helps you keep your current mobile line active while you adjust to a different system. Follow the steps below to transfer eSIM from one phone to another without losing important services:
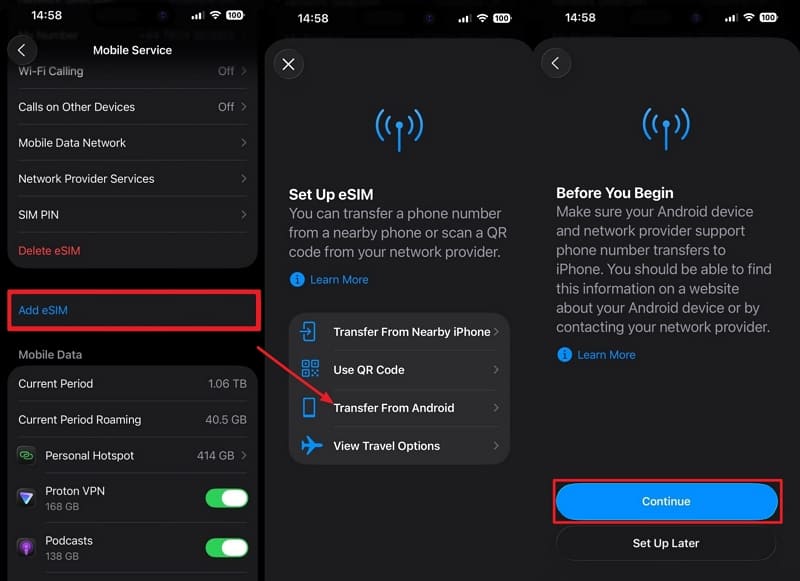
Instructions. On iPhone, access Mobile Services settings > Add eSIM > tap Transfer from Android Device > select Continue. Now, scan the QR code shown on your iPhone with your Android device.
3. Using Carrier App
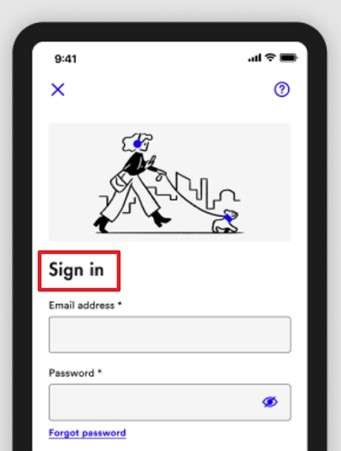
The Visible Carrier app lets you manage your mobile line digitally. It focuses on simple controls for your number, plan, and eSIM without store visits. You can download the Visible app from both the Play Store and the App Store. If automation fails, the app offers 24/7 support to help you complete activation manually.
When you upgrade phones, the app moves your line to the new device through a guided process. It deactivates the old phone and helps you download a fresh eSIM onto the new device. This keeps your current number and plan safe during the switch to a new phone. Now, let's see how to use the Visible app on iPhone or Android to move eSIM to a new phone (iPhone to iPhone) safely:
Step 1. Update your new iPhone to the latest iOS and connect to a stable Wi‑Fi.
Step 2. On your old iPhone, open the Visible app. Go to Account > Device > Transfer eSIM or Move Line.
Step 3. Start the transfer there, then install the Visible app on your new iPhone and sign in.
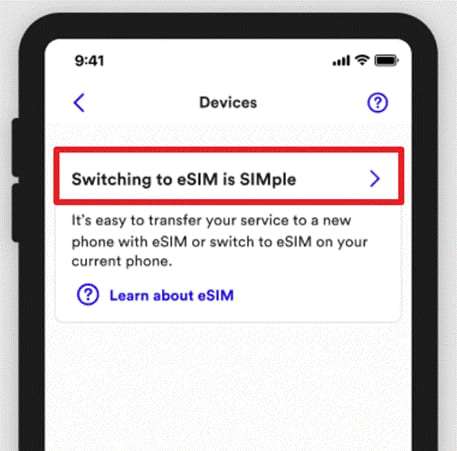
Step 4. When prompted, scan the QR code or enter the details. Then, expand the Switching phones is SIMple menu.
Step 5. Select A New Phone and follow the on‑screen instructions. Choose a name or default line setting.
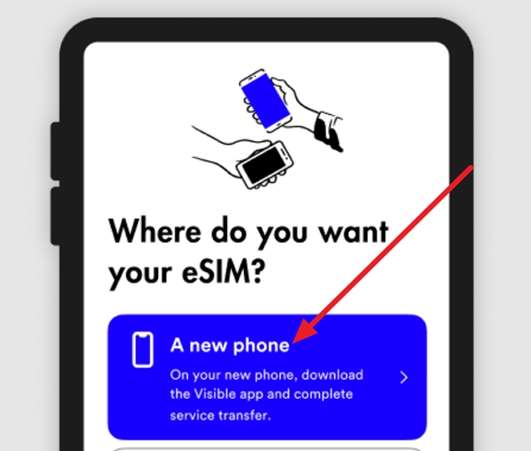
Step 6. After setup finishes, place a test call or text. The transfer can take around 30 minutes to finish.
Part 3. Fixes When eSIM Won’t Move or Activate
Sometimes eSIM setup fails, leaving you stuck without calls, texts, and mobile data. These problems are usually caused by minor issues such as software, signal, or incorrect activation details. Now, we will walk through quick fixes for common eSIM transfer-to-new-phone errors.
“No Service” After Transfer
Seeing "No Service" after an eSIM move can be scary because your phone appears completely offline. This usually means the eSIM is installed but has not fully registered on the carrier network yet. Thus, we will explore how to fix this on an iPhone and an Android device.
For iPhone
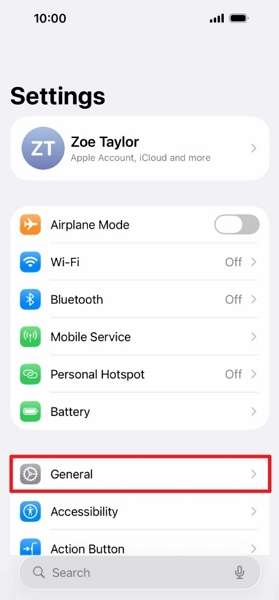
Step 1. First, open iPhone settings and tap General.
Step 2. Next, choose Transfer or Reset iPhone at the bottom.
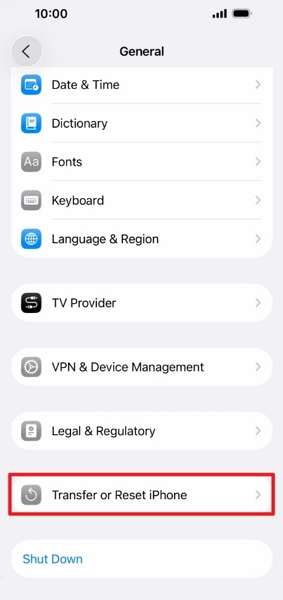
Step 3. Tap Reset. Then, choose Reset Network Settings and enter the passcode if needed.

Step 4. When the iPhone restarts, test calls and data again to see if service returns.
For Android
Step 1. Open Settings on Android, then tap System Settings.
Step 2. Tap System and Update. These names vary by phone model. Next, choose Backup and Reset.
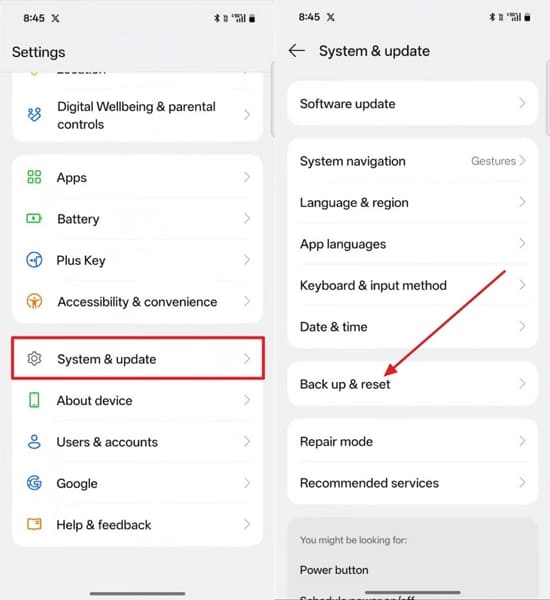
Step 3. Next, select Reset Phone and tap Reset Network and Bluetooth Settings.
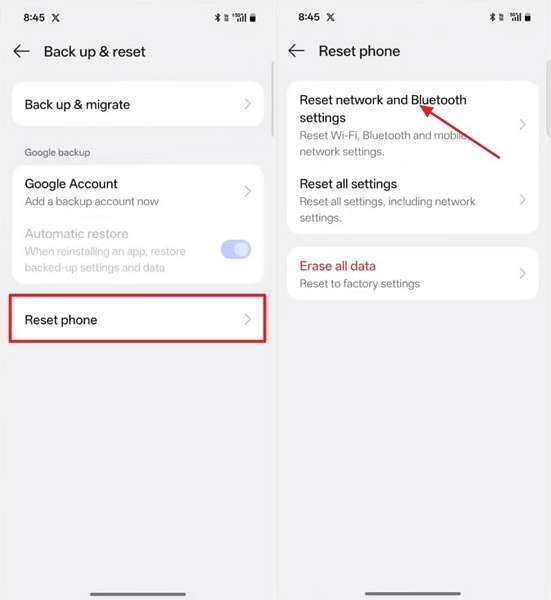
Step 4. Enter phone password to confirm. Afterward, restart your phone and test.
Activation Stuck or Spinning for a Long Time
Waiting for the eSIM activation to spin for a long time can feel frustrating and confusing. In many cases, the eSIM download started, but your phone has not yet fully completed the carrier check. Now, we will look at simple checks you can try on both iPhone and Android devices.
For iPhone
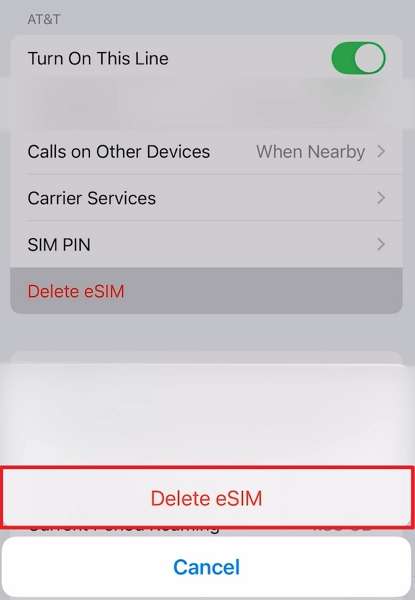
Step 1. First, open iPhone Settings and tap Cellular.
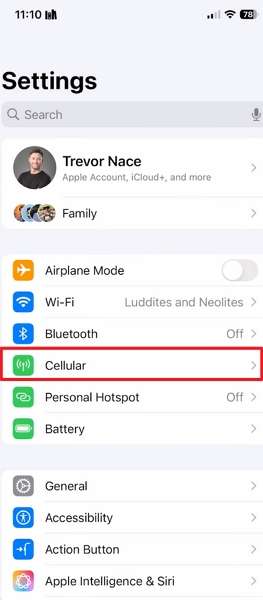
Step 2. Scroll down and navigate to Delete eSIM. Press that option.
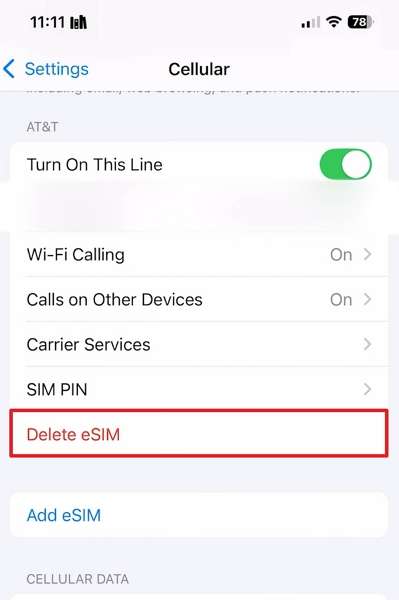
Step 3. Tap Delete eSIM again in popup. Next, enter the iPhone passcode if asked.
Step 4. Open Settings again. Go to Cellular and choose Add eSIM.
Step 5. Follow your carrier's instructions or use the QR code to reinstall the eSIM.
For Android
Step 1. Open Android Settings, then tap Connections, then SIM Manager.
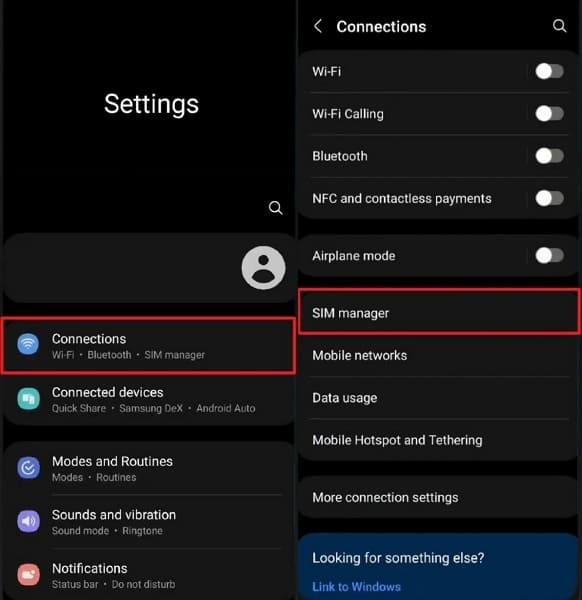
Step 2. Select your eSIM profile and tap Remove to delete it from your phone.
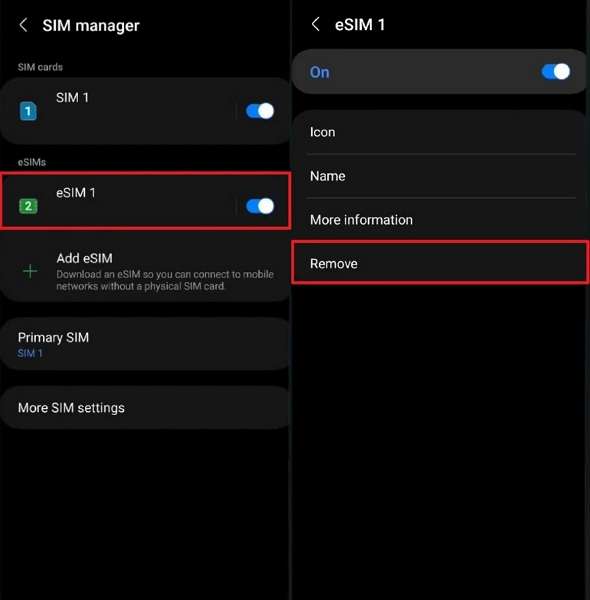
Step 3. After removal, tap Add eSIM in SIM Manager.
Step 4. Enter your activation code or scan the QR from your carrier to reinstall the eSIM.
eSIM Transfer Option Missing or Greyed Out
Transferring an eSIM from one phone to another should be simple, not stressful or confusing. When the transfer option is missing, it can feel like something is seriously wrong. Often, the ability to transfer eSIM from one phone to another exists but is blocked. Now, we will show easy checks to get the transfer option back.
For iPhone
Step 1. Confirm you use an eSIM‑capable iPhone model, such as the iPhone XR or the latest model.
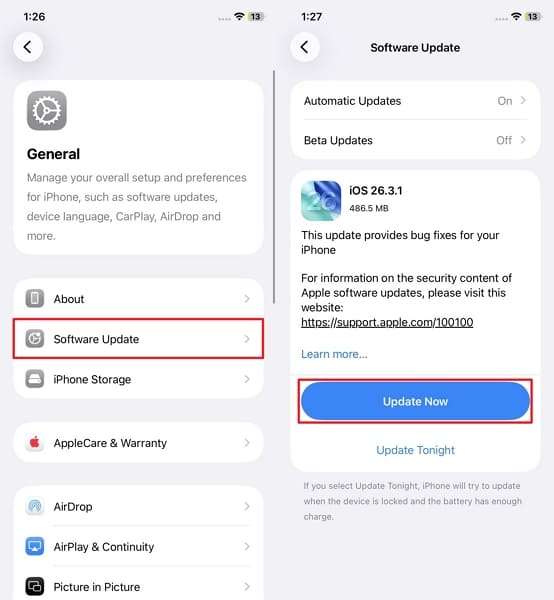
Step 2. Open iPhone Settings, then scroll down and tap General for system controls.
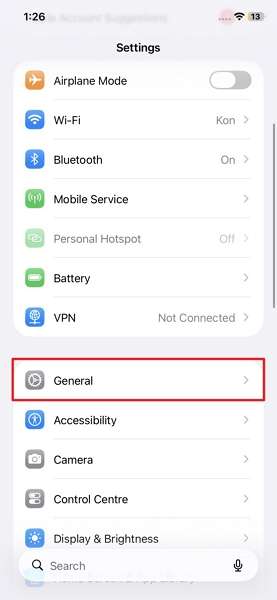
Step 3. Choose Software Update, wait while iPhone checks. Then, tap Update Now to install the latest firmware.
For Android
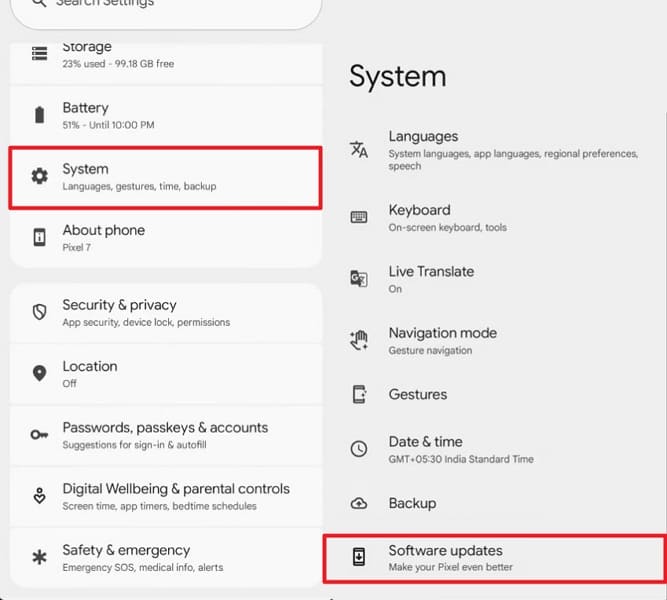
Step 1. Open Settings > System > Software Update.
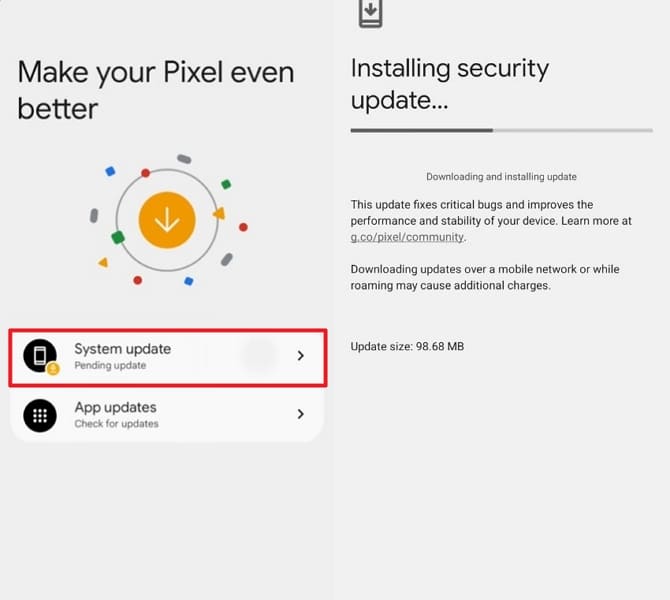
Step 2. Tap System Update, then follow the prompts to install the latest Android firmware.
eSIM QR Code Not Scanning or Invalid
Seeing a code that repeatedly refuses to scan can feel annoying and uncertain. Often, the pattern is correct, but your camera or screen makes it hard to read. In other cases, small details like lighting, focus, or slight paper damage silently break the process. Therefore, we will walk through quick checks you can try on both iPhone and Android devices.
For iPhone
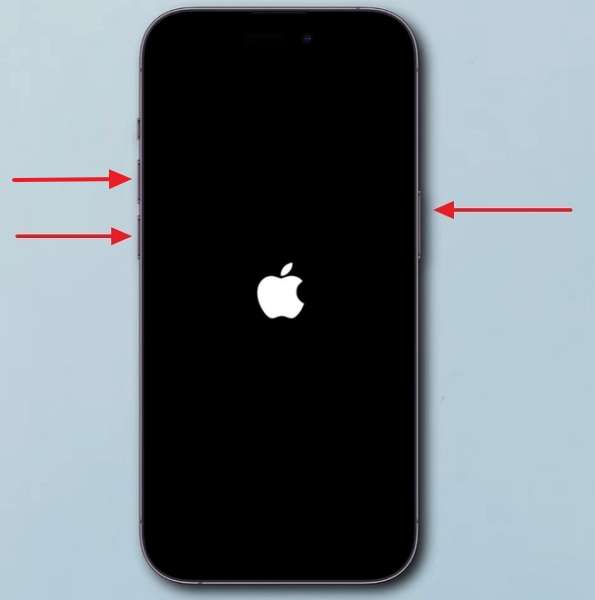
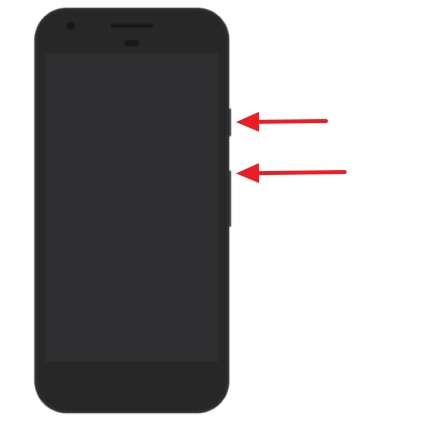
Step 1. To fix this problem, try force restarting your iPhone.
Step 2. Press and release Volume Up. Then, press and release Volume Down.
Step 3. Now, press and hold the Power button until you see the Apple logo.
For Android
Step 1. Press and hold Power and Volume Down together until the screen goes black.
Step 2. Keep holding both buttons until the phone vibrates. Then, release to restart.
Quick Pro Tip. Transfer All Your Data with the MobileTrans App
After moving eSIM to a new phone, shifting contacts, photos, and chats can also feel overwhelming. This is where the MobileTrans App helps you copy your important data between devices in just a few taps. It lets you move photos, videos, messages, and more over Wi‑Fi or cable, without a complicated setup. While you focus on moving your eSIM to a new phone, MobileTrans handles the rest in the background.
Key Features
- Multi-Type Data Migration: Transfer up to ten different data categories together when switching between two phones.
- Cross-Platform File Sharing: Easily move large files between phone, computer, and tablet without complicated setup.
- High-Speed Phone-to-Phone Transfers: MobileTrans reaches up to 30 MB/s, transferring 1GB of video in about 30 seconds.
- Cable-Free Transfers: Send content over local connections only, avoiding mobile data and eliminating the need for physical cables.
- WhatsApp Chat History Management: Merge previous and new WhatsApp conversations when moving from an Android device to an iOS phone.
Ultimate Guide to Transfer Phone Data Using the MobileTrans App
Next, follow the simple steps in MobileTrans to transfer phone data smoothly from an iPhone to an Android device.
Step 1. After launching the app on iPhone, tap Phone to Phone. Next, tap iPhone to Android > Basic Data.
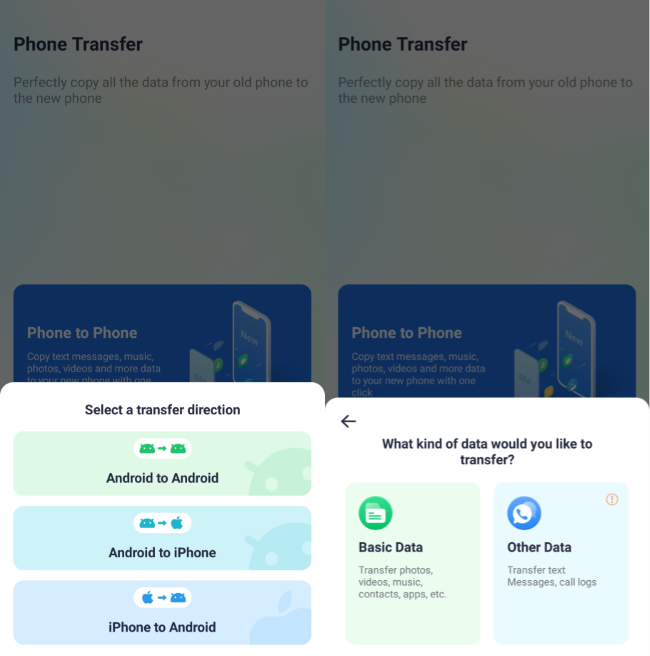
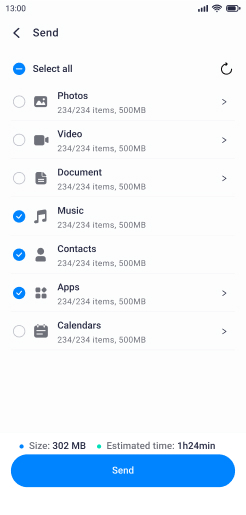
Step 2. Next, select the data to transfer to the iPhone and tap Send.
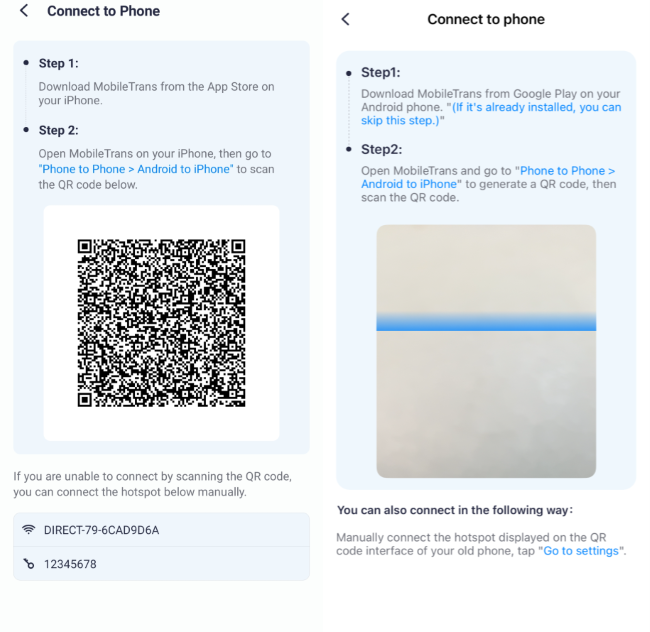
Step 3. On Android, tap Phone to Phone > iPhone to Android > Basic Data. Next, scan the QR code.
If you prefer working on a computer, you can switch to the MobileTrans desktop version. It lets you move data between Android and iOS and supports over 6,000 popular device models. The desktop tool also allows selective transfers, so you can choose exactly which data types to move during the process.
Conclusion
Moving to a new device feels easier once you understand how eSIM transfers actually work. With clear steps, you can transfer eSIM to a new phone, avoid service gaps, and fix common activation problems. If you want to protect your photos, chats, and other personal data during the upgrade, use the MobileTrans App for smooth phone‑to‑phone transfers.
FAQs
-
What if my old phone battery dies during eSIM transfer?
Allow both phones to charge fully, then restart the devices and repeat your carrier's transfer or activation steps carefully. If issues continue after rebooting, contact support and request a fresh eSIM profile or replacement QR code. -
Can I change my eSIM back to a physical SIM?
Many carriers let you convert an eSIM line into a physical SIM by requesting a replacement hardware card. You normally keep the same number and plan, but you may pay a small fee for a new card. -
Will voicemail and call forwarding move to my new phone?
In many cases, network‑side voicemail settings follow your number, while some device shortcuts must be reconfigured manually. After transferring the eSIM from one phone to another, place test calls and adjust voicemail access codes if anything seems different.


