How to AirDrop Photos & Files from iPhone to Mac (and Vice Versa)

Written By Nicola Massimo |


 TL;DR:
You can wirelessly transfer photos and files between an iPhone and a Mac without an internet connection by enabling Wi-Fi and Bluetooth on both devices and keeping them within a 30-foot range.
● AirDrop compatibility requires an iPhone 5 or newer running iOS 7 or later (including the recent iOS 26 release), and a Mac introduced in 2012 or later running OS X Yosemite or newer.
● Accepted files automatically save to the Mac's downloads folder or the corresponding iPhone app, but transfers will fail if a Personal Hotspot is enabled or if the devices are locked.
● For large files, resolving persistent AirDrop failures, or moving files between Android and Mac, use the third-party MobileTrans software via a direct USB cable connection.
Ask AI for a summary
 ChatGPT
 Perplexity
 Gemini
 Claude
 Grok
Grok
Wondering "how to AirDrop to Mac?" You've come to the right place. iPhone users generally have to depend on third-party services such as Dropbox or else use iCloud or iTunes. Apple’s AirDrop is one of the fastest and most convenient ways to wirelessly send files from iPhone to Mac. Now that iOS 26 has come out, AirDrop of iOS 26 brings out even more user-friendly features for Apple users.
AirDrop has a file-sharing feature which was released by OS X Lion and allows users to transfer files via AirDrop from iPhone to Mac easily. This feature made it simple for the users and iOS devices with a release of iOS 26 which offered a simple way for the users to share files like photos between iOS devices. It is also a great way to export photos from iPhone to Mac.
Part 1. Pre-flight Check: 4 Things to Do Before You AirDrop
AirDrop is a way of transferring files between iOS devices. On Mac, these AirDrop feature was used previously but as the different technologies of iOS devices, this feature is rarely used. But now AirDrop has come up with a new feature for Mac to transfer files between devices. It can even work on Mac or other iOS devices that are not connected to the same network. As it is built in the Apple operating system, you can't use AirDrop to transfer between Android and Mac, but you can use alternatives for that purpose.
Before you understand how to AirDrop from iPhone to Mac, there are a few essential prerequisites and preparations to ensure a smooth experience. You need to understand the system requirements and steps to turn on AirDrop on Mac.
For AirDropping to a Mac, you need to turn on the AirDrop mode on both devices in which you want to share files and then choose the files and AirDrop them to the other device. Airdrop uses Wi-Fi and Bluetooth of your iPhone to establish a connection between iPhone and Mac. The best advantage of using this Airdrop is that it works without internet connection.
So, how to enable AirDrop on Mac and AirDrop iPhone to Mac? Check out the instructions below:
- Check Device Compatibility: AirDrop is available on iPhone 5 or later, iPad (4th generation or later), iPad Air, iPad Pro, iPad mini, and iPod touch (5th generation or later) running iOS 7 or later. On the Mac side, you'll need a Mac computer with OS X Yosemite or later, or a MacBook introduced in 2012 or later.
- Turn On AirDrop on iPhone and Mac: Make sure AirDrop is enabled on both your iPhone and Mac. On your iPhone, go to Settings > General > AirDrop and switch AirDrop on. How to turn on AirDrop on Mac? Go to Finder > AirDrop and ensure it's turned on as well.
Or, you can open Control Center, and tag on AirDrop, and then choose any option from below:
- Off: simply turn off the Airdrop.
- Contacts Only: your contacts will only be visible.
- Everyone: Anyone can have rights to use your AirDrop.

- Enable Wi-Fi and Bluetooth: AirDrop relies on both Wi-Fi and Bluetooth to establish a peer-to-peer connection between devices. Make sure that both Wi-Fi and Bluetooth are turned on for your iPhone and Mac.
On your iPhone, you can enable Wi-Fi and Bluetooth by going to Settings > Wi-Fi (toggle it on) and Settings > Bluetooth (toggle it on).
On your Mac, click on the Wi-Fi icon in the menu bar and select "Turn Wi-Fi On." For Bluetooth, click on the Bluetooth icon in the menu bar and select "Turn Bluetooth On."
- Bring Your Devices in Close Proximity: AirDrop works best when the devices are within close range, typically within 30 feet (9 meters) of each other. Ensure that your iPhone and Mac are in close proximity for optimal performance.
Part 2. How to AirDrop from iPhone to Mac
How to airdrop photos from iPhone to Mac is an important thing that you should know before transferring the data. Transfer iPhone to Mac airdrop does not require both devices to log in to the same iCloud account to use airdrop. It will offer benefits as while transferring files through Airdrop, it will not require approval permission for each transfer.
Steps for How to Airdrop from iPhone to Mac
Step 1: On your iPhone, navigate to the app or location where the file, photo, or other item you want to share is stored. For example, if you want to share a photo, open the Photos app and select the desired image.
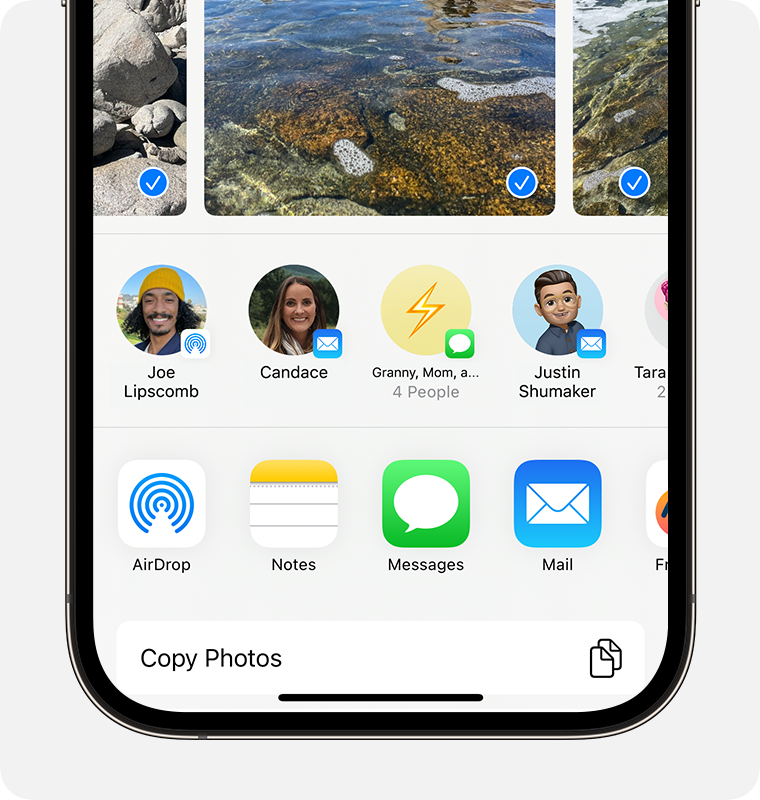
Step 2: Once you've selected the item you want to share, look for the Share icon (a square with an upward-pointing arrow) and tap on it. In the Share Sheet that appears, tap on the AirDrop icon (two concentric circles with a triangle at the bottom).
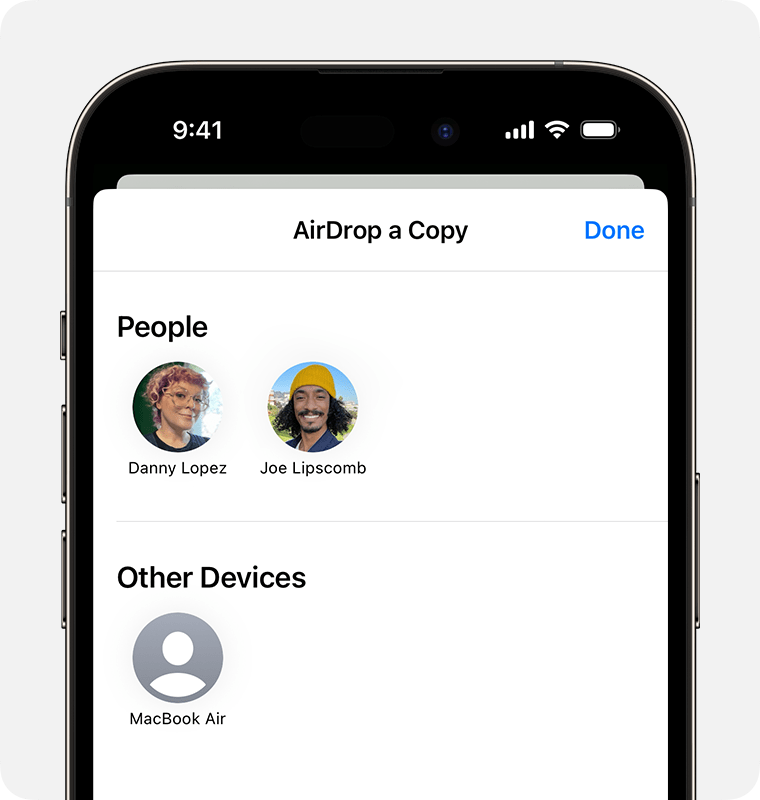
Step 3: Your iPhone will start scanning for nearby AirDrop-compatible devices. After a few seconds, you should see your Mac listed as an available device. Tap on the person’s name to begin the transfer.
Step 4: On your Mac, you'll receive an AirDrop request notification showing a preview of the item being shared. Click on the "Accept" button to allow the transfer.
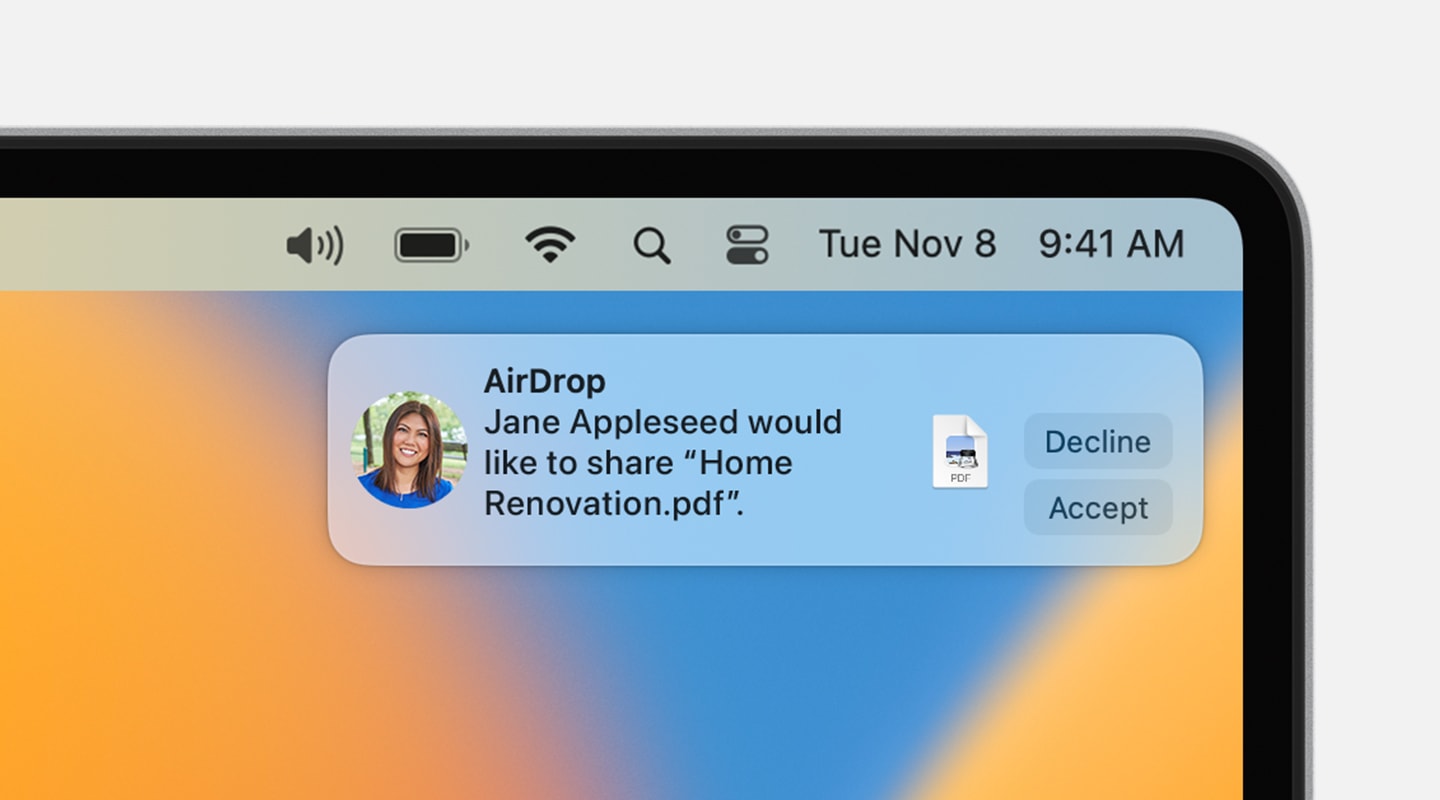
Step 5: Your Airdropped files will begin transferring your photos from iPhone to Mac. When finished, the Mac will make a little sound effect and your files will be located in the user downloads folder.
Part 3. Alternative Method: For Large Files or When AirDrop Fails
MobileTrans is a powerful tool that works well with all iPhone devices and Android devices. It has features that can restore files from backups, transfer files from phone to phone and much more. If you have been wondering how to airdrop photos from iPhone to Mac, then this option will definitely give you a solution. It can also help you move files between Android and Mac.
MobileTrans - iPhone to Mac Transfer
How to Transfer iPhone Data to Mac in 1 Click!
- • Easily transfer photos, videos, calendars, contacts, and messages from iPhone to Mac.
- • Backup and restore data on your device to a computer with one click.
- • Takes less than 10 minutes to finish.
 4.5/5 Excellent
Step 1. Download MobileTrans and Connect your iPhone Mac
This can be done via a USB cable. Once connected, the computer will indicate a new device. Open up the MobileTrans software to enable you to choose the transfer option.
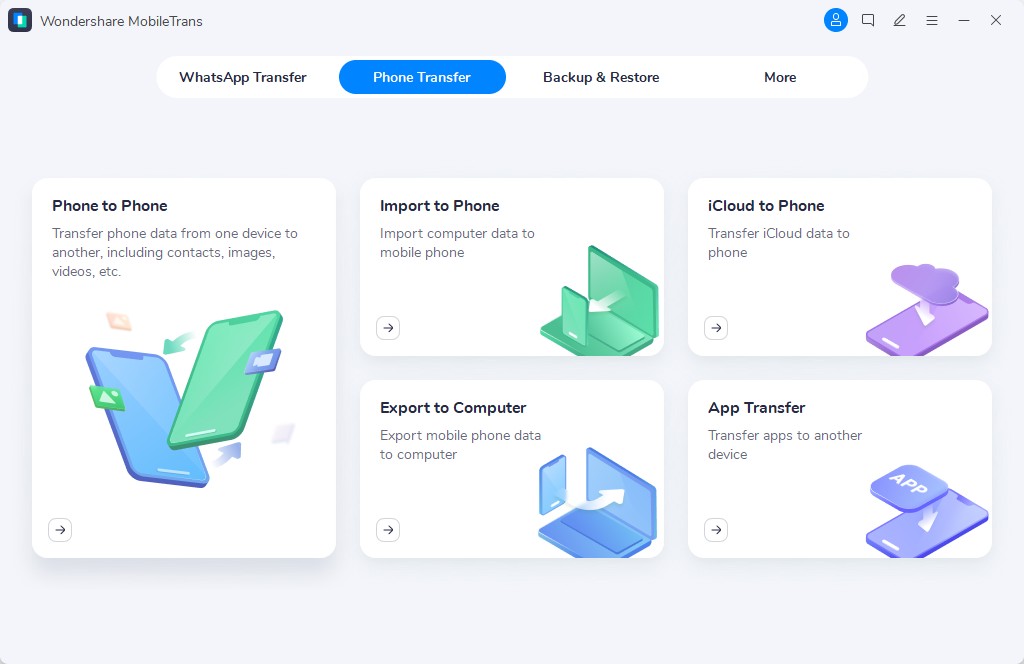
Step 2. Select the files you need to transfer
This step will enable you to see all the files saved on your iPhone. MobileTrans has made it easy how to access iPhone files on Mac because the entire list will be populated. Select the particular ones you need to transfer to Mac.
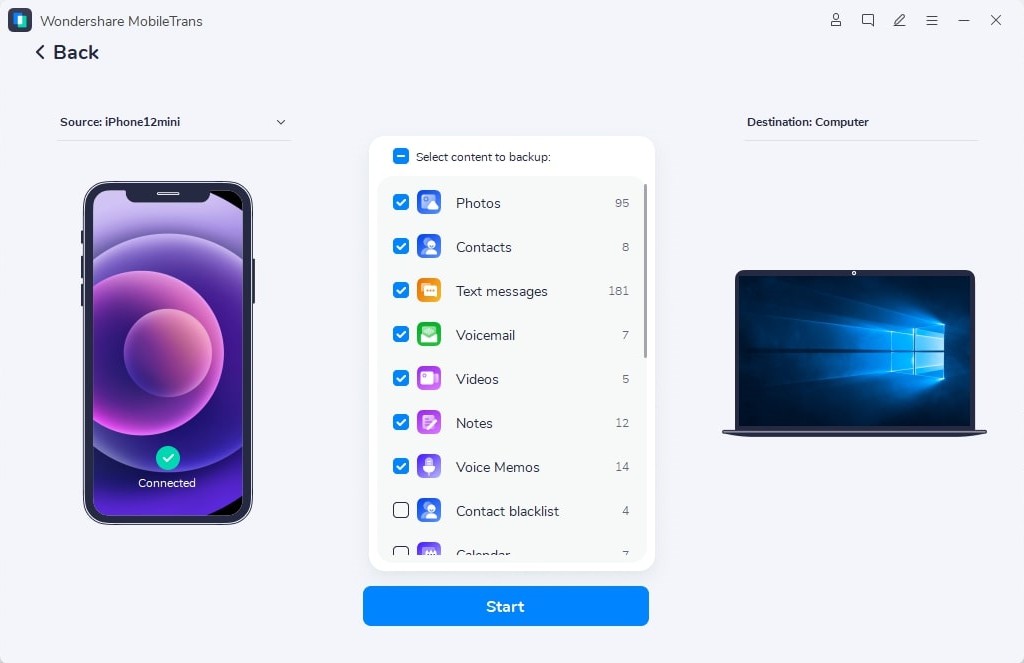
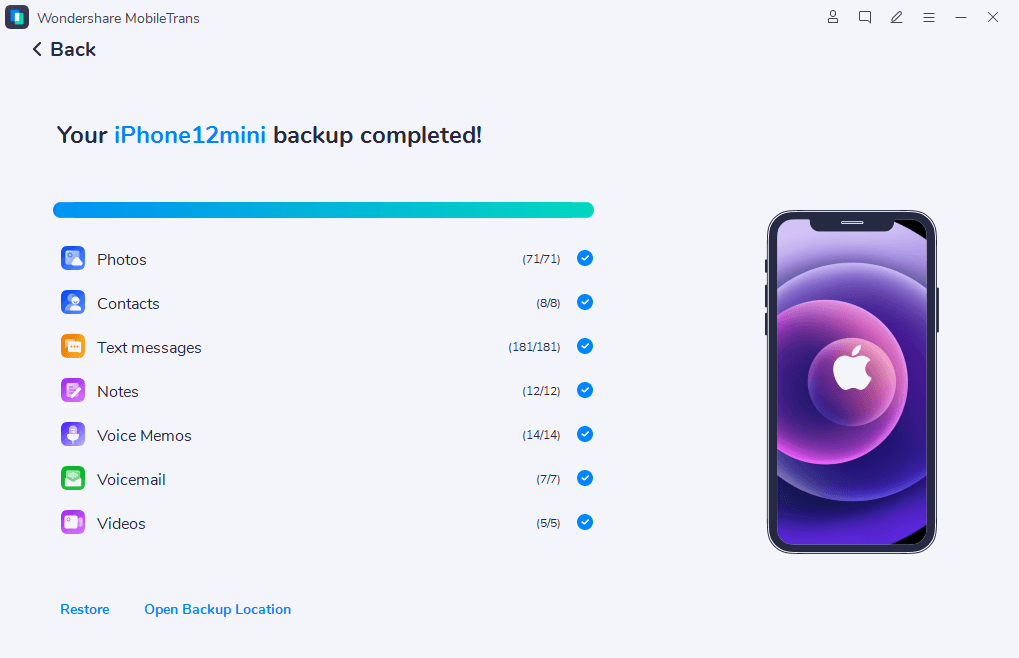
Step 3. Start Transfer
In order to begin the transfer process, click on the 'Start' button to enable your files be moved to Mac. You may then opt to back them up on Mac for future extraction. The files will backup to Mac soon.
Part 4. How to AirDrop from Mac to iPhone
Transferring files from Mac to iPhone using AirDrop is just as straightforward as transferring from iPhone to Mac. Here's how you can share files from your Mac to your iPhone:
Steps for How to AirDrop from Mac to iPhone
Step 1: On your Mac, open the Finder and select the file(s) you want to transfer to your iPhone. You can select multiple files by holding Command and clicking on each file.
Step 2: Right-click on the selected file(s) and choose "Share" from the context menu, or click the Share button in the Finder toolbar. In the share menu, select AirDrop.
Step 3: Your Mac will start searching for nearby AirDrop-enabled devices. Your iPhone should appear in the list of available devices. Click on your iPhone to initiate the transfer.
Step 4: On your iPhone, you'll receive an AirDrop notification asking if you want to accept the file. Tap "Accept" to begin the transfer.
Step 5: The file transfer will begin immediately. Once completed, you'll hear a confirmation sound on your iPhone, and the transferred file will be saved to the appropriate app (e.g., Photos for images, Files app for documents).
Pro Tips:
- Make sure both devices are unlocked and nearby during the transfer process.
- If you're having trouble finding your iPhone, try moving the devices closer together (within 30 feet).
- You can drag and drop files directly to the AirDrop window in Finder for quicker transfers.
- For large files, consider using a wired connection or MobileTrans for more reliable transfers.
Part 5. Troubleshooting: AirDrop Not Working?
- Airdrop not showing up in Control Center.
- Can’t Airdrop Music.
- It is not possible to transfer the files other than iOS devices.
- Apple notes that Airdrop users ensure that devices are used within 30 feet range of each other.
To ensure a smooth and hassle-free transfer experience when sharing data between your iPhone and Mac, consider the following tips:
- Keep Your Devices Up-to-Date: Regularly update your iPhone and Mac to the latest software versions. Apple often releases updates that improve the performance and stability of features like AirDrop, ensuring a better overall experience.
- Restart Your Devices if AirDrop Is Not Working: If you encounter issues with AirDrop, try restarting both your iPhone and Mac. This can often resolve temporary glitches or connectivity issues that may be causing problems with AirDrop.
- Check Your AirDrop Visibility Settings: On your iPhone, go to Settings > General > AirDrop and ensure that your visibility is set to "Everyone" or "Contacts Only," depending on your preference. On your Mac, click on the AirDrop icon in the Finder sidebar and adjust your visibility settings accordingly.
- Disable Personal Hotspot and Other Potential Interference: If you're experiencing issues with AirDrop, try disabling your iPhone's Personal Hotspot feature, as well as any other potential sources of interference, such as Bluetooth accessories or Wi-Fi extenders.
- Restart Wi-Fi and Bluetooth on Both Devices: If AirDrop is still not working properly, try restarting both Wi-Fi and Bluetooth on your iPhone and Mac. This can help reset the wireless connections and potentially resolve any underlying issues.
- Use a Reliable Cloud Storage Service: While AirDrop and MobileTrans are great for local data transfers, consider using a reliable cloud storage service like iCloud, Google Drive, or Dropbox for seamless access and sharing of your data across multiple devices.
Part 6: FAQs
1. Why can't I AirDrop from iPhone to Mac?
If you're having issues or can't send files with AirDrop, check your Bluetooth and Wi-Fi connections, check your Firewall settings, and make sure that your AirDrop receiving setting is set correctly in the Finder.
2. Why is my AirDrop stuck on waiting?
Some of the common causes of AirDrop stuck on waiting are: Both devices are not close enough to each other to let AirDrop connect them. Your iPhone or Mac is not fulfilling the AirDrop minimum requirements. Wi-Fi and/or Bluetooth is turned off on any device or a personal hotspot is enabled.
3. Why is AirDrop failing from iPhone to Mac?
If AirDrop isn't working on your iPhone, iPad, or Mac, ensure Wi-Fi and Bluetooth are on. Make sure that your Apple devices are all up to date and your iPhone is unlocked. Be sure to restart your devices after making changes to your settings and try AirDrop again.
Conclusion
After going through all the above parts you might be clear on how to airdrop from iPhone to Mac easily. Finally, we can say that Airdrop usually works just fine without any hassle.
New Trendings

Top Stories
All Categories


Nicola Massimo
staff Editor