

![[Best Methods] How to Export iPhone Photos to Mac](https://mobiletrans.wondershare.com/images/images2024/how-to-export-iphone-photos-to-mac.jpg)

 TL;DR:
Choosing the best method to export iPhone photos to a Mac depends on your transfer volume, with Wondershare MobileTrans and the Mac Photos app offering the fastest wired batch transfers, while AirDrop and iCloud provide convenient wireless syncing.
● Wireless transfers require an internet connection or both devices on the same Wi-Fi network, with iCloud Photos automatically syncing your entire library at the cost of your iCloud storage space, while AirDrop is best for sending individual photos.
● My Photo Stream provides an automated wireless alternative that avoids using much iCloud storage, but it is strictly restricted to transferring only your 1000 most recent photos rather than an entire library.
● Direct wired connections require a Lightning to USB cable and only access internal iPhone storage when using the native Mac Photos or Files apps, whereas the third-party Wondershare MobileTrans software allows full-library batch exports without internet dependencies.
Ask AI for a summary
 ChatGPT
 Perplexity
 Gemini
 Claude
 Grok
Grok
Transferring photos from your iPhone to your Mac is a great way to free up storage space on your phone, create backups of your memories, and have all your photos accessible across devices. With the latest iOS and macOS updates, Apple has made it easier than ever to get photos off your iPhone and onto your Mac.
In this guide, we'll cover the top reasons you may want to export iPhone photos to your Mac, along with a detailed walkthrough of the best methods on how to export iphone photos to Mac, including AirDrop, the Photos app, Files app, iCloud Photos, iCloud Photo Stream, and the MobileTrans software.
We'll also compare the pros and cons of each method to help you decide which option works best for your needs. Let's dive in!
In this article
Why Transfer iPhone Photos to Mac?
Why do you need to move photos from iPhone to Mac? There are multiple situations.
Here are some of the most common reasons for transferring photos from your iPhone to your Mac:
- Free up storage space on your iPhone. As you accumulate more photos and videos, your iPhone's storage can fill up quickly. Transferring photos to your Mac frees up valuable space on your phone.
- Create backups of your photos. Having copies of your photos in multiple locations safeguards them against accidental deletion or device malfunction. Storing them on your Mac provides an additional backup.
- View photos on a bigger screen. The gorgeous Retina display on MacBooks and iMacs allows you to see your iPhone photos in much higher resolution and detail.
- Edit, organize, and manage photos. The Photos app on Mac provides advanced editing tools and options for organizing your photo library that aren't available on iPhone.
- Sync photos across devices. Storing photos on your Mac makes it easier to access them from all your Apple devices when you have iCloud Photos enabled.
- Share photos with friends and family. Uploading iPhone photos to your Mac makes it simple to share them via email, messaging, social media, or creating printed photo albums to mail.
Best Methods to Export iPhone Photos to Mac
Now let's go over the top techniques for getting photos off your iPhone and onto your Mac.
#1 How to Export iPhone Photos to Mac Using Airdrop
AirDrop provides a quick, easy way to wirelessly transfer photos between your iPhone and Mac one photo at a time. Here's how it works:
On your iPhone:
Step 1: Open the Photos app and find the photo(s) you want to transfer to your Mac.
Step 2: Tap the Share button (the box with an arrow pointing upward).

Step 3: Tap the AirDrop icon. This will start scanning for nearby Apple devices.
On your Mac:
Step 1: Click the AirDrop icon in the Finder. Make sure AirDrop is set to allow receiving from Contacts Only or Everyone.

Step 2: When your iPhone appears, accept the AirDrop transfer.
Step 3: The photo(s) will be saved to your Mac's Downloads folder.
The advantages of AirDrop are that it's wireless, easy to use, and transfers immediately. The disadvantage is that both devices must be on the same Wi-Fi network. Also, AirDrop allows any Apple device, even unfamiliar ones, to send and receive content, which could pose a security risk.
#2 How to Export Iphone Photos to Mac Using the Photos App
The Photos app on your Mac provides a wired option for transferring multiple photos quickly between your iPhone and Mac. Here's how to use it:
Step 1: Connect your iPhone to your Mac with the Lightning to USB cable that came with your phone.
Step 2: Open the Photos app on your Mac. Make sure you're in the Import tab. Your connected iPhone will appear in the sidebar under Devices. Click on it.

Step 3: Select the photos you want to import by Cmd/Ctrl-clicking. Or import all new photos by clicking Import All New Items.
Step 4: Click “Import” to transfer the photos to your Mac.
The Photos app makes it easy to import all new photos or selected images in just a few clicks. With a direct-wired connection, transfers are lightning-fast. One downside is that you need the USB cable on hand to connect the devices.
#3 How to Transfer iPhone Photos to Mac with the Files App
The Files app provides access to the files stored on your iPhone and makes it easy to drag and drop them to your Mac. To use it:
Step 1: Launch the Files app on your iPhone. If you're not already on the Browse tab, navigate to it.
Step 2: Locate and select the ellipsis icon positioned in the top-right corner. Choose the "Edit" option.

Step 3: Scroll down to the "Locations" section and activate the desired third-party service or app.

Step 4: Confirm your selection by tapping "Done".
The Files app method makes it easy to access all the files and media on your iPhone. You can quickly select, drag, and drop multiple photos at once. The downside is being able to access files on internal iPhone storage only.
#4 How to Transfer iPhone Photos to Mac Via iCloud
If you have iCloud Photos enabled on your iPhone and Mac, all photos you take on your iPhone will automatically upload to iCloud and sync across any Apple devices signed into your iCloud account.
To check if you have iCloud Photos set up:
Step 1: On your iPhone, open Settings > [your name] > iCloud > Photos and make sure it is toggled on.

Step 2: On your Mac, open System Preferences > Apple ID > iCloud and make sure Photos is checked.

With iCloud Photos, transfers happen seamlessly over Wi-Fi or cellular data, so you don't need any cables. All your latest photos will automatically appear in the Photos app on your Mac when it's connected to the internet. The only potential downside is that it takes up your iCloud storage space.
#5 iCloud Photo Stream
If you don't want to use iCloud Photos, you can use the My Photo Stream feature to automatically transfer your latest iPhone photos to your Mac through iCloud. To enable it:
On your iPhone:
Step 1: Go to Settings > [your name] > iCloud > Photos.

Step 2: Turn on My Photo Stream.
On your Mac:
Step 1: Open System Preferences > Apple ID > iCloud
Step 2: Make sure the Photo Stream is checked.

With Photo Stream enabled, your 1000 most recent photos will automatically upload from your iPhone to iCloud and transfer to your Mac. An advantage over iCloud Photos is that it doesn't take up as much iCloud storage space. A disadvantage is that it only transfers your latest 1000 photos, not your entire library.
#6 How Do I Export Photos From iPhone to Mac via Wondershare Mobiletrans
MobileTrans Wondershare - Backup & Restore is a desktop app for Windows and Mac that provides a quick and easy way to export photos from your iPhone directly to your computer.
Wondershare MobileTrans
Export Your iPhone Photos to Mac Easily
- • No data loss. No data leaks.
- • Retain the original clarity and size of photos.
- • Support various data, including files, photos, videos, apps, contacts, etc.
- • Compatible with over 6,000 types of devices acorss Android and iOS.
 4.5/5 Excellent
Here is how it works:
Step 1: Download and install MobileTrans on your Mac from the Wondershare website.
Step 2: Connect your iPhone to the computer using a USB cable. The app will automatically detect your device.
Step 3: In MobileTrans, switch to the “Phone Transfer” tab. Then click Export to Computer.
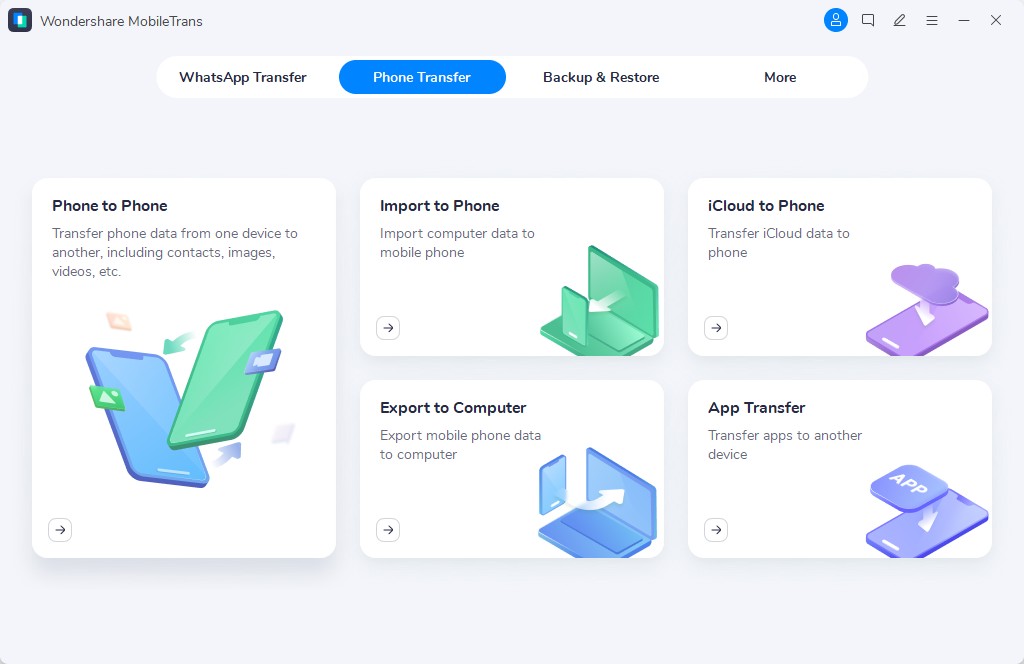
Step 4: Select the photos you want to transfer. Click Export to transfer the photos to your computer.
Or click Export All to transfer your entire photo library.

The benefit of using MobileTrans is that it allows transferring your entire photo library, or selected albums/photos, all in one batch. The direct phone-to-computer connection is also very fast.
Why Choose MobileTrans: Comparing all methods
Each method has its own advantages. Choose the one that fits you the most.
Here is a comparison of the pros and cons for each method of transferring photos from iPhone to Mac:
| Method | Pros | Cons |
| AirDrop |
|
|
| Photos App |
|
|
| Files App |
|
|
| iCloud Photos |
|
|
| iCloud Photo Stream |
|
|
| MobileTrans |
|
|
As you can see, each method has its own pros and cons. Wireless options like AirDrop, iCloud Photos, and Photo Stream provide convenience, while wired options like the Photos app, Files app, and MobileTrans offer speed and reliability.
Overall, the best option for most users is MobileTrans, as it combines the ability to transfer any photos you select in one fast batch. It also avoids limitations like restricted storage access or needing an internet connection. The direct phone-to-computer connection is lightning-fast.
Conclusion
Transferring photos from your iPhone to your Mac opens up a whole host of benefits - from freeing up space on your phone to keeping backups of your memories across devices.
Apple has provided great built-in options like AirDrop, the Photos app, and iCloud syncing to help get photos effortlessly from your iPhone to your Mac. Third-party tools like Wondershare MobileTrans also offer easy exporting of your iPhone photo library directly to your computer.
So, the method you choose depends on your specific needs and preferences. Wireless options like AirDrop provide flexibility but are slower for big transfers. Wired options through apps offer direct and fast transfers. Automated iCloud-based options work seamlessly in the background but can use cloud storage space.
In most cases, MobileTrans provides the best of both worlds - a quick wired connection to directly export any photos you select all at once. So, if you need to regularly get photos off your iPhone, MobileTrans is your best bet for fast, flexible, and reliable photo exporting.
4.5/5 Excellent

