The festive season isn't fulfilled without photographing the charm of Christmas trees and lights. For displaying holiday decorations or sharing the glowing lights with friends, using iPhone for capturing photos is believed to be the best option. However, capturing tall, brightly illuminated Christmas trees or lights can become challenging for some users.
Knowing the appropriate iPhone settings for Christmas lights is crucial to take the ideal photo, paired with a bit of creativity. In this article, we will provide expert advice and techniques to assist you in capturing stunning images of Christmas trees and lights with your iPhone. We will also assist you with the optimal iPhone camera settings and familiarize you with the MobileTrans App for effortless photo transfer.
In this article
Part 1. Best Tips and Tricks to Take Perfect Christmas Tree and Lights Pictures with iPhone
Taking pictures of Christmas trees and lights is the best way to preserve holiday memories. However, it often involves challenges like capturing tall trees or working with dim lighting. To help you overcome these difficulties, here are some practical tips specifically designed for Christmas photography:
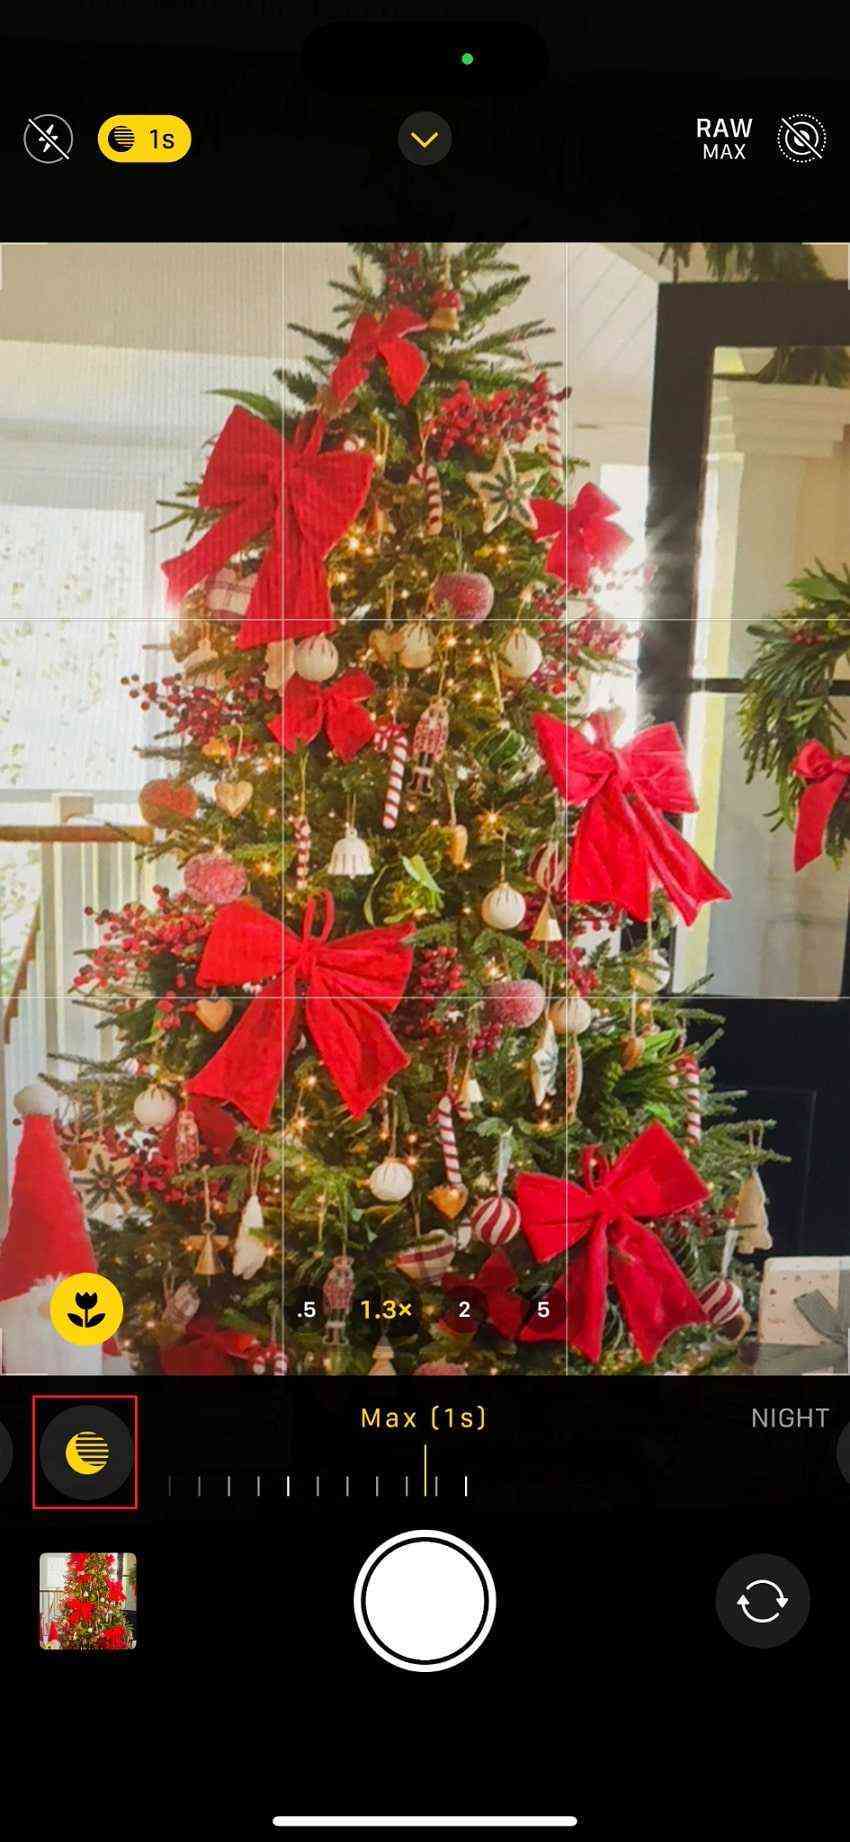
- Enable Night Mode For Low Light: Night Mode is perfect for capturing the brilliance of Christmas lights in dark environments. It automatically adjusts to enhance brightness and detail while reducing noise in the background.
- Capture Low Angle Shots: You must take a photograph from a low angle to highlight the height of your Christmas tree or to enhance the drama of outdoor lighting arrangements. Stand near the tree's base and angle the phone upwards to take this shot.
- Use the Wide-Angle Lens For Tall Trees: Switch to your iPhone’s ultra-wide-angle lens to take photos of tall Christmas trees. This allows you to fit the entire tree into the frame, even if you’re standing close. Hold the phone vertically for a portrait-style shot to emphasize the tree’s height while utilizing the best iPhone settings for Christmas trees.
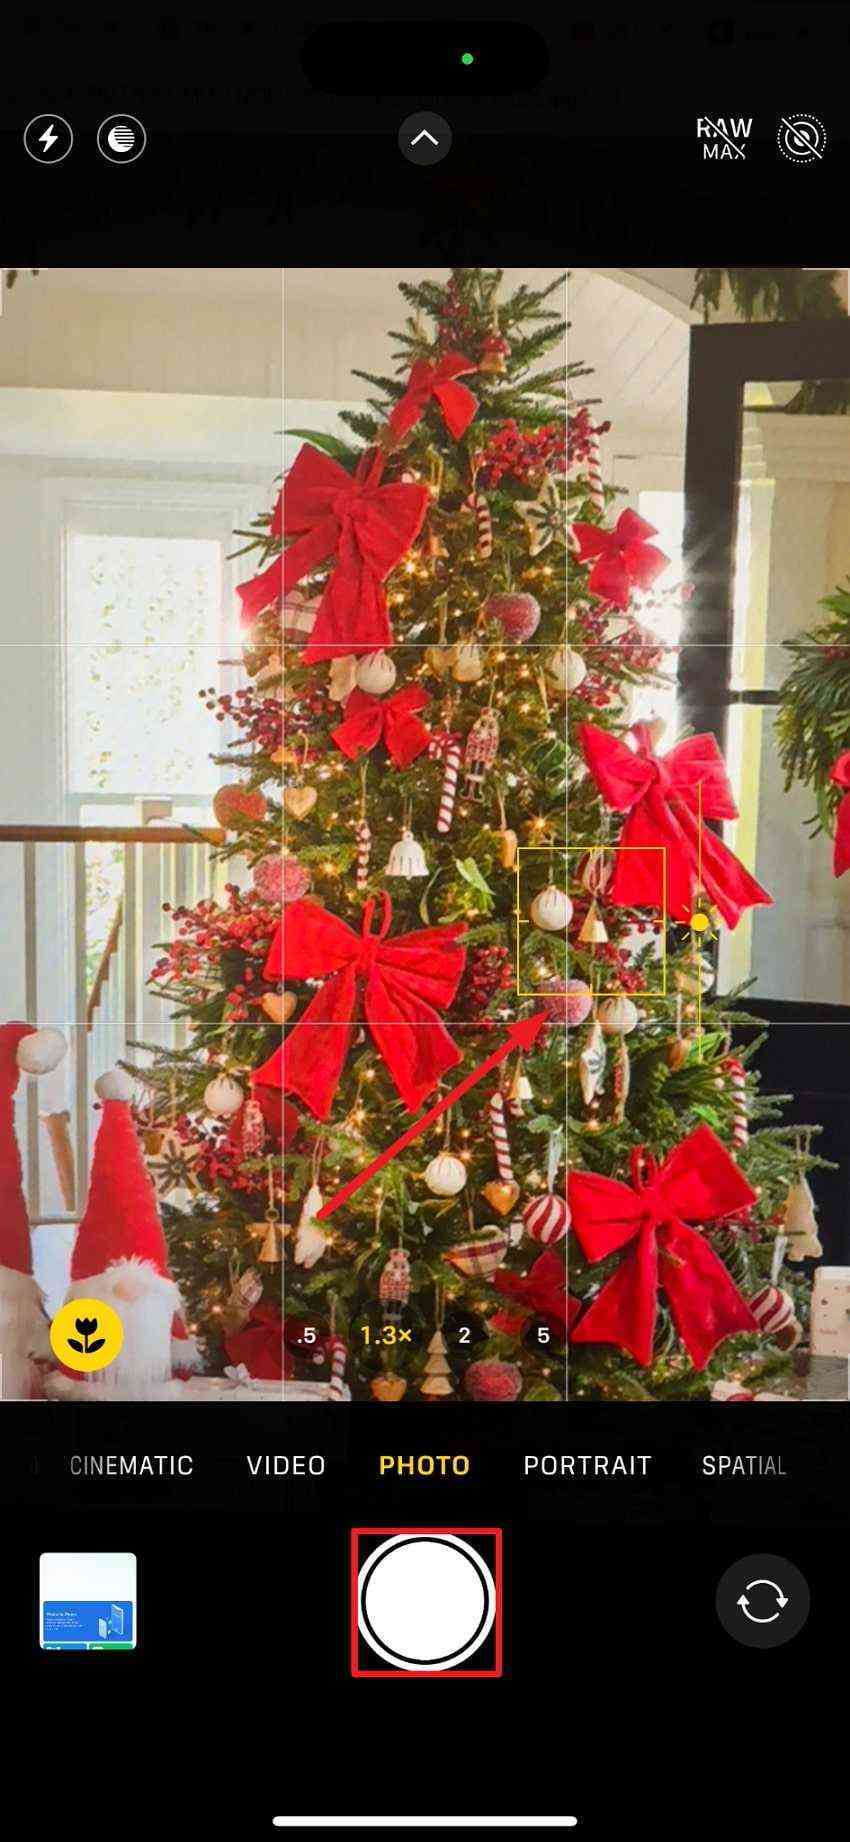
- Adjust Exposure For Bright Lights: Over brightness in your Christmas light images can distort their quality. To prevent this from happening, tap on the brightest part of the tree or lights, then slide the exposure adjustment icon downward to reduce brightness.
- Use HDR For Balanced Lighting: For photos where bright lights and dark backgrounds are both present, enable HDR. This balances the exposure in the scene, ensuring the lights aren't too bright while the shadows remain visible.
Part 2. How To Take Pictures of Christmas Lights/Trees With an iPhone?
After learning about the best camera settings for Christmas photography, you must be equipped with the basic knowledge about taking photos with an iPhone. To learn how to take a picture of your Christmas tree with an iPhone, follow the given step-by-step guide for taking stunning tree shots:
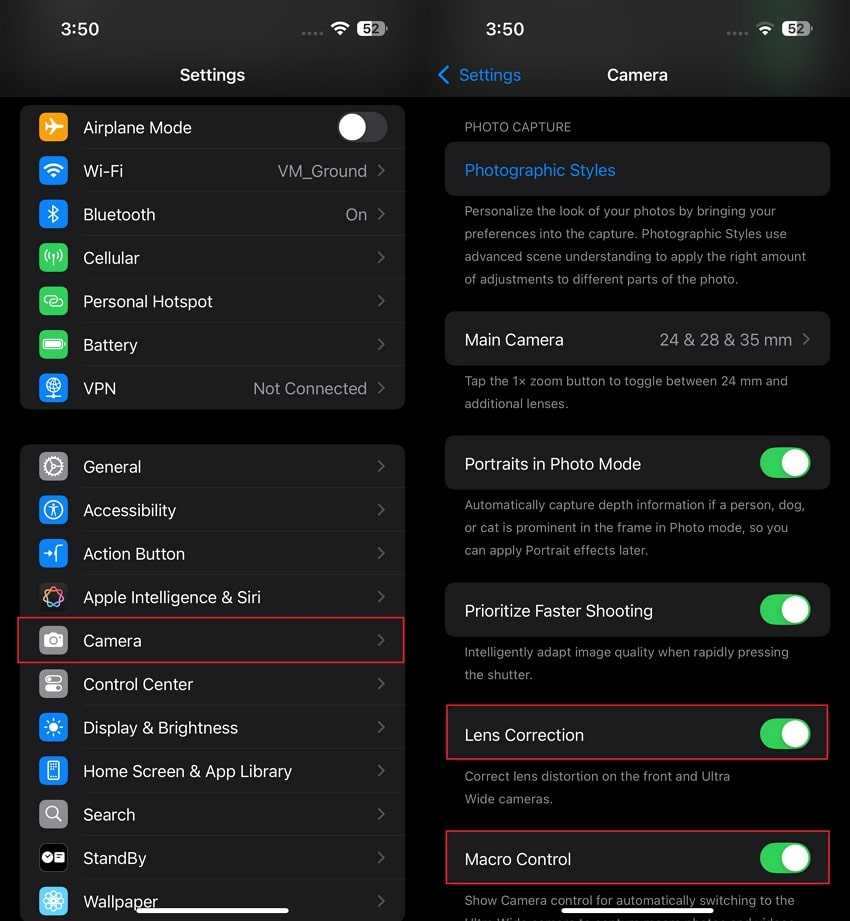
Step 1. Go to your iPhone’s "Settings" menu and scroll down the screen. From the available options, tap on the "Camera" setting and enable the "Lens Correction" feature to fix any lens distortion in your photos. Next, toggle the "Macro Control" to let the camera automatically switch between macro and standard modes. You can even play around with other camera settings to get the desired result.
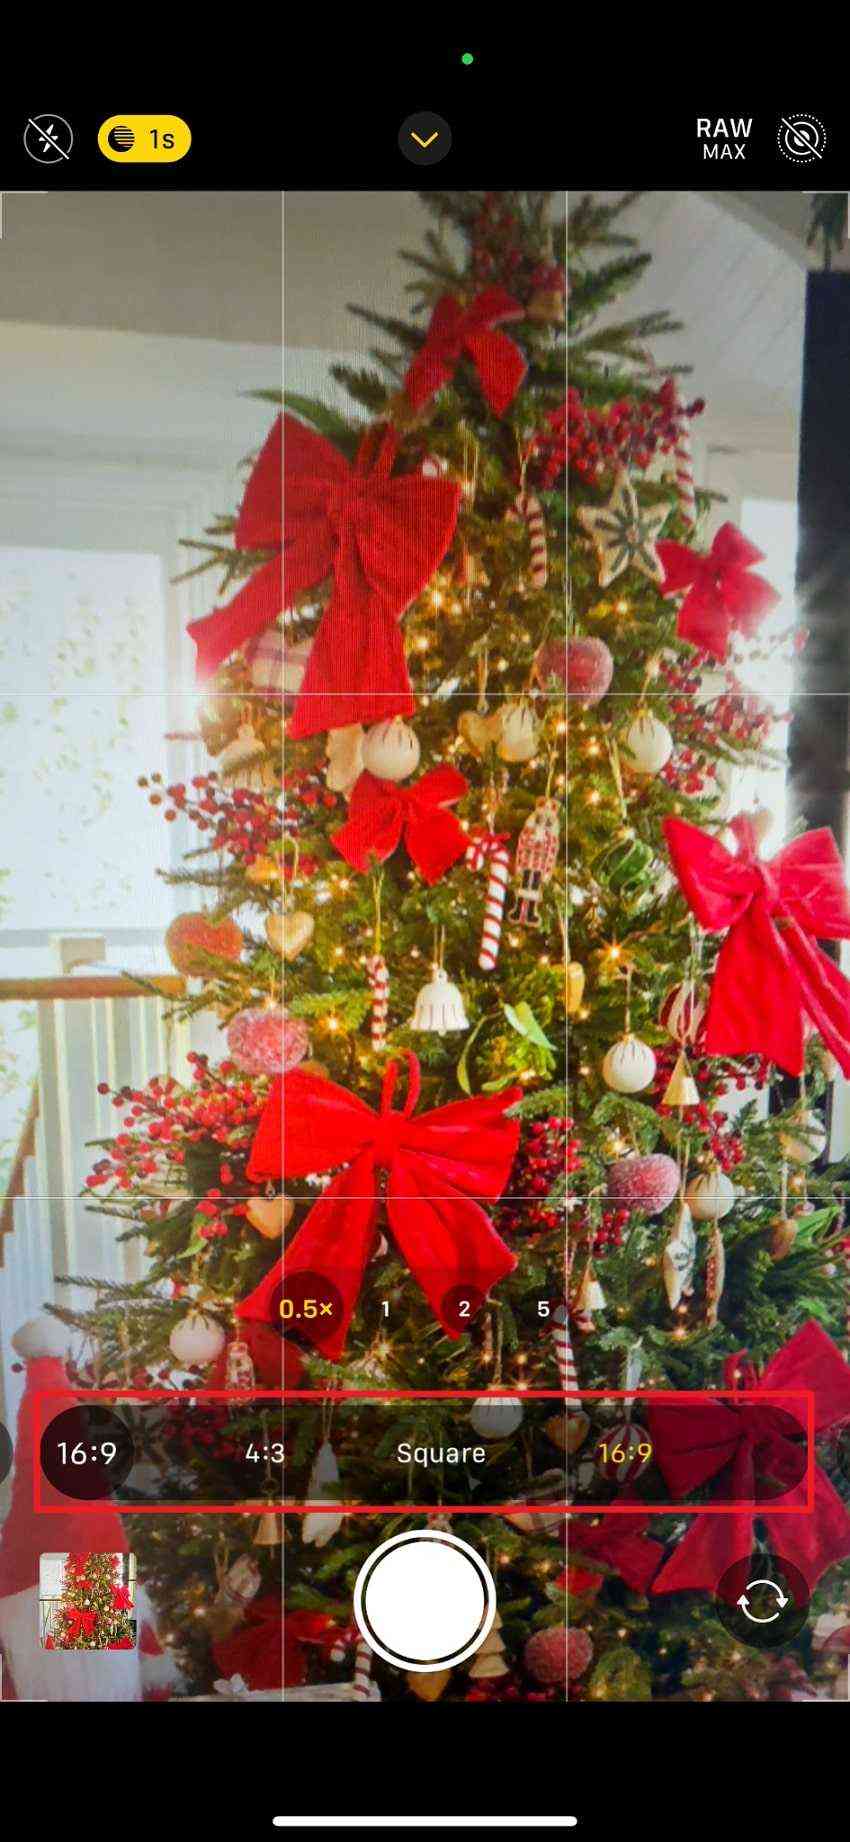
Step 2. Once you’ve applied your desired camera settings, navigate to the "Camera" app and position the camera at the Christmas tree. Then, swipe up on the screen and tap on the "Aspect Ratio" option. Next, select your preferred aspect ratio to frame your Christmas tree according to your desired composition.
Step 3. Again, swipe up on the screen, and new options appear below. From these options, tap the "Moon" icon to enable Night Mode. Once activated, drag the slider left or right to choose between Auto and Max timers.
Step 4. To adjust brightness, tap your finger on the tree to focus, and a slider with the "Sun" icon will appear on the screen. Move the slider up and down to balance the brightness to get the perfect exposure for your photo. After applying iPhone settings for the Christmas trees, press the "Capture" button to take the photo.
Bonus Part. Make a Quick Phone Transfer When Shifting to iPhone: Avoiding Data Loss
After learning about iPhone settings for Christmas trees, you may want to purchase the latest iPhone to take the best pictures. While switching phones, you must also know about the best way to transfer your captured images to your new iPhone. Users looking for a professional app for data transfer to the new iPhone can use the MobileTrans App.
This app allows you to transfer your precious photos, including your Christmas tree shots, from Android to iPhone or between iPhones without the risk of losing any content. Moreover, MobileTrans simplifies the transfer process with a QR-code-based connection, allowing you to link two devices. In addition to photos and videos, you can transfer all types of data, including contacts, messages, and even files.
Advantages
- MobileTrans App also prioritizes privacy and security, ensuring your data stays protected.
- With MobileTrans App, users can even transfer WhatsApp data between iPhones and Androids.
- The transfer process has a fast speed of up to 30MBs to let you transfer even large files within seconds.
- No mobile data is used during the transfer, as it works through a local hotspot.
Guide to Use MobileTrans App For Transferring Christmas Photos to New iPhone
Having established the MobileTrans app as an excellent option for image transfer, it’s time to explore the steps for transferring your precious Christmas photos to your new iPhone. After learning how to take a picture of your Christmas tree with an iPhone, follow this simple guide to transfer your festive memories with ease.
Step 1. Choose the Transfer Direction on the Old Phone
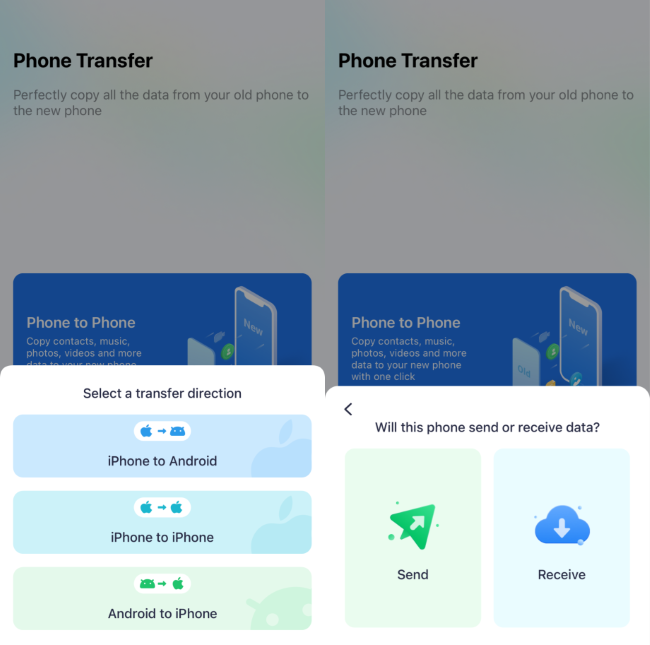
After installing the MobileTrans application on your phone, open it and tap on the "Phone to Phone" option on the sender's phone. Next, choose the "iPhone to iPhone” from the "Select Transfer Direction" bottom-up menu.
Step 2. Start the Photo Transfer on the Sender's Phone
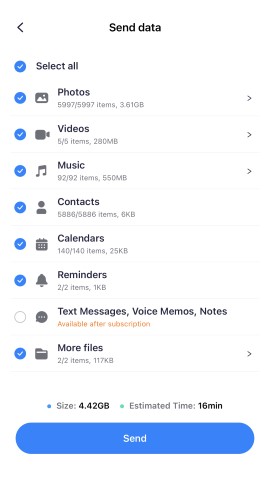
The app will ask you whether this phone will receive or send data. Select "Send" to make your old phone the source device. Then, select the "Photos" option from the new screen before pressing the "Send" button. Next, the app will display a QR code scanning screen to make connections between old and new devices.
Step 3. Connect Old iPhone to New One For Data Transfer
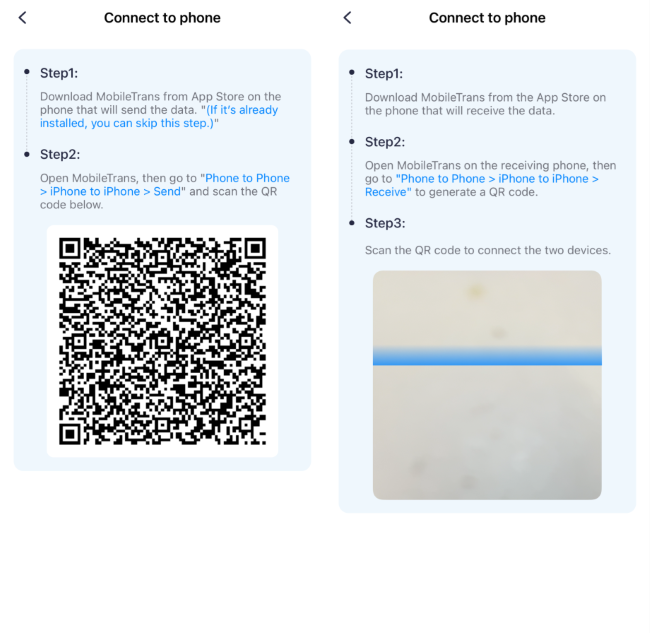
Launch this application on your new phone and tap the "Phone to Phone" option on the main screen. Then, choose "Receive" to make your new phone the receiving device. Lastly, scan the "QR code" displayed on the new phone using your old phone's QR code scanner screen to begin the photo transfer process.
Conclusion
This article guided you on how to take stunning photos of Christmas trees and lights on your iPhone. By following the tips and iPhone settings discussed for Christmas trees, you can capture the magic of the holiday season. Additionally, with the help of MobileTrans, transferring your holiday photos to the new iPhone is a quick and secure process.


