


 TL;DR:
You can transfer iPhone photos to an external hard drive by routing them through a computer using built-in desktop tools or by plugging the drive directly into your phone using a Lightning or USB-C adapter.
● Direct transfers without a PC require newer iOS versions and a compatible connector, allowing you to export unmodified originals directly into the iOS Files app.
● Moving images via iCloud is inefficient for large batches because the web interface lacks a 'Select All' function, forcing users to manually select every single picture prior to downloading.
● Native desktop transfers require specific environments, such as Windows 10 to use the PC Photos app, or Mac OS X 10.3 and newer to utilize the Apple Photos or Image Capture software.
Ask AI for a summary
 ChatGPT
 Perplexity
 Gemini
 Claude
 Grok
Grok
You may be almost running out of space, or you already have. Either way, you need a method for cleaning and clearing your phone’s memory ASAP. An external hard drive is an excellent way to back up photos and other items that take up massive storage.
Thus, it’s essential to know how to transfer iPhone photos to external hard drive. As you'll discover from this guide, it's straightforward. You can do it in many ways, using a computer (Windows or Mac). You can also connect the hard drive directly to your iPhone using an appropriate USB adapter.
Read on to find out which way is best.
In this article
-
- Transfer Photos from iPhone to External Hard drive via MobileTrans
- How to Transfer Photos from iPhone to Flash Drive via File Explorer
- How to Transfer Photos from iPhone to USB Flash Drive on Photos App
- How to Transfer iPhone Photos to External Hard Drive via Image Capture
- How Can I Transfer Photos from iPhone to USB Flash Drive via iCloud?
How to Transfer Photos from iPhone to External Hard Drive with Computer
You can transfer photos from your iPhone to an external harddrive in many ways on a computer. These include the Wondershare MobileTrans software. It's one of the most effective options for quickly copying lots of photos. Besides MobileTrans, you can use File Explorer or the Photos app. You can also use iCloud or the Image Capture feature on Mac.
Let's now jump into the details.
Transfer Photos from iPhone to External Hard drive via MobileTrans
As mentioned, Wondershare MobileTrans - Phone Transfer is fast and allows you to transfer hundreds of photos in minutes. It's one of the most sought-after options. The software streamlines the way we transfer data from the iPhone to any other device. It's very user-friendly.
Wondershare MobileTrans
Transfer Your Photos and Other Data to Computer Easily
- • No data loss. No data leaks.
- • Support various data, including files, photos, videos, apps, contacts, etc.
- • Compatible with thousands of device types acorss Android and iOS.
 4.5/5 Excellent
How do I transfer photos from iPhone to flash drive via MobileTrans? Read the simple steps below:
- Connect your iPhone and the hard or flash drive to the computer. Ensure the connection for both devices is established.
- Install the MobileTrans software on your computer. MobileTrans is supported on both Mac and Windows.
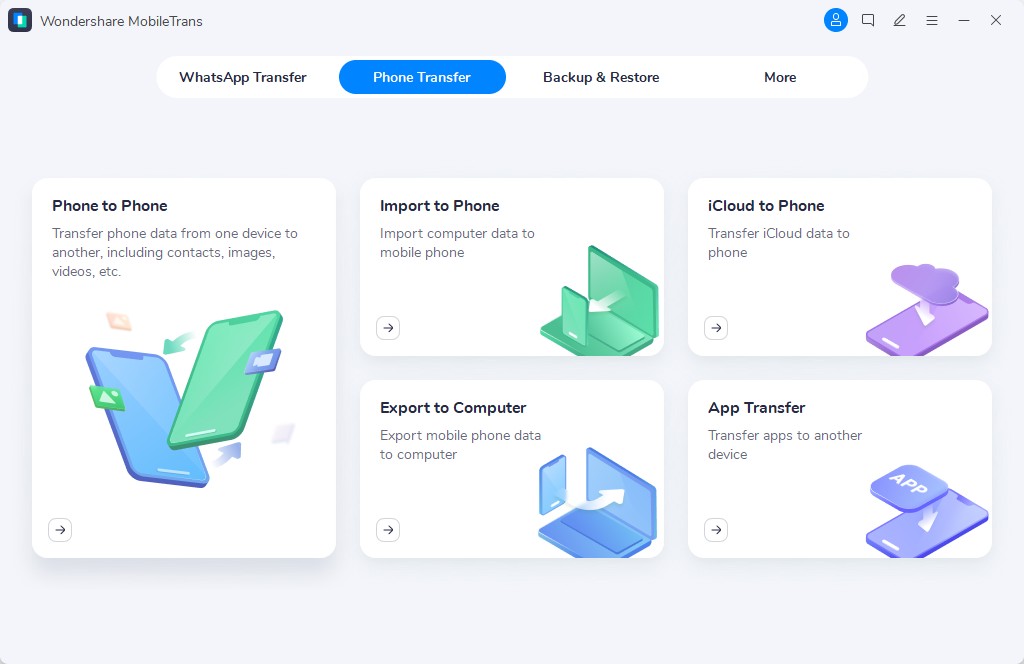
- After the installation, open the software and click the Phone Transfer option. From this interface, choose the Export to Computer option.
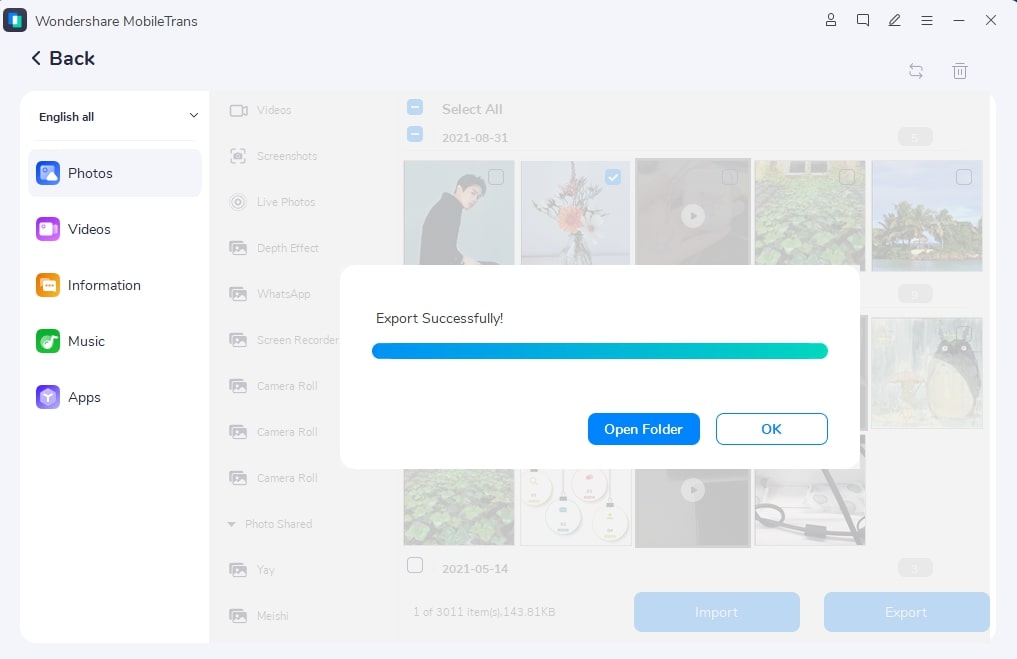
- A window will appear displaying five data types that MobileTrans supports. Click the Photos option on the left sidebar. Then, select the pictures you wish to transfer from your iPhone.

- Once you've selected the pictures, click the Export button to proceed. A window will pop up, allowing you to choose a location where you wish to transfer the file. Opt to save your iPhone photos to the connected hard drive or flash drive.
- Wait a few minutes for the transfer to be completed. After that, you can find all your photos on the external device.
That's how to export photos from iPhone to flash drive or external hard drive. As you can see, it will only take a few clicks!
4.5/5 ExcellentHow to Transfer Photos from iPhone to Flash Drive via File Explorer
You can also use the built-in tools on your computer. One method is to transfer the photos using File or Windows Explorer.
How do I transfer photos from iPhone to USB flash drive or external hard drive via File Explorer? It's also straightforward, as the following steps describe:
- Connect your iOS device and the external hard drive or flash drive to your computer.
- Allow the appropriate permissions on the iPhone.
- Press the Windows + E buttons to open the Windows Explorer.

- If you're on Windows 10, click This PC on the left sidebar. Then, click the iPhone's icon to access the phone's internal storage.

- Go to DCIM to access all the pictures on your iPhone. Select them all, right-click and choose Copy.
- Go to the external hard drive and paste the pictures there.

You can also create a folder for storing your photos on your hard drive or flash drive.
How to Transfer Photos from iPhone to USB Flash Drive on Photos App
You can use the built-in Photos app to transfer your iPhone photos. How do you transfer photos from iPhone to flash drive via the Photos app on Windows 10? Follow these steps:
- Connect your iOS device and the external hard drive to the PC using the appropriate cables. For a flash drive, you don't need a cable - connect it directly.
- Launch the Photos app, which you can access from the Start menu.

- Click Import in the top-right corner.
- Select all the images that you want to import to your flash drive or external hard drive.
- Select your drive from the menu to start the process and wait until it's concluded.
On Mac OS X 10.3 and newer, there's also a Photos app, which replaced iPhoto in earlier versions. This app enables users to transfer photos from iPhone to Mac using a USB cable. Thus, it will also let you copy photos from your iOS device to an external hard drive. You can do so by following the easy steps below:
- Connect your iPhone and the flash or external hard drive to the Mac.
- Run the Photos software on your Mac, then go to the Devices section. Select your iPhone.
- Click the 'Import to' option, then choose to save the imported photos to the external drive.

- Click Import All New Photos or choose the images you wish to copy to the drive. Click Import [number] Selected. You can view the transferred photos from the computer.

How to Transfer iPhone Photos to External Hard Drive via Image Capture
It's far simpler to use the Image Capture feature on Mac than many might think. Here's how to transfer photos from Phone to flash drive or external hard drive through the Image Capture:
- Connect your phone to the Mac using the appropriate cable.
- Agree to Trust the computer for the two devices to connect to each other.
- Launch the Image Capture on your Mac. You can search for it in Finder if this is your first time using it - Go > Applications > Image Capture.

- Choose your iPhone from the menu, and your photos will show on the screen.
- Select your flash drive or external hard drive from the "Import to" menu at the bottom of the screen.
- Click Download All. Your photos will be transferred to your external hard drive.

How Can I Transfer Photos from iPhone to USB Flash Drive via iCloud?
You can transfer pictures from iPhone to flash drive or external hard drive using iCloud on a PC or Mac. It's a great way to move a small number of photos.
But since there's no 'Select All' option, it's inconvenient for large photo transfers. You must select every individual photo before exporting them to your drive.
How do you transfer photos from iPhone to USB flash drive or external hard drive via iCloud? First, you must ensure iCloud Photos is activated on your iPhone:
- Go to Settings on the iPhone, tap your name, and go to your Apple account.
- Tap iCloud > Photos > toggle 'Sync this iPhone' on to store your iPhone photos in iCloud.

Next, you must go to iCloud on your computer to access your photos and transfer them. Follow these steps:
- Open a browser and go to iCloud.com. Sign in to your Apple ID.
- Open Photos in iCloud.
- Connect your external hard drive or flash drive to the computer.
- Select all the photos that you wish to transfer. Click the download icon in the top-right corner.
- Choose your external hard drive or flash drive from the menu and click Save.

How to Transfer iPhone Photos to External Hard Drive Without Computer
If you have no access to a computer at the moment, don't worry. You can transfer photos from iPhone to USB flash drive or external hard drive without a PC. iPhones on newer iOS versions allow direct connection and data transfer with external devices.
You can buy a small USB drive to connect to your iPhone directly. Just ensure it has the correct connection. That can either be a Lightning cable or a USB-C, depending on your iPhone model. Follow these steps to transfer your photos:
- Connect the USB flash drive to your iPhone.
- Launch the Photos app and select all the photos that you wish to transfer.
- Tap the Share icon.
- Select Export Unmodified originals - you'll see the Files app.
- Tap Browse and select your external drive under Locations, then tap Save.

Your photos have now been transferred to the flash drive. You can disconnect the drive from the iPhone.
For an external hard drive, look for a Lightning or USB-C connector, then do the following:
- Use a USB-C or Lightning to connect your iPhone to the external hard drive.
- Grant external device permission to access your iPhone.
- Check the external hard drive location. Open the Files app on your iPhone, then tap Browser. Select 'Locations' at the bottom of the screen to view the external hard drive.
- Move the iPhone photos to the external hard drive. Please navigate to the Photos app and choose pictures, tap the Share icon > Save to Files > On My iPhone. Choose to save photos into your external hard drive.
Conclusion
Transferring photos from an iPhone to an external hard drive is easy, after all! Our guide on how to transfer iPhone photos to external hard drive has discussed many ways to do so. Generally, you can transfer the images with or without a computer.
Before you export photos from an iPhone to a USB flash drive or hard drive, be sure they are worth saving. Remove any that you don't want, then choose one of the methods for moving iPhone photos that works best for you. After that, get ready to take new shots and fill up all that free space you now have!
You may be almost running out of space, or you already have. Either way, you need a method for cleaning and clearing your phone’s memory ASAP. An external hard drive is an excellent way to back up photos and other items that take up massive storage.
Thus, it’s essential to know how to transfer iPhone photos to external hard drive. As you'll discover from this guide, it's straightforward. You can do it in many ways, using a computer (Windows or Mac). You can also connect the hard drive directly to your iPhone using an appropriate USB adapter.
Read on to find out which way is best.
In this article
-
- Transfer Photos from iPhone to External Hard drive via MobileTrans
- How to Transfer Photos from iPhone to Flash Drive via File Explorer
- How to Transfer Photos from iPhone to USB Flash Drive on Photos App
- How to Transfer iPhone Photos to External Hard Drive via Image Capture
- How Can I Transfer Photos from iPhone to USB Flash Drive via iCloud?
How to Transfer Photos from iPhone to External Hard Drive with Computer
You can transfer photos from your iPhone to an external harddrive in many ways on a computer. These include the Wondershare MobileTrans software. It's one of the most effective options for quickly copying lots of photos. Besides MobileTrans, you can use File Explorer or the Photos app. You can also use iCloud or the Image Capture feature on Mac.
Let's now jump into the details.
Transfer Photos from iPhone to External Hard drive via MobileTrans
As mentioned, Wondershare MobileTrans - Phone Transfer is fast and allows you to transfer hundreds of photos in minutes. It's one of the most sought-after options. The software streamlines the way we transfer data from the iPhone to any other device. It's very user-friendly.
How do I transfer photos from iPhone to flash drive via MobileTrans? Read the simple steps below:
- Connect your iPhone and the hard or flash drive to the computer. Ensure the connection for both devices is established.
- Install the MobileTrans software on your computer. MobileTrans is supported on both Mac and Windows.
- After the installation, open the software and click the Phone Transfer option. From this interface, choose the Export to Computer option.
- A window will appear displaying five data types that MobileTrans supports. Click the Photos option on the left sidebar. Then, select the pictures you wish to transfer from your iPhone.
- Once you've selected the pictures, click the Export button to proceed. A window will pop up, allowing you to choose a location where you wish to transfer the file. Opt to save your iPhone photos to the connected hard drive or flash drive.
- Wait a few minutes for the transfer to be completed. After that, you can find all your photos on the external device.
That's how to export photos from iPhone to flash drive or external hard drive. As you can see, it will only take a few clicks!
How to Transfer Photos from iPhone to Flash Drive via File Explorer
You can also use the built-in tools on your computer. One method is to transfer the photos using File or Windows Explorer.
How do I transfer photos from iPhone to USB flash drive or external hard drive via File Explorer? It's also straightforward, as the following steps describe:
- Connect your iOS device and the external hard drive or flash drive to your computer.
- Allow the appropriate permissions on the iPhone.
- Press the Windows + E buttons to open the Windows Explorer.
- If you're on Windows 10, click This PC on the left sidebar. Then, click the iPhone's icon to access the phone's internal storage.
- Go to DCIM to access all the pictures on your iPhone. Select them all, right-click and choose Copy.
- Go to the external hard drive and paste the pictures there.
You can also create a folder for storing your photos on your hard drive or flash drive.
How to Transfer Photos from iPhone to USB Flash Drive on Photos App
You can use the built-in Photos app to transfer your iPhone photos. How do you transfer photos from iPhone to flash drive via the Photos app on Windows 10? Follow these steps:
- Connect your iOS device and the external hard drive to the PC using the appropriate cables. For a flash drive, you don't need a cable - connect it directly.
- Launch the Photos app, which you can access from the Start menu.
- Click Import in the top-right corner.
- Select all the images that you want to import to your flash drive or external hard drive.
- Select your drive from the menu to start the process and wait until it's concluded.
On Mac OS X 10.3 and newer, there's also a Photos app, which replaced iPhoto in earlier versions. This app enables users to transfer photos from iPhone to Mac using a USB cable. Thus, it will also let you copy photos from your iOS device to an external hard drive. You can do so by following the easy steps below:
- Connect your iPhone and the flash or external hard drive to the Mac.
- Run the Photos software on your Mac, then go to the Devices section. Select your iPhone.
- Click the 'Import to' option, then choose to save the imported photos to the external drive.
- Click Import All New Photos or choose the images you wish to copy to the drive. Click Import [number] Selected. You can view the transferred photos from the computer.
How to Transfer iPhone Photos to External Hard Drive via Image Capture
It's far simpler to use the Image Capture feature on Mac than many might think. Here's how to transfer photos from Phone to flash drive or external hard drive through the Image Capture:
- Connect your phone to the Mac using the appropriate cable.
- Agree to Trust the computer for the two devices to connect to each other.
- Launch the Image Capture on your Mac. You can search for it in Finder if this is your first time using it - Go > Applications > Image Capture.
- Choose your iPhone from the menu, and your photos will show on the screen.
- Select your flash drive or external hard drive from the "Import to" menu at the bottom of the screen.
- Click Download All. Your photos will be transferred to your external hard drive.
How Can I Transfer Photos from iPhone to USB Flash Drive via iCloud?
You can transfer pictures from iPhone to flash drive or external hard drive using iCloud on a PC or Mac. It's a great way to move a small number of photos.
But since there's no 'Select All' option, it's inconvenient for large photo transfers. You must select every individual photo before exporting them to your drive.
How do you transfer photos from iPhone to USB flash drive or external hard drive via iCloud? First, you must ensure iCloud Photos is activated on your iPhone:
- Go to Settings on the iPhone, tap your name, and go to your Apple account.
- Tap iCloud > Photos > toggle 'Sync this iPhone' on to store your iPhone photos in iCloud.
Next, you must go to iCloud on your computer to access your photos and transfer them. Follow these steps:
- Open a browser and go to iCloud.com. Sign in to your Apple ID.
- Open Photos in iCloud.
- Connect your external hard drive or flash drive to the computer.
- Select all the photos that you wish to transfer. Click the download icon in the top-right corner.
- Choose your external hard drive or flash drive from the menu and click Save.
How to Transfer iPhone Photos to External Hard Drive Without Computer
If you have no access to a computer at the moment, don't worry. You can transfer photos from iPhone to USB flash drive or external hard drive without a PC. iPhones on newer iOS versions allow direct connection and data transfer with external devices.
You can buy a small USB drive to connect to your iPhone directly. Just ensure it has the correct connection. That can either be a Lightning cable or a USB-C, depending on your iPhone model. Follow these steps to transfer your photos:
- Connect the USB flash drive to your iPhone.
- Launch the Photos app and select all the photos that you wish to transfer.
- Tap the Share icon.
- Select Export Unmodified originals - you'll see the Files app.
- Tap Browse and select your external drive under Locations, then tap Save.
Your photos have now been transferred to the flash drive. You can disconnect the drive from the iPhone.
For an external hard drive, look for a Lightning or USB-C connector, then do the following:
- Use a USB-C or Lightning to connect your iPhone to the external hard drive.
- Grant external device permission to access your iPhone.
- Check the external hard drive location. Open the Files app on your iPhone, then tap Browser. Select 'Locations' at the bottom of the screen to view the external hard drive.
- Move the iPhone photos to the external hard drive. Please navigate to the Photos app and choose pictures, tap the Share icon > Save to Files > On My iPhone. Choose to save photos into your external hard drive.
Conclusion
Transferring photos from an iPhone to an external hard drive is easy, after all! Our guide on how to transfer iPhone photos to external hard drive has discussed many ways to do so. Generally, you can transfer the images with or without a computer.
Before you export photos from an iPhone to a USB flash drive or hard drive, be sure they are worth saving. Remove any that you don't want, then choose one of the methods for moving iPhone photos that works best for you. After that, get ready to take new shots and fill up all that free space you now have!


