


 TL;DR:
If your iPhone is failing to update to iOS 26, you can resolve the issue by verifying hardware compatibility, removing existing beta profiles, or forcing the installation via iTunes or Finder.
● Before attempting the installation, confirm your device supports iOS 26, which includes models from the iPhone 8 up to the iPhone 17 series, and ensure the battery is either charged above 50% or actively connected to power.
● Phones currently running an iOS 26 Beta will not automatically install the final public release until you manually delete the beta configuration profile from the VPN & Device Management settings and restart the device.
● When over-the-air updates fail due to storage limits or Wi-Fi restrictions, you can force the update using the Restore iPhone function in Windows iTunes or Mac Finder, but this method entirely erases your device and requires a prior data backup.
Ask AI for a summary
 ChatGPT
 Perplexity
 Gemini
 Claude
 Grok
Grok
Every iOS upgrade comes under much excitement, as Apple users look forward to new updates and features within their devices. After the launch of iOS 26, many critical analyses have referred to this update. However, with iOS 26 announced for September 2025, critics are now eyeing finding new things in this upgrade.
Amidst the discussion of upgrading iOS on your iPhone, users may face the issue of the iPhone stuck on Install Now or stuck on software update. This article is generally designed to answer the questions related to “why won’t my iPhone update” and how to do it.
Part 1: Why Can’t iPhone Update to New iOS 26 Version
Before coming onto the fixes that would help you update your iPhone to the latest iOS version, it is essential to understand why the iPhone won’t update to iOS 26. Or, sometimes, you can get stuck at preparing update. This accounts for the primary reasons that lead to such a case, which are featured as follows:
1. iPhone Does Not Support iOS Version
The primary reason is whether the iPhone supports the iOS version you tend to update. Usually, iPhones do not update under such circumstances as the iOS version has no support across the device.
2. Lack of Storage
Keep a check on your storage, as it becomes a reason for your device to not update to the latest iOS version. Every update requires space from your device, which, if unavailable, would influence it to halt the process.
3. Wi-Fi Network Restriction
There might be a chance that you may have restricted the network settings across your device, which won't update the iOS on your iPhone. It is necessary to have a stable Wi-Fi network with no restrictions for updating your iOS.
4. iOS Beta Version Not Deleted
A prominent reason for iPhone won’t update to iOS 26 is the beta version that may not have been deleted from your device. With the beta version not deleted, the iPhone won't automatically update to the latest iOS version. Deleting the beta version is necessary to ensure the device's operation.
Part 2: What Should You Do Before Update to iOS?
Before updating your iOS on the iPhone, there are a few things that you should ensure to prevent any irregularities. Rather than getting confused about why won’t my iPhone update, you should look into these precautions to regulate your path into updating your iPhone to the latest iOS version.
1. Back Up Your Data
The first thing you should cover as a significant precaution is to back up your data on the iPhone. Rather than keeping the data on the device, it would help if you also kept it within other sources to prevent data loss. Wondershare MobileTrans provides the perfect interface for backing up the data on your computer. Users can keep all kinds of data with the help of this efficient tool that executes the complete process with ease.
MobileTrans provides a quick procedure that can be catered under a few steps. With an interface supporting all kinds of users, this is a cognitive solution for backing up important data and recovering it.
Check our video tutorial below:
MobileTrans - Backup Phone Data to PC for Free
Back up all content on iPhone to PC quickly and easily. Furthermore, you can restore the backup to any iOS/Android device whenever necessary.
2. Know Risks of iOS Beta
iOS Beta is a great thing to try if you are an enthusiast looking forward to Apple's latest updates. However, while looking into upgrading your device to iOS Beta, you should be aware of the risks that are associated with it. Device performance may be questioned due to this upgrade as there will be many bugs within it that are to be resolved.
Additionally, non-functioning applications will be another significant risk you have to look over. This may occur since the app won’t be supported across this version of iOS. Finally, you may also have to look into the risks of draining the iPhone battery, as iOS Beta can have glitches that can potentially disrupt the functionality of your device.
3. Check Device Compatibility
You should also look into the device compatibility to determine if your device supports the iOS 26 upgrade. The following devices will support this update:
- iPhone 17 series
- iPhone 16 series
- iPhone 15 series
- iPhone 14 series
- iPhone SE (2022)
- iPhone 13 Pro Max
- iPhone 13 Pro
- iPhone 13
- iPhone 13 mini
- iPhone 12 Pro Max
- iPhone 12 Pro
- iPhone 12
- iPhone 12 mini
- iPhone 11 Pro Max
- iPhone 11 Pro
- iPhone 11
- iPhone SE (2020)
- iPhone XS Max
- iPhone XS
- iPhone XR
- iPhone X
- iPhone 8 Plus
- iPhone 8
4. Charge Your iPhone
Another quick thing to consider before updating your iOS is its charging levels. iPhone does not update automatically if the device's battery is lower than 50%. So the perfect thing is to keep your device charged up to 70% for this update. On the other hand, you can also connect your device for charging and start updating it to transfer it to iOS 26 successfully.
Part 3: Fix iPhone Won’t Update to New iOS
If you are still facing the issue of the iPhone not updating its iOS, you may need to look into some necessary fixes to resolve such problems. In this part, we have provided some fixes if iPhone won't download and install an update.
Fix 1: Restart your iPhone
Out of all fixes, the first thing that you can consider for this case is to restart your iPhone. This process generally resolves all issues in the device that are glitchy or hindering its processes. To restart your iPhone, you should follow the simple set of steps shown below:
Step 1: Open the “Settings” of your iPhone and lead to the “General” settings.

Step 2: Scroll down to find the option of “Shut Down” to turn off the iPhone. Once it is turned off, tap and hold your device's “Power” button to restart it.

Fix 2: Delete Beta Version
Since you are looking to delete the beta version of your iOS from the device before the public release of its non-beta iOS version, you will have to look for a proper procedure to delete it from your iPhone. To get yourselves removed from the Apple Beta Software Program, you will have to follow the steps to delete the beta version from your device:
Step 1: Launch the “Settings” of your iPhone and lead to the “General” settings.

Step 2: Find the option of "VPN & Device Management" on the next screen and tap on the configuration profile of the iOS 26 Beta.

Step 3: Locate the “Remove Profile” button on the next screen and restart your device to revert to the previous iOS version installed on your device. You can then update the device to the latest iOS version.

Fix 3: Updating Your iPhone in iTunes
There are many methods to fix the issue of the iPhone won't update iOS 26. Out of the available methods, another convenient technique is to use iTunes if you have a Windows device and an iOS device. Try out the following steps to update your iPhone in iTunes to the latest version:
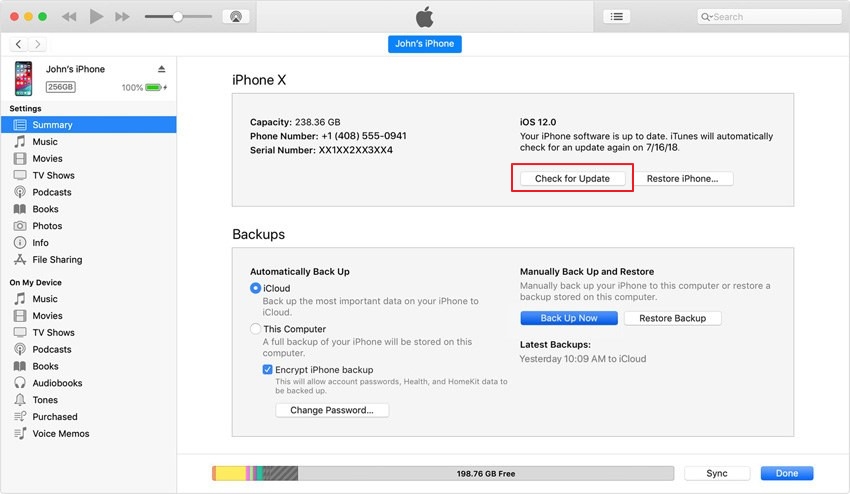
Step 1: Launch iTunes on the computer and connect your iPhone through a lightning cable. As the iPhone gets detected on the platform, click on the “iPhone” button on the top of the window.
Step 2: You will find the “Check for Update” button on the right side of the screen. A pop-up appears on the screen where you have to click the "Download and Update" button to confirm the process.
Fix 4: Updating Your iPhone in Finder
If you are a Mac user, you can use Finder to update the iOS to the latest version. The process is simple and can be covered through the following steps:
Step 1: You need to connect your iPhone to the Mac through a lightning cable. Then, proceed to launch Finder on the device.
Step 2: Find your iPhone under the “Locations” section and click on it. Tap on “Check for Update” and confirm if your iPhone requires to be updated to the latest iOS version.

Fix 5: Restoring Your iPhone in iTunes
Is your iPhone still not updating to iOS 26? iTunes provides another option for restoring your iPhone, essentially updating it to the latest version. This method, however, erases all the data present in the device. Thus, you need to ensure that you back up all the data in your device, as restoring it would erase all the data and settings of the iPhone. Go through the steps to restore your iPhone in iTunes:
Step 1: Open iTunes on your Windows computer and connect the iPhone with a USB connection. As it gets detected, click on the ‘iPhone’ button on the top of the screen.
Step 2: Locate the "Restore iPhone" button on the screen that appears on the front. Confirm the pop-up option on the screen, demanding confirmation to restore the iPhone to the latest version.

Fix 6: Restoring Your iPhone in Finder
You can also use Finder to restore your iPhone to the latest version. If you own a Mac, you must follow the simple steps to restore your device. However, remember to back up your device’s data and settings:
Step 1: Launch Finder on your Mac and proceed to connect your iPhone with the device using a lightning cable.
Step 2: Find the iPhone under the “Locations” section on the left-hand pane. Now, click on "Restore iPhone" and confirm the process. This will restore the device and install the latest available version of iOS on it.

Conclusion
You have a comprehensive overview of how to manage your device if you wish to update it to the latest iOS 26. While getting aware of the precautions and why it won't update, the article has also provided you an overview of fixes resolving the issue of the iPhone won’t update to iOS 26.
MobileTrans - Backup Phone Data to PC in 1 Click
Back up all content on iPhone to PC quickly and easily. Furthermore, you can restore the backup to any iOS/Android device whenever necessary.
New Trendings

Top Stories
All Categories


Axel Nash
chief Editor