Users may see an error while trying to update or restore their iOS device, which can lead to frustration. This error often interrupts users unexpectedly, signaling potential issues with connectivity or software. Therefore, promptly resolving this issue is important to regain access to your data and device functionality.
Whatever the cause, the need to fix it is immediate, and nobody wants to lose precious files or face extended downtime. With the right technique and approach, you can identify the causes of this error to bring your device back to functionality. For this, we will provide some of the best solutions to fix the iPhone that could not be restored 4013 error.
In this article
Part 1. What is the 4013 Error and Why It Happens?
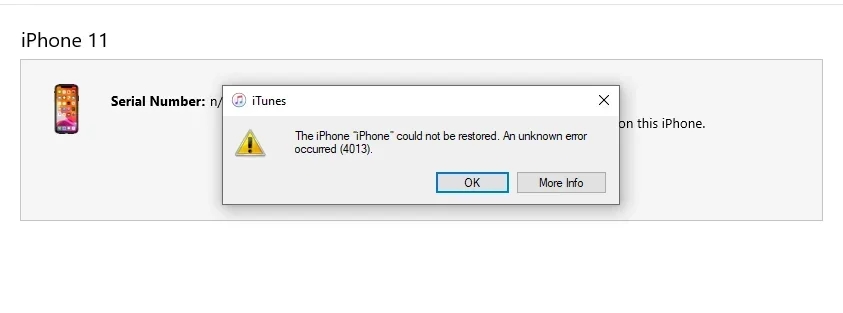
Before moving toward the solution, you need to get some more information about this error and why it happens. As explained before, error 4013 emerges as an unknown error that occurs when you try to update or restore an iPhone or iPad. Below are some reasons that might lead to the “the iPhone could not be restored 4013” error and how they affect your device.
- Damaged Cables or Ports: This interruption often fails the restoration process, which causes error 4013. So, make sure to use an original cable and test different ports to ensure a stable and uninterrupted process.
- Corrupt iOS Update: Sometimes, a corrupt update file can cause issues during installation, which leads you to this error. To avoid this, ensure a stable internet connection and retry the download if the update fails initially.
- Old iTunes Version: This incompatibility can prevent iTunes from completing the restoration process. By regularly updating iTunes, users can communicate effectively with their devices and avoid errors like 4013.
- Limited Storage: Insufficient storage can stop restoration, especially when large files or updates are involved. Freeing up storage and ensuring there is enough space before restoration can resolve this issue.
Part 2. How to Fix “The iPhone Could Not Be Restored 4013” Error?
Now that you understand what causes this error, it’s time to explore some of the best ways to fix it. Upon facing the "iPhone cannot be restored 4013" error, fixes like updating software or forcing a restart of your phone can restore your device. In this section, we will provide you with the best possible solutions to tackle the error efficiently.
Method 1. Try Another USB Cable/Device
One common cause of error 4013 is a faulty USB cable or device. Although a weak connection is often overlooked, it plays a crucial role in restoring your device successfully. To fix this, you should check the USB cable you’re using. It might not provide a stable connection if it’s worn out, frayed, or not an official product.
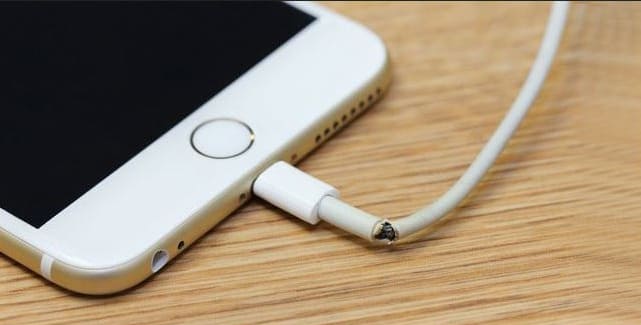
In that case, you need to try switching to a new or certified cable to eliminate this as a potential cause. If the error persists, consider using a different computer for restoration. Sometimes, testing your iDevice with another computer helps rule out compatibility or system issues.
Method 2. Force Restart the iPhone
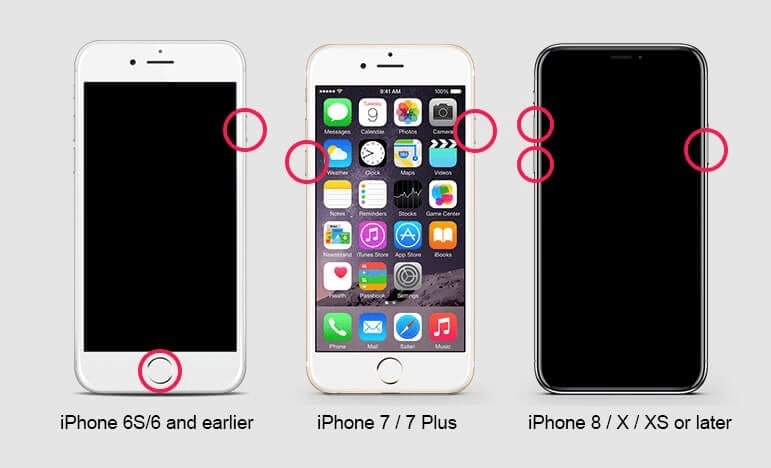
When changing the USB cable or computer doesn't fix the error, the next step is to force restart your device. It can resolve temporary malfunctions or software issues that might be causing the error during restoration. Follow the steps below to learn how to do this to resolve the iPhone could not be restored 4013 error:
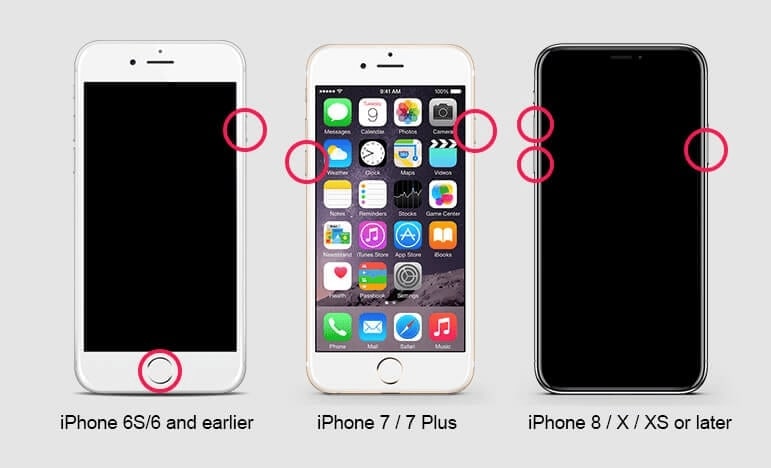
- For iPhone 8 or Later: Swiftly press and let go of the "Volume Up" button and replicate the same action with the "Volume Down" button. Next, keep pressing the "Side" button non-stop until the Apple logo begins to appear.
- For iPhone 7 and 7 Plus: Start the procedure by pressing the "Volume Down" and "Sleep" buttons on your phone's right and left side. Once both buttons are pressed for a few seconds, the famous Apple logo appears to signal a successful restart.
- For iPhone 6s or Earlier: To fix the 4013 error, begin by pressing and keeping pressure on the "Home" and "Sleep/Wake" buttons of your device. Once the logo appears, you can let go of the buttons, and your phone will finish restarting.
Method 3. Update the iTunes and Windows Version
If force restarting doesn’t resolve the issue, outdated software might be the cause of this error. Whether you are using iTunes or Windows operating system, you need to be updated to maintain compatibility during restoration. In the following steps, we’ll guide you on updating iTunes and Windows to resolve the 4013 error without complications.
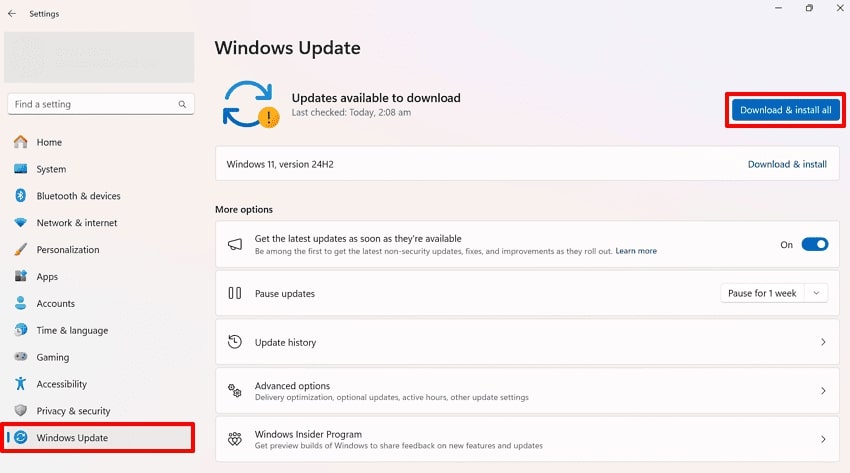
Update Windows
Instruction: Go to the Settings app on your computer and access the "Update And Security" tab. Upon accessing it, a message will pop up telling you that a system update is available for installation. To install the update on your system, simply click the "Download & Install All" button.
Update iTunes
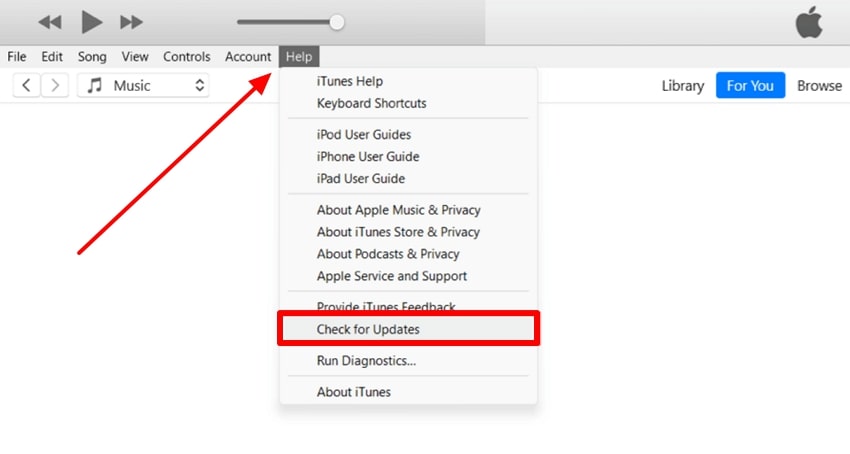
Instructions: You need to launch “iTunes" on your preferred desktop to access its main interface. Then, click the "Help" tab in the top toolbar on the screen. Next, press the "Check for Updates" option from the newly appeared drop-down menu. Upon accessing the popup, hit the "Install" button to update your iTunes and resolve the iPhone cannot be restored 4013 error.
Method 4. Use the iPhone Repair Tool to Fix Error 4013 Without Data Loss
When conventional methods like restarting or updating fail, a repair tool becomes the most reliable solution to fix this error. These tools are specially designed to resolve complex system issues without erasing your valuable data. Among the top tools available, we recommend Dr. Fone – System Repair (iOS), designed to restore your device functionality without the hassle of factory resets or data recovery later.
This software simplifies the repair process with two advanced modes tailored for different levels of system issues. Standard Mode is designed to resolve common problems, such as update failures or error 4013, without affecting your data.
For more complicated cases, the Advanced Mode performs a deep scan to ensure even complex issues are effectively fixed. Thus, follow the steps below to understand how to use this tool to fix the iPad could not be restored 4013 error.
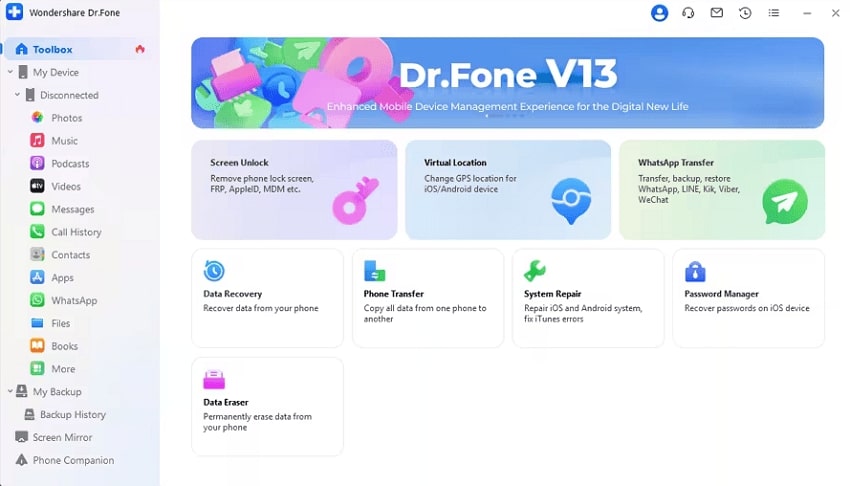
Step 1. Commence by downloading the latest version of Dr.Fone – System Repair (iOS) on your PC. Afterward, you need to open the software to access its main interface. Next, click the "Toolbox" option in the left panel to access its features. After that, select the "System Repair" feature and link your iOS gadget to your computer in order to move further.
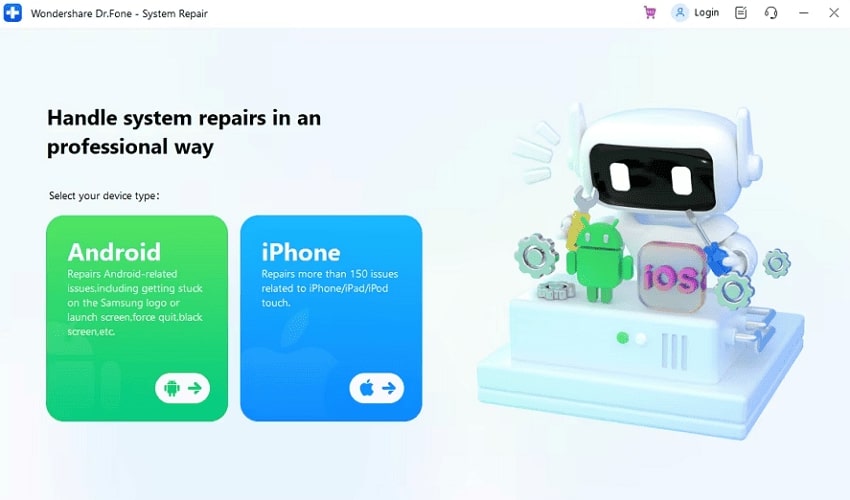
Step 2. Upon connecting, choose the "iPhone" option under the "Select your Device Type" section. Next, you need to choose "iOS Repair" from the available options on the screen. Now, click "Standard Repair" mode on the following screen that pops up.
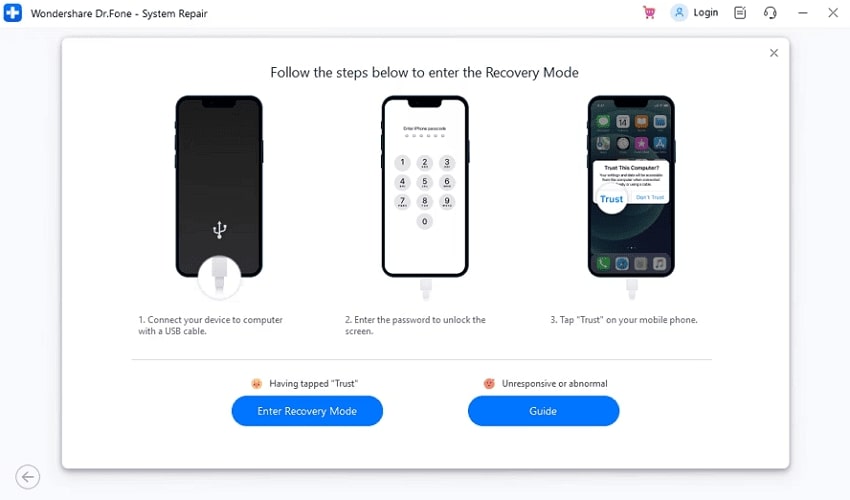
Step 3. Following this, place your iOS device in "Recovery Mode" and use the "Enter Recovery Mode" button to obtain the appropriate firmware for your iOS model. The upcoming window will offer various firmware options for you to download and fix your 4013 error.
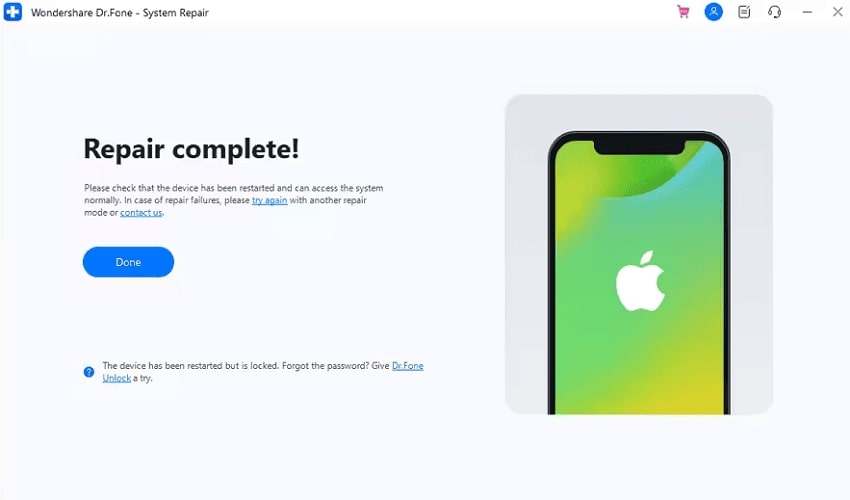
Step 4. After installing the firmware, hit the "Repair Now" button to begin the repair process and show a loading screen. Following extensive repairs, the final screen will display the message "Repair Completed!" prompting you. Now, you have to press the "Done" button to finish the procedure.
Method 5. Try iTunes Recovery Mode
If the 4013 error persists even after attempting the above methods, iTunes Recovery Mode offers another effective solution. This mode allows you to restore your device by bypassing the normal boot process, which can resolve system-level errors. It’s a great option when other methods have not worked, as it can fix deeper software issues without causing data loss. Below, we'll explain how to do this to fix an iPhone that could not be restored 4013 error.
Step 1. Inaugurate by connecting your mobile device to the computer using a USB cable. When your phone is connected, you need to enter Recovery Mode. To accomplish this, you can choose to do it for various phone models in the following manner.
- For iPhone 8 Series or Later: Start by promptly pressing the "Volume Up" button and then letting it go. Afterward, you must promptly press the "Volume Down" button before releasing it. Next, continuously hold down the "Side" button until the recovery mode screen appears on your PC.
- For iPhone 7 or 7 Plus: To execute this action, simultaneously press and maintain the pressure on the "Volume Down" and "Sleep" buttons. Then, transitioning to a black screen on the phone indicates that the recovery mode has been accessed.
- For iPhone 6 or Earlier: Press both the "Home" and "Sleep/Wake" buttons simultaneously with constant pressure. Keep this until you are able to see the Recovery Mode screen on your cellphone.
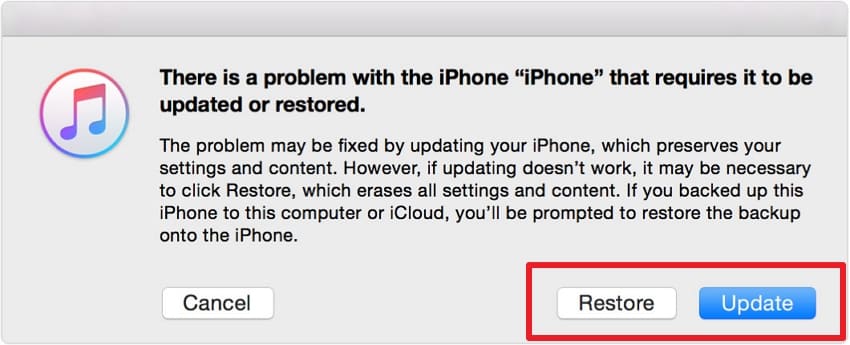
Step 2. Following this, open the iTunes application on your computer. A message will pop up asking if you prefer to update or restore your mobile device. You can select "Update" from this point to try resolving the iPhone cannot be restored 4013 error.
If this method is not successful, you can select "Restore" as an alternative. However, users should be aware that this option will delete all information on their devices.
Method 6. Factory Reset Your iPhone
When none of the methods work, it is time to reset your iOS device to restore it to factory resetting. By doing so, you will be able to get rid of any persistent errors. To follow through with this task, go through the instructions explained below:
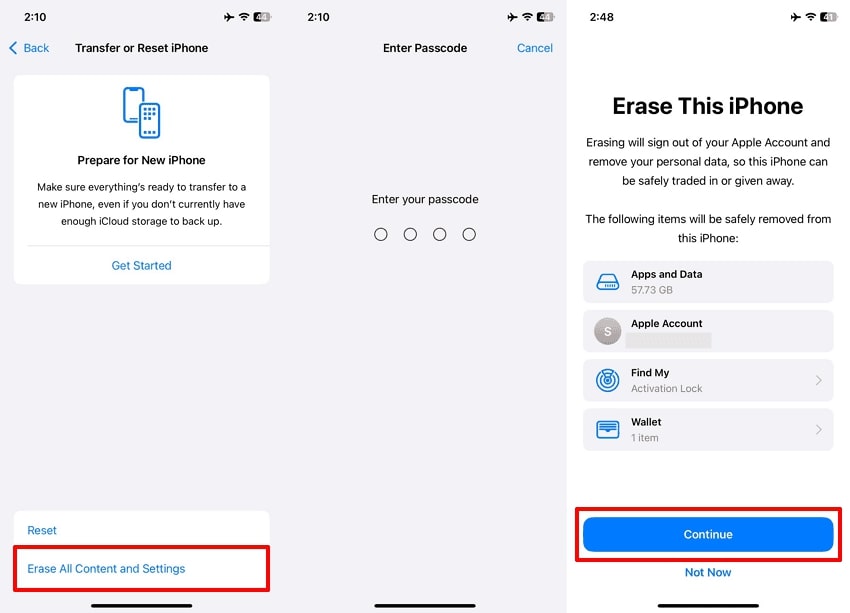
Step 1. To commence the process, open the "Settings" app on your phone. Next, choose the "General" option and scroll to the bottom. After that, you need to tap the "Transfer or Reset iPhone" option.
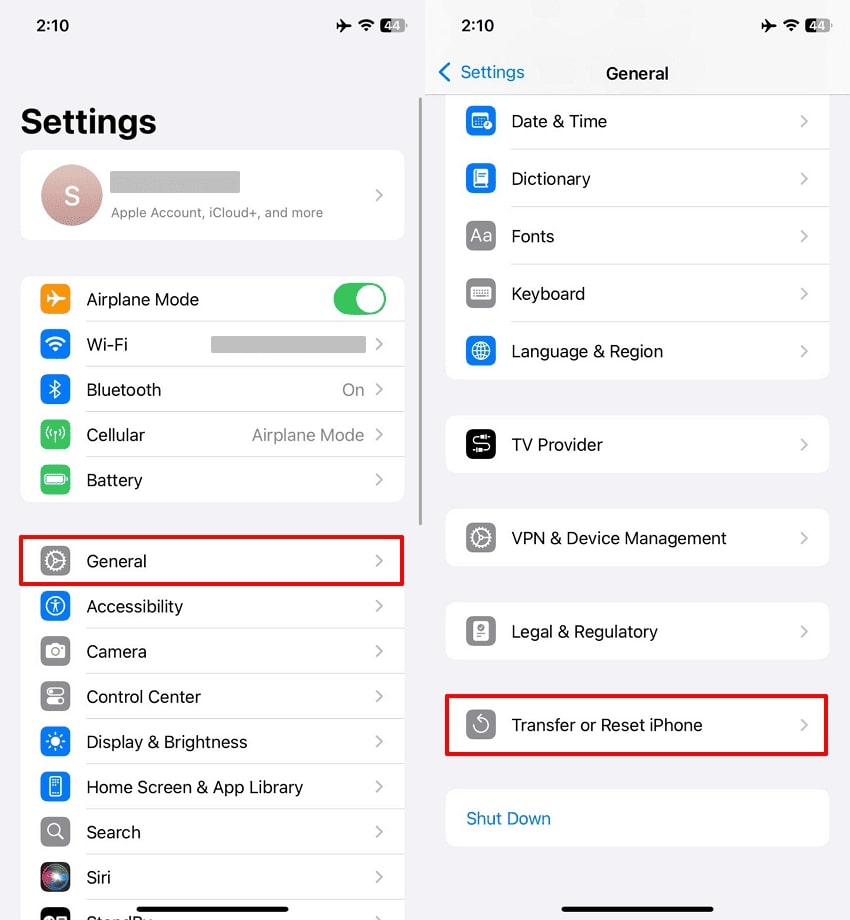
Step 2. Moving forward, tap once more on the "Erase All Content and Settings" option on the screen. After that, you need to input your device password to proceed. Upon accessing the newly appeared screen, hit the "Continue" button to follow the onscreen instructions for factory resetting your phone.
Part 3. How to Restore Your iPhone Data Using iTunes Backup?
After resolving error 4013 and restoring your device's functionality, recovering your valuable data is the next step. This ensures you regain access to all files and settings that were previously stored. For this, utilizing a comprehensive backup solution like iTunes can simplify the process. However, traditional iTunes recovery can be time-consuming and limited in flexibility.
To cater to these needs, we recommend Wondershare MobileTrans as the best of all the other alternatives. This tool offers flexible restoration and lets you recover specific files instead of having to do the entire backup. Alongside that, users can restore data from previous backups without overwriting existing content. It ensures complete security and preserves all content, including multimedia and contacts, during restoration.
Powerful Features
- Data Backup: Besides restoring data, you can create full or selective backups of device data, including contacts and media files.
- App Transfer: Users can migrate all their applications, like WhatsApp and WeChat, from one device to another.
- Flexible Data Management: This tool supports flexible data transfer or restoration, which enables users to customize their data handling process.
- Phone-to-Phone Transfer: Using this robust data management app, users can transfer all their mobile data to different mobile or operating systems.
Wondershare MobileTrans
Restore Your Data to Phone Easily
- • No data loss. No data leaks.
- • Support various data, including files, photos, videos, apps, contacts, etc.
- • Compatible with thousands of device types acorss Android and iOS.
- • Restore from iTunes with simple steps.

 4.5/5 Excellent
Manual to Restore Your iPhone Data Using iTunes Backup via Wondershare MobileTrans
After fixing the iPhone could not be restored 4013 error, follow the comprehensive instructions below to restore your data from iTunes backup using this tool:
Step 1. Launch this Advanced Tool to Initiate the Process
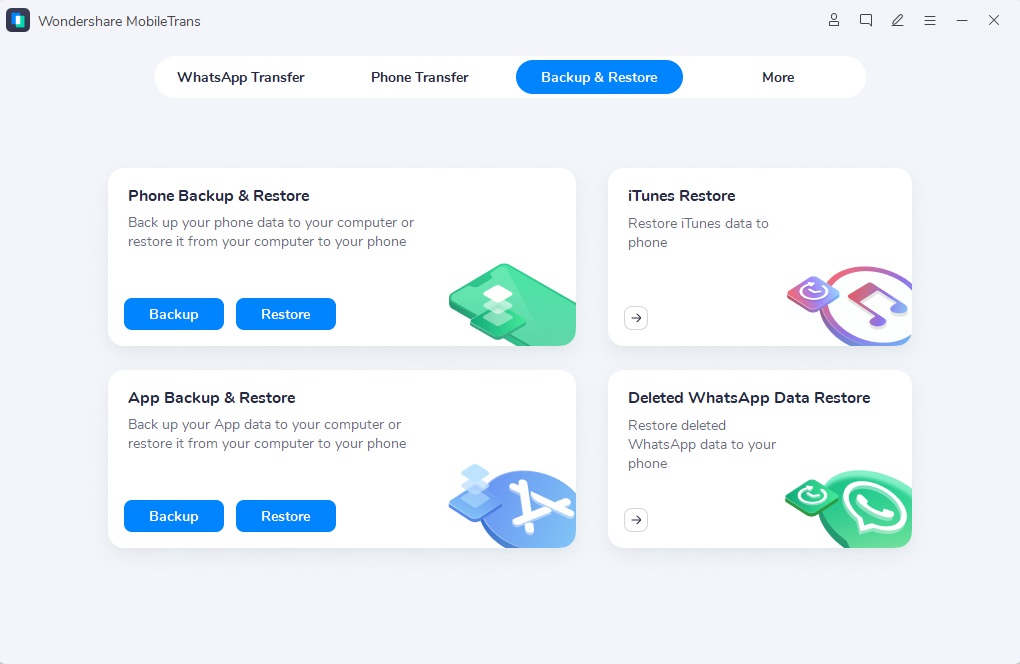
To begin, download Wondershare MobileTrans and open it on your preferred desktop. Afterward, navigate to the "Backup & Restore" tab from the main interface. Upon accessing it, click the "iTunes Restore" option to move further.
Step 2. Select the Data File for Restoration
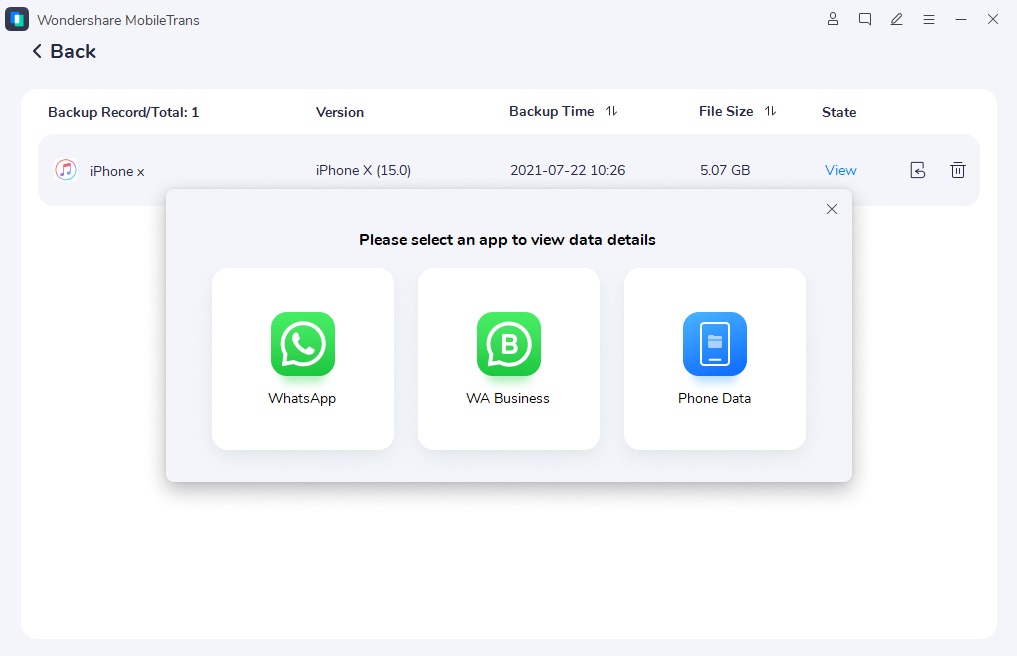
Now, connect your phone on which you want to restore backup to your computer. Upon entering the Restore page, a range of data and backup options will be presented to you. You will need to choose between various backup options to access the iTunes backup file.
Step 3. Restore the Data in Your Phone
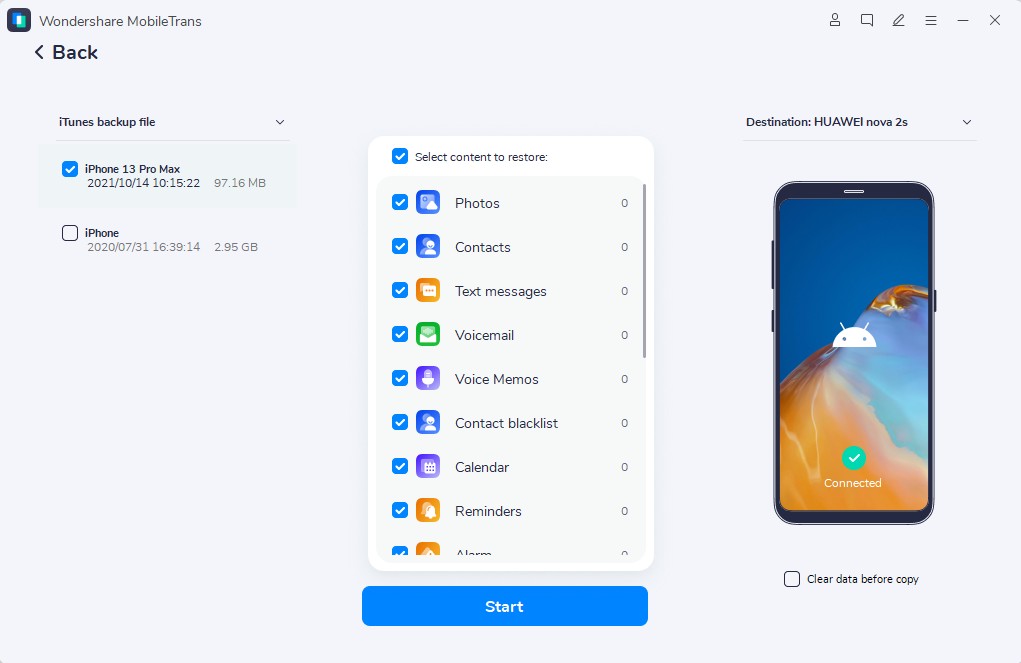
Afterward, every data in the backup file will be displayed on the window as soon as it is opened. Now, press the “Start” button once you have selected the necessary files for restoration. After that, a window will appear to show the progress, and once it's complete, you can disconnect your phone.
Conclusion
To sum up, error 4013 can be manageable with the right technique and approach. Methods like updating your tools or employing specialized software like Dr.Fone – System Repair (iOS) are effective solutions to restore your device. Once the "iPad could not be restored 4013 error" is resolved, data restoration becomes a priority. While iTunes offers a standard recovery option, it may lack flexibility and ease.
This is where Wondershare MobileTrans proves to be a superior solution to cater to these needs. The tool offers comprehensive data backup and restoration features beyond basic recovery. It ensures your information is restored securely without any unnecessary complications.


