PC to iPhone Transfer
- Transfer photos, videos and more from Android or iOS device to Computer.
- Transfer 5 types of data from computer to mobile devices directly.
- Transfer 18+ types of data including messages, photos. videos, and more.
How to Transfer Videos from PC/Laptop to iPhone [5 Easy Ways]

Written By Navkiran Dhaliwal |


 TL;DR:
To bypass enhanced security steps on newer devices like the iPhone 17 running iOS 26, use MobileTrans for fast transfers of files over 4GB, or utilize a direct USB connection to the DCIM folder if you prefer a manual, software-free approach.
● For optimal compatibility, convert videos to MP4 format using the H.264 codec before transferring, though iPhones natively support MP4, MOV, and M4V formats.
● Wireless transfers via iCloud require the latest Windows OS version on your PC and are restricted by a 5GB free storage limit, making this method primarily suited for smaller files unless you have a paid subscription.
● When executing a manual USB transfer without iTunes installed, you must tap the Allow this device to access photos and videos prompt on the iPhone to expose the required DCIM folder to your Windows system.
Ask AI for a summary
 ChatGPT
 Perplexity
 Gemini
 Claude
 Grok
Grok
The compatibility between Windows and iPhones is not seamless. Transferring photos and videos from a PC to an iPhone can be daunting for tech-savvy individuals, let alone beginners who may not know how to do it. This is especially true for users of the latest iPhone 17 and iOS 26, where enhanced security features may add extra steps if you’re unfamiliar with the process.
Worry, no more! Scroll down to find how to transfer video from PC to iPhone Camera roll.
Method 1: Transfer PC Videos to iPhone via MobileTrans [Best Choice]
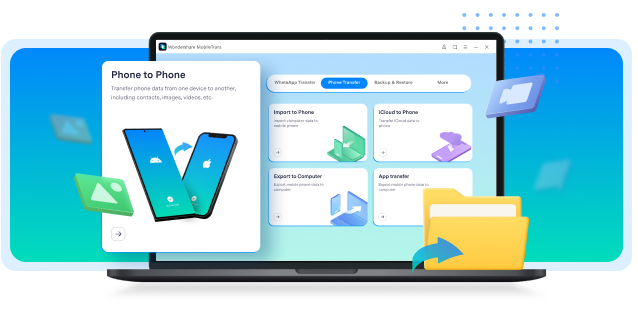
Using a specialized third-party tool is the most efficient method to transfer videos from a PC to an iPhone. However, not all PC to iPhone apps are created equal. You need the best of the best to ensure a fast and secure transfer. MobileTrans is the ultimate solution for any transfer need, whether iPhone to PC, iPhone to iPhone, Android to PC, or any combination.
With MobileTrans, you can transfer up to 5 types of files from your PC to your phone. You can also transfer videos between Android and Mac.
Wondershare MobileTrans
Transfer Videos from Computer to iPhone With a few Clicks!
- • Transfer photos, music, videos, and more from PC (Windows & Mac) to iPhone.
- • Backup 18+ data types from Android and iPhone to PC (Windows & Mac).
- • Supports transfer 18+ types of data between 6000+ mobile devices.
- • Support transfer of WhatsApp data between Android and iOS devices.
- • Support the latest iOS 26 and Android 16.
 4.5/5 Excellent
How to transfer photos and videos from PC to iPhone?
Step 1. Visit the official website of MobileTrans and download it on your Windows/Mac computer.
- Open the application.
- On the main interface, choose Phone Transfer.
- Under Phone Transfer options, choose Import to Phone.

Step 2. Connect the iPhone to the PC.
- You can connect the iPhone to the computer via a lightning cable.
- On the warning message on your iPhone — tap Allow.
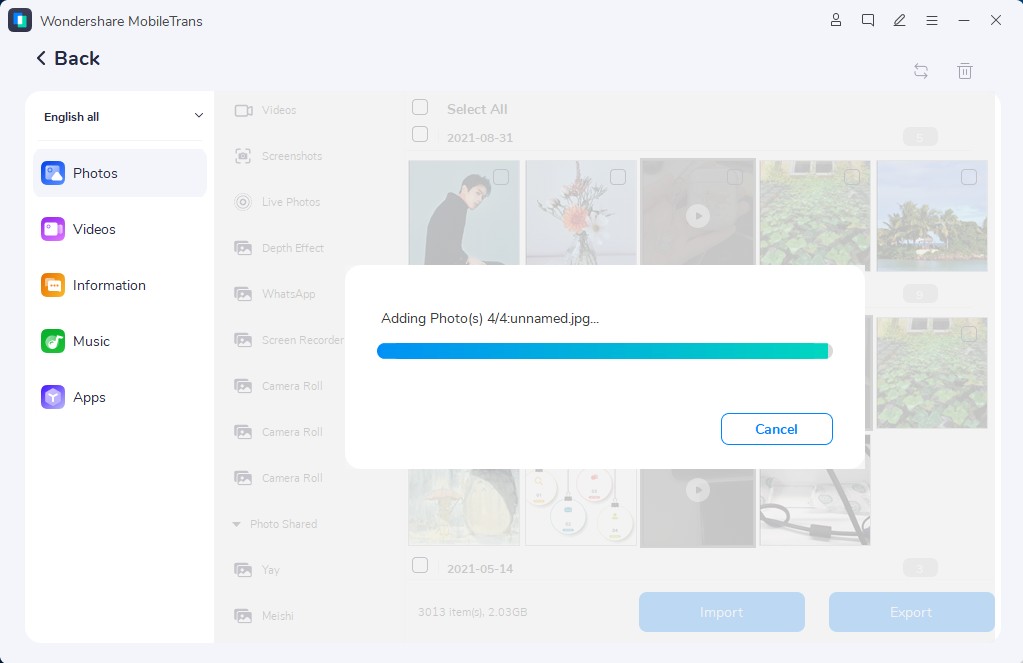
- Hit the import button and select all the photos and videos that you want to transfer from PC to iPhone.

Step 3. Once you've imported videos to MobileTrans, clock on Select all, then hit the Import button again to transfer the video files. The progress bar will show you the number of files that has been imported successfully.
As mentioned earlier, you can transfer photos and videos from PC to iPhone within three easy steps using MobileTrans. Of course, you will also find other ways to import photos and videos from PC to iPhone.
If the videos are not playing on your phone, try easy methods to resolve the issue first. Click on the link to learn more.
- Pros:
- • Fast and efficient transfer speed
- • Supports multiple file types (photos, videos, music, etc.)
- • User-friendly interface
- • No quality loss during transfer
- • Works with both Windows and Mac
- Cons:
- • Requires installation of third-party software
- • Some features require premium subscription
Method 2: Send Videos from PC to iPhone via iTunes
Step 1. Connect the Windows computer to the iPhone using the lightning cable.
- If you see a ‘Trust this computer’ prompt on the iPhone — ensure to click on Trust.
- Navigate to iTunes on the computer and choose the iPhone icon on the upper-left of the screen.
Step 2. Choose the Photos option from the left pane.
- On the right pane, check the box assigned to Sync Photos from the option.
- Choose to sync “All folders” or just “Selected folders” options. Plus, check the box assigned to Include videos
If you have selected All folders options, all the folders, including the multimedia files (Photos + Videos), will get added automatically. On the other hand, if you choose Selected folders, you will have to choose the subfolders containing the photos and videos from PC to iPhone.
Step 3. Choose the “Done” button.
- And choose the “Apply” option.
iTunes will then sync your photos to your iPhone, depending on the size. Wait for the transfer to get completed.
- Pros:
- • No additional software required (uses built-in iTunes)
- • Official Apple solution
- • Free to use
- • Supports batch transfers
- • Works with both Windows and Mac
- Cons:
- • Requires iTunes installation
- • Slow transfer speed for large files
- • May require iTunes updates
- • Limited to photos and videos only
- • Can be complicated for beginners
Method 3: Transfer Videos from PC to iPhone with iCloud
However, you will have to ensure that all Windows has the latest version of the OS you are running on the device.
Here’s how to transfer photos and videos from computer to iPhone via iCloud:
- Open the web browser on your computer.
- Visit iCloud.com from the computer that contains the photos and videos you want to transfer.
- Sign in via your Apple ID credentials linked to the particular iPhone device.
- Choose Photos and Videos.
- Click on the Upload icon — at the upper-right corner of the interface.
- Choose all the photos and videos you want to upload from the computer. (You can use the CTRL key and select multiple files at once.
- Choose Open after selecting the photos and videos file.
Wait for the file to upload. Now, hover over the iPhone device and download the photos and videos from the iCloud app on the iPhone. That's how to transfer videos from PC to iPhone camera roll.
- Pros:
- • No additional software required (uses built-in iCloud)
- • Wireless transfer
- • Works across multiple Apple devices
- • Free to use (with 5GB free storage)
- • Automatic backup and sync
- Cons:
- • Limited free storage space (5GB)
- • Requires stable internet connection
- • Slow upload/download speeds for large files
- • May require iCloud storage subscription for large transfers
- • Limited to Apple ecosystem devices
Method 4: Move Videos from Computer to iPhone with Cloud Storage Services

Step 1. Upload Videos to Cloud Storage:Choose a cloud storage service like Google Drive, Dropbox, or iCloud Drive on your PC. Upload the videos you want to transfer to the cloud storage service by signing in to your account and following the upload instructions.
Step 2.On your iPhone, download and install the corresponding app for the cloud storage service you used. Sign in to your account within the app to access your uploaded videos.
Step 3.Locate the videos you uploaded on the cloud storage app on your iPhone. Select the videos you want to transfer to your device and choose the option to download them for offline viewing.
Step 4.Once the videos are downloaded to your iPhone, you can manage them within the cloud storage app or move them to your camera roll or another folder for easy access.
By utilizing cloud storage services, you can conveniently transfer videos from your PC to your iPhone without the need for physical connections, allowing you to access your videos on the go with ease.
- Pros:
- • No additional software required (uses existing cloud services)
- • Wireless transfer
- • Works across multiple devices
- • Free basic storage available
- • Automatic backup and sync
- Cons:
- • Limited free storage space
- • Requires stable internet connection
- • Slow upload/download speeds for large files
- • May require subscription for large transfers
- • Dependent on third-party service reliability
Method 5: Transfer Photos and Videos from PC to iPhone Manually
Follow these simple steps to send videos to iPhone from PC via USB cable:
- Start by connecting the iPhone to PC using the USB cable.
- If you have iTunes installed on the computer — you will see Trust this device prompt on the iPhone screen. Choose Trust to proceed.
- If you don’t have iTunes installed on the computer, you will see “Allow this device to access photos and videos” warning flash. Choose Allow to proceed.
- After connecting the iPhone to PC successfully, navigate to the computer.
- From the left pane, choose the connected iPhone.
- Apple does not allow you to access anything besides Photos and Videos — so you will only find the DCIM folder.
- Simply navigate to the folder where the desired videos and photos are stored.
- Right-click on the after selecting the files.
- From the drop-down menu options, choose to Send to.
- Under Send to option — choose the iPhone device.
Once you click the Send to option, it will take some time for Windows import photos and videos to the iPhone.
- Pros:
- • No additional software required
- • Direct USB connection
- • Free to use
- • Works with both Windows and Mac
- • No file size limitations
- Cons:
- • Requires USB cable connection
- • Slower transfer speed
- • Limited to photos and videos only
- • Can be complicated for beginners
- • Manual process required
FAQ
Q: What video formats are supported when transferring from PC to iPhone?
A: iPhone supports most common video formats including MP4, MOV, and M4V. For best results, convert videos to MP4 format using H.264 codec before transferring.
Q: Why is my iPhone not showing up on my PC when connected?
A: Make sure you're using a working Lightning cable and that your iPhone is unlocked. You may also need to trust the computer on your iPhone when prompted. Try a different USB port or cable if the issue persists.
Q: Can I transfer videos larger than 4GB to my iPhone?
A: Yes, iPhones support videos larger than 4GB. However, some transfer methods like iTunes may have limitations. Using MobileTrans or cloud services is recommended for large video files.
Q: Will transferring videos from PC to iPhone reduce their quality?
A: No, when using proper transfer methods like MobileTrans or direct USB transfer, the video quality remains unchanged. Avoid using compression tools during the transfer process.
Q: How long does it typically take to transfer videos from PC to iPhone?
A: Transfer time depends on file size and method used. A 1GB video might take 1-2 minutes via USB, while cloud transfers can take longer depending on your internet speed.
Q: Do I need to install any special software to transfer videos?
A: While you can use built-in options like iTunes or iCloud, dedicated software like MobileTrans offers faster transfers and more features without requiring technical knowledge.
Conclusion
There you go! Thats all the five methods for transferring photos and videos from PC to iPhone.
There is nothing wrong with the other methods mentioned. Still, the iTunes method will take time because you must update the iTunes app and Windows OS before moving the files from the computer to the iPhone. And the iCloud storage could take hours, depending on the files.
So, long story short — use MobileTrans.
New Trendings

Top Stories
All Categories


Navkiran Dhaliwal
staff Editor