


 TL;DR:
To transfer photos from a Samsung phone to a USB stick, connect both devices to a PC to move files via Windows Explorer or MobileTrans, or use an OTG adapter for a direct, computer-free transfer.
● Transferring without a computer requires an OTG cable or Micro USB flash drive to plug directly into the phone to copy files natively.
● The Windows Explorer method avoids third-party software by requiring users to manually copy photos from the Samsung device's DCIM or Camera folder and paste them into the connected USB drive.
● The MobileTrans software requires first exporting the selected photos to a computer folder before transferring them to the USB stick, but it provides additional support for full device backups.
Ask AI for a summary
 ChatGPT
 Perplexity
 Gemini
 Claude
 Grok
Grok
Not sure how to transfer photos from Samsung to a USB stick? Well, this article got you covered.
Here, you'll find out the easiest ways to transfer photos from Samsung S to a USB stick without requiring any technical knowledge. From using advanced data transfer software to employing simple free steps, this guide lists three methods to transfer photos from Samsung devices to USB Stick. So, depending on your necessities, you can use either of these methods to move photos from Samsung devices to USB Stick effortlessly.

Part 1: Transfer Photos from Samsung to USB Stick via Cable
The most common way to transfer photos from Samsung S to a USB stick is via a USB cable. Able to transfer files at 480Mbps — USB cable ensures to move the files quickly and without damaging the contents of the files.
Method 1: Transfer photos from Samsung to USB with MobileTrans
Yes, you do not need a third-party application to move photos from Samsung devices to a USB stick. However, a third-party application like MobileTrans makes the process effortless.
MobileTrans is a top-notch data transfer software that users at all levels can employ to execute all kinds of data transfer operations. From its extensive feature to the clean interface and lots more, this tool boasts all necessities every user would require to transfer data from any Samsung device to a USB without any complications.
Key Features
- Support Whatsapp data transfer, backup, and restore.
- Move data from Android to Android or Android to iOS without any damage.
- Support transfer of over 18 types of data files, including chats, videos, photos, and lots more.
- 100% data privacy and top-notch security.
Follow these simple steps to transfer files from Samsung to a USB flash drive with MobileTrans using a USB cable.
Step 1: Visit the official MobileTrans website and download the application. Launch the application and connect your Samsung device to the computer using the USB cable. Plus, insert the USB flash drive to the same computer on which the application is installed.
Step 2: From the main interface, choose Phone Transfer and select Export to computer.

Step 3: Choose the file types, i.e., and choose the photos you want to transfer. After selecting the photos, click on the Export option.

Step 4. After moving the files to the computer. All you have to do is click the Open folder from the pop-up and select the USB storage from the options to save the photos to the USB stick instantly.
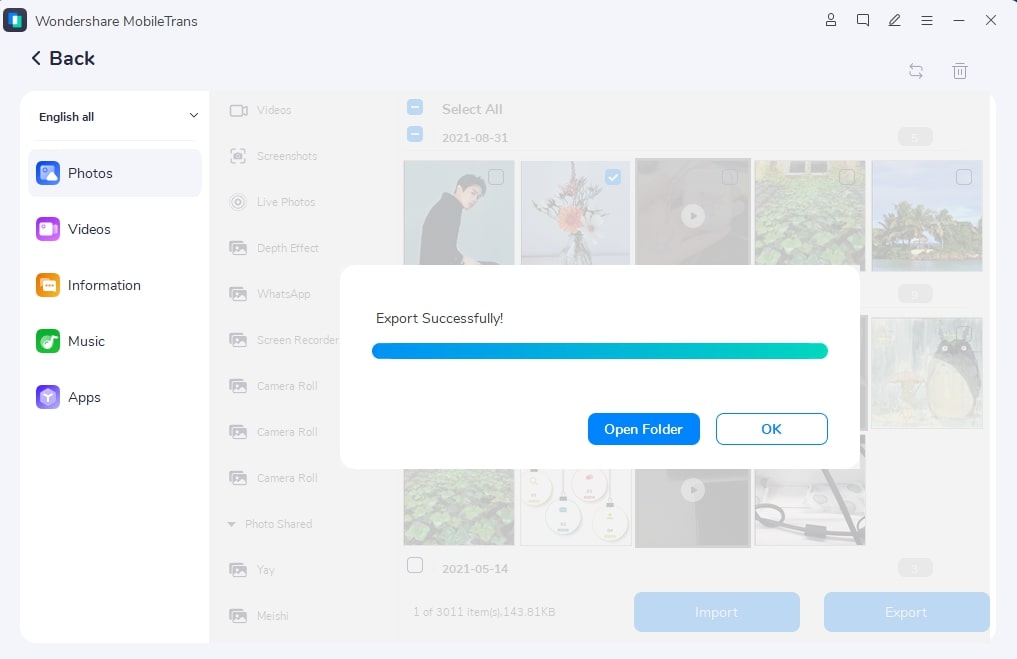
That’s how to transfer photos from the Samsung device to a USB stick using MobileTrans. As you will find out, this is the most simplest and effective method to transfer files from Samsung S22/23/24 to a USB flash drive.
Method 2: Transfer photos from Samsung S10 to USB stick with Windows Explorer
If you do not want to utilize third-party applications for the job, you can utilize the local Windows setting to move files from Samsung devices to a USB flash drive. Here's how to transfer photos from Samsung S10 to a USB Stick with Windows Explorer:

Step 1. Insert the Samsung device into the computer. Similarly, plugin the USB flash drive into the computer.
- After inserting the Samsung S10/20/21/22 into the computer — choose Allow to Transfer files or Allow to Transfer Photos by scrolling down the notification panel.
Step 2. Navigate to This PC and choose the Samsung device. Within the drive — choose Internal Storage or SD card.
- Hover to the DCIM or Camera folder to access the photos you want to copy.
- Choose all the photos by pressing CTRL+the desired photos.
- Right-click and choose Copy from the drop-down menu options. On the contrary, if you want to remove the files from the Samsung device, choose Cut instead of Copy.
Step 3. Navigate to This PC and select the inserted USB flash drive.
- Create a new folder. Assign it a new name.
- Paste the copied photos into the newly created folder.
This method does not require any third-party application. And you can utilize this method to transfer the photos and other media contents from your Samsung smartphone to a USB drive using the steps shown above. However, unlike MobileTrans — the process is not intuitive and thus will take time.
Part 2: Transfer Photos from Samsung to USB Flash Drive without Computer
Another effective means to transfer photos from Samsung to a USB flash drive is without a computer, i.e., Using OTG or Micro USB flash drive. All you need is an OTG cable or micro USB drive for this method.
Here's how to transfer photos from Samsung to a USB flash drive without a computer:
Step 1. Confirm the Samsung Phone's connectivity. You can check this by directly inserting the Micro USB flash drive or an OTG. There are also third-party like USB OTG checkers — that you can utilize to check the connectivity capacity. So, start by connecting the flash drive to the phone through the OTG.
Step 2. Allow access
When the connection is successful — there will be a notification requesting you to allow access.

Step 3. Transfer the photos — Open the folder where you have stored the photos. Select them. And choose to Copy the photos. Hover to a folder within the inserted storage device (i.e., USB flash drive) and paste the photos.

Yes, it is simpler than the earlier methods. However, you will need an OTG or micro USB flash drive for successful copying for this to work. Nevertheless, if you do not have one — you can follow other methods mentioned in this guide to transfer photos from a Samsung phone to a USB flash drive.
Part 3: Backup Photos from Samsung to Computer
Most people want to move the photos from Samsung phones to other devices to free up the space on their devices. Well, backing up the images to the computer is a perfect way to do so. However, not everyone has the idea to get the job done without complications.
For this reason, you might need advanced data transfer software like Wondershare MobileTrans. So, in this section, we will walk you through the simple steps to backup photos from Samsung to a computer using MobileTrans.
That said, here's how to backup photos from Samsung phone to computer using MobileTrans;
Step 1. Install and launch MobileTrans
Visit the official page of MobileTrans and install the application. Then, launch the application and choose the Backup and Restore option within the MobileTrans application.

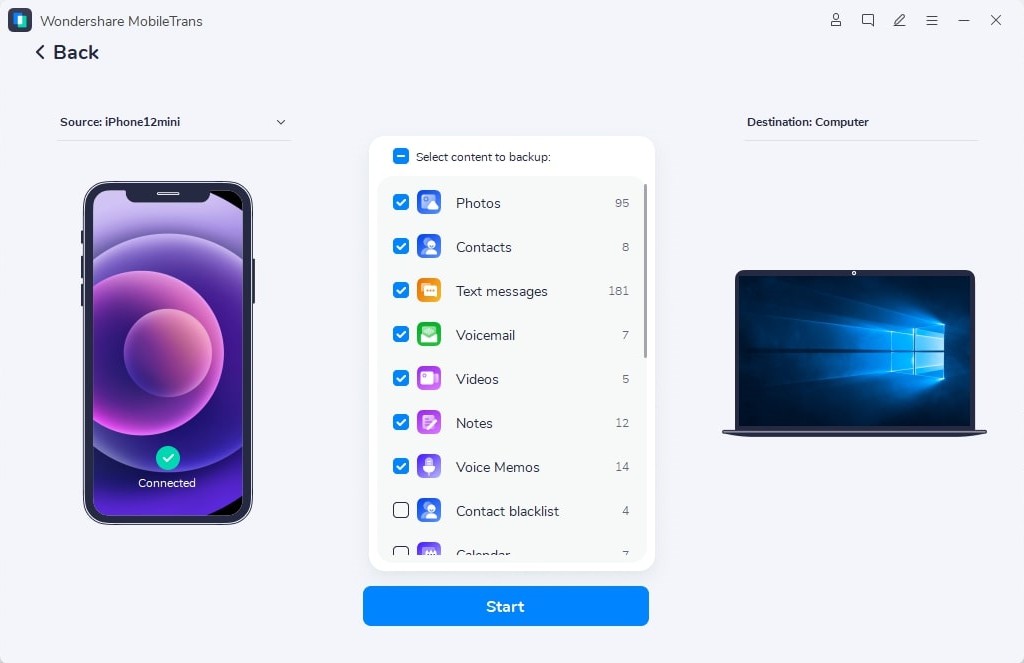
Step 2. Select file types and begin backup
After you select the Backup & Restore, select ‘Backup’ under ‘Phone Backup & Restore’ option. Then, check the box assigned to the Photos. In case you want to choose other file types, check the boxes assigned to them.
Step 3. Backup completed
Click on Start. The process will take some time before completion. Once the process is completed, you can view the files from the MobileTrans backup file.
You can also restore the files by visiting the ‘Phone Backup & Restore section’ within the MobileTrans application. Then select click ‘Restore’, select files you want to restore, and click Start to complete the process.
Conclusion
One of these three options must have helped you transfer the photos from Samsung S9/10/20/21/22 to a USB flash drive. Depending on the resources, i.e., Cable, OTG — you can choose the most suitable means.
Transferring photos from Samsung mobile to a USB flash drive using MobileTrans is the one we recommend to our users. The reason: not only is it less time-taking but also effective. Meaning the data will be transferred without any damage. Besides moving the photos and files to a USB drive, MobileTrans also carried several other features like Backing the files to the computer and restoring it later to the Samsung devices.
New Trendings

Top Stories
All Categories


Navkiran Dhaliwal
staff Editor