


 TL;DR:
Transferring photos between any smartphone and computer is best handled by cross-platform tools like Wondershare MobileTrans for bulk transfers, while native methods like Windows File Explorer, AirDrop, or the Android File Transfer app are ideal depending on your specific operating systems.
● Android devices allow direct drag-and-drop transfers to Windows PCs via USB using Windows File Explorer, but transferring to a Mac requires installing the Android File Transfer app because macOS Finder lacks native support.
● iPhone users can wirelessly send photos to a Mac via AirDrop if both devices share a Wi-Fi network and Bluetooth range, whereas Windows PC transfers require iTunes or a direct USB connection (which is only recommended for small file quantities).
● Universal wireless alternatives like Google Drive or email work across all devices without cables, though email is restricted by strict file size limits and serves best as a fallback for sending a few select images.
Ask AI for a summary
 ChatGPT
 Perplexity
 Gemini
 Claude
 Grok
Grok
Unsurprisingly, there are various ways to transfer photos from phone to computer or computer to phone. It's only a matter of a few clicks.
We've prepared this concise guide to give you a heads up on how to transfer photos from phone to computer and vice versa using different effective methods. Besides, the transfer methods introduced on this page are not just good for photo transfer, but can also be employed in transferring any kind of files from PC to phone or phone to PC without hassles. Hence, reading this guide will be a win-win for you.
Part 1: Transfer Photos from Any Phone to Any Computer
Are you looking to transfer photos from Android to Mac or iPhone to Windows, or vice versa? Don't panic, regardless of the phone or computer you're looking to transfer photos between, we've explained the best method to employ in transferring photos from any Phone to any computer handily.
Method 1: Transfer Photos between Phone and Computer with MobileTrans
Lately, lots of data transfer software have flooded the internet with the claim of being the best. But, the fact is none has been a good match for the Wondershare MobileTrans software.
Wondershare MobileTrans
Transfer Photos from Phone to Computer With a few Clicks!
- • Export photos, music, videos, and more from Phone to PC (Windows & Mac).
- • Backup 18+ types of data from Android and iPhone to PC (Windows & Mac).
- • Supports transfer 18+ types of data between 6000+ mobile devices.
- • Support WhatsApp transfer between Android and iOS devices.
- • Support the latest iOS and Android OS.
 4.5/5 Excellent
How To Use MobileTrans To Transfer Photos From Phone To PC
Step 1: Start MobileTrans app on your Mac/Windows PC and connect your phone to the PC using its USB cable. Then, select ‘Phone transfer’ and click ‘Export to Computer’ from the MobileTrans interface.

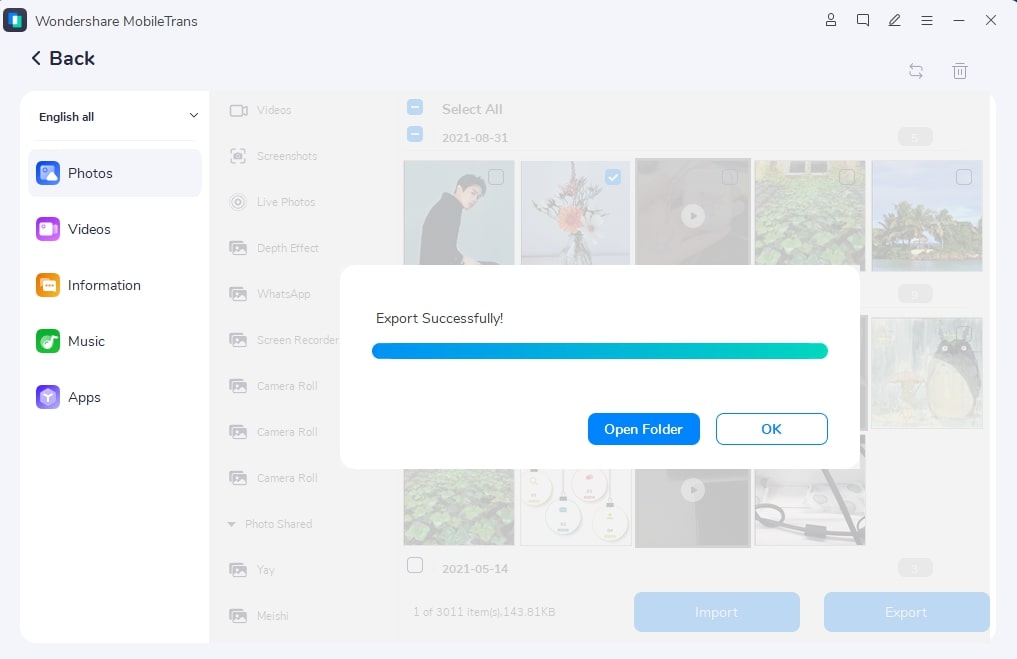
Step 2: From the left-hand side of the page, select ‘Photos’, then tick the checkbox of each photo you're want to transfer to your computer.

Step 3: Finally, click ‘Export’ at the bottom of the screen. The MobileTrans data transfer software will begin to move the selected photos from phone to computer. This process usually takes only a few minute to get completed.
Haven understood the steps to transfer photos from phone to computers, let's take a look at the how to transfer photos from PC to phone with Wondershare MobileTrans.
How To Transfer Photos From PC to Phone Using MobileTrans
Step 1: Start MobileTrans app on your Mac/Windows PC and connect your phone to the PC using its USB cable. Select ‘Phone transfer’ once again, but this time, choose ‘Import to phone’ from the MobileTrans interface.
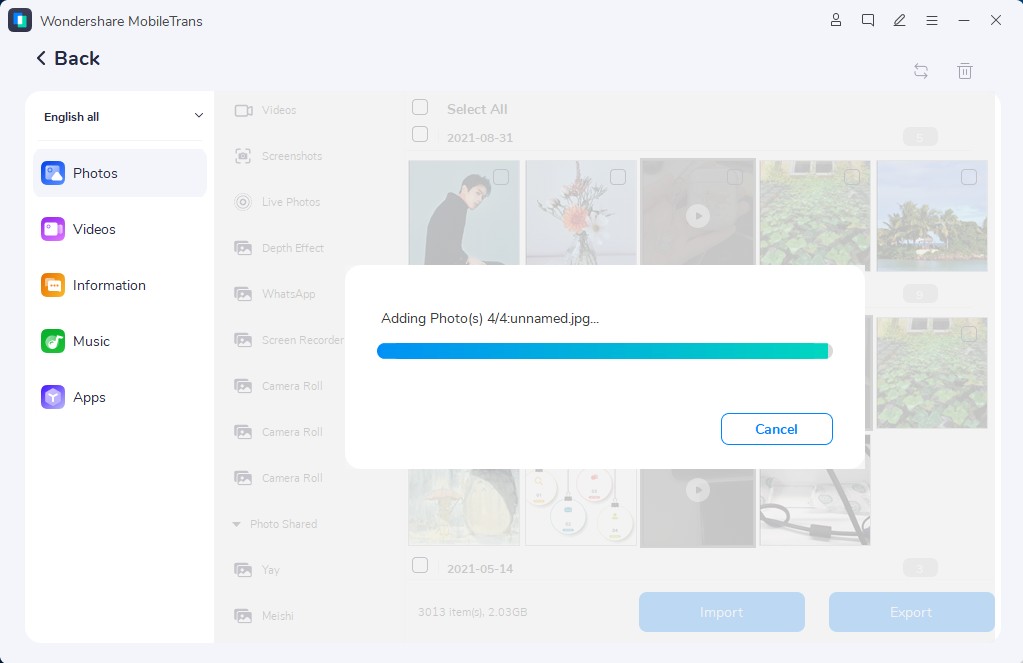
Step 2: On the next page, click ‘Photos’, then hit the ‘Import button’ at the bottom to select the photos you're looking to send.
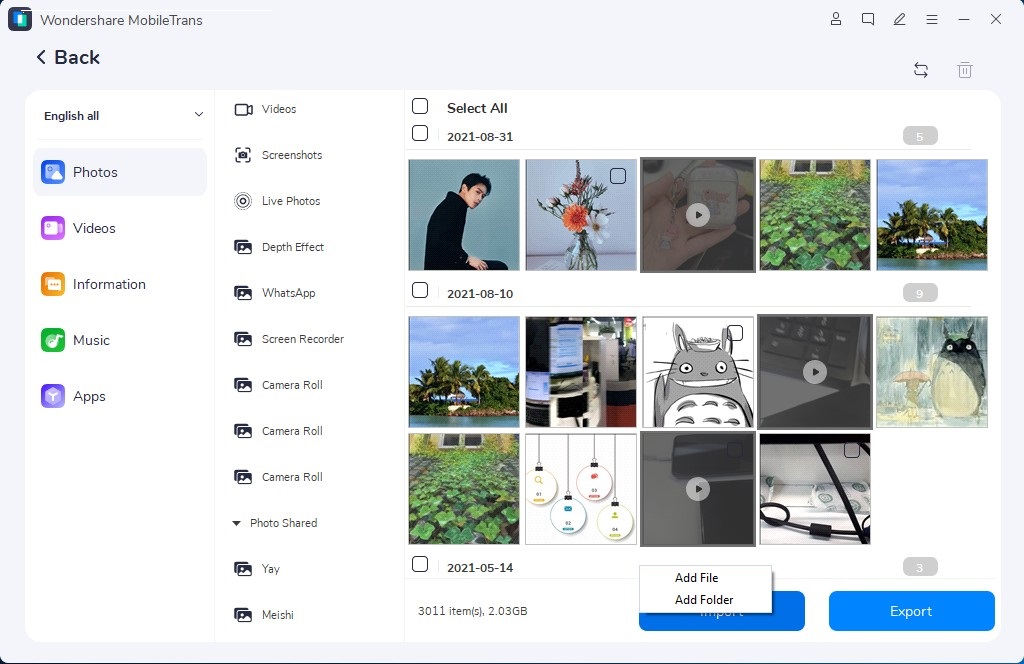
Step 3: Tick the check box beside each imported photos, then click on Import again to finally transfer photos from computer to phone.
Method 2: Sync Phone Photos to Computer with Cloud Storage using google drive

Another effective method to transfer photos from any phone to any computer is via cloud storage. Yes, cloud services like Google drive can be used to save our phone data to cloud-based storage without any compromise.
Besides, saving data in cloud storage is even safer because it enables easy access to your files anytime, anywhere. It's only a matter of signing into the cloud service and your data will be accessible instantly.
See steps to sync phone photos to computer with cloud storage below.
Step 1: Login into Google photos account via a browser to access Synced photos. Then, navigate to the top-right corner of the page and hit the ‘Settings’ button.
Step 2: Click on ‘Show More’ in the “Export your data” option. Then, choose “Backup’ to proceed.
Step 3: Click on “All photo albums included” to select the folders you're looking to download to your PC. Then, check off all folders you want to back up.
Step 4: Click on “Next step. >select “Export once from the “Frequency” section >
Step 5: Select “Create export’. By doing so, the photos will begin to back up onto your PC instantly.
Step 6: Once the backup process is completed, click on the “Download” link to copy the photos to your PC.
Method 3: Upload Photos from Phone to Laptop with E-mail
E-mail transfer is effective for transferring photos from phone to PC without compromise. Although the number of files that can be sent per email is limited, using this transfer method saves you from going through the process of connecting your phone to the PC. Plus, it also acts as a last option to restore your photos, if unfortunately, something happens to your PC or mobile device.
See the step-wise guide below to transfer photos from phone to laptop using E-mail.
Step 1: Open the Photos app/Gallery on your Android/iOS device and select the Photo(s) you want to send to your PC.
Step 2: Hit the ‘Share’ option at the bottom of the screen. Then from the option that appears in the menu that pops out, select ‘Gmail’.
Step 3: Input the email account you're looking to send the photos to, then click ‘Send’ to transfer photos from phone to PC.
Part 2: Transfer Android phone Photos to Windows PC
Photo transfer between Android and Windows PC can also be executed without using a data transfer tool, cloud service, or email. Yes, you can easily employ the popular drag-n-drop transfer method used in transferring files between Android and Windows PCs.
Method 1: Transfer Photos with Windows File Explorer
All you need to do is connect your Android device to the Windows PC using its cable and you're good to transfer photos to the PC via Windows file explorer.
The steps outlined below explain the Android to Windows photo transfer process better.
Step 1: Connect your Android phone to the Windows PC using a USB cable.
Step 2: Launch Windows File Explorer on your PC and locate your Android device at the left side of the Windows page.
Step 3: Next, navigate to the location where you saved the photos on your PC.
Step 4: Select the photos you want to transfer to the Windows computer, then drag-n-drop them to a preferred location on the PC.
Part 3: Download Photos from Android Phone to Mac
Unlike Windows PCs, Mac computers don't support file transfer to or from Android using the ‘Finder app’. Hence, to transfer photos from an Android phone to Mac, you'll need to install the Android file transfer app on your PC.
Method 1: Transfer Photos with Android file transfer
The steps below explain the photo transfer procedure from Android to Mac using Android file transfer.
Step 1: Download and install the Android file transfer app on your Mac computer.
Step 2: Open the Android file transfer using Mac Finder app > connect the Android device to your Mac computer using its USB cable.
Step 3: Now, open the location where you saved the photos on your Android app, then drag and drop the photo files you want to transfer to Mac to a preferred location on the computer.
Part 4: Get Photos from iPhone to Windows PC
Transfer of photos from iPhone to Windows PC can be done using different methods. Yes, you can either use iTunes or just download via file explorer using its USB cable. Keep scrolling to learn the simple steps to get photos from iPhone to Windows PC.
Method 1: Sync Photos from iPhone to Windows PC using iTunes
iTunes is Apple's official tool for managing all iOS devices multimedia files. With iTunes, you can easily transfer photos from iPhone to Windows PC without hassle. All you just need is to download the iTunes app on your PC and you are good to go.
The steps to sync photos from iPhone to Windows PC using iTunes is outlined below;
Step 1: Download and install the latest version of iTunes on your Windows computer, then launch the app.
Step 2: Connect your iPhone to the PC using its USB cable. Then, ‘Trust’ the computer to your device.
Step 3: Click your device on the ‘iTunes’ top bar. Then, navigate to the left side of the iTunes interface and click on ‘Photos’.
Step 4: Tick the check box located next to ‘Sync Photos’, ‘Selected folder’, then choose the ‘Folder or App’ you want to sync the photos from.
Step 5: Click on ‘Sync all photos and albums. You can also select ‘Include videos’ to add iPhone videos in the sync process.
Step 6: Now, click on ‘Start Menu’ and select photos to start the ‘Photos’ app.
Step 7: Finally, hit the ‘Import’ button and choose ‘From a USB device from the option. Then, select your iPhone and follow the given instructions. Afterward, choose the photos you want to import to the PC and select the preferred location to save them.
The transfer process will take only a few minutes to complete.
Method 2: Download Photos from iPhone to PC via USB cable
The second, but very common method of transferring photos from iPhone to PC is via USB cable.
The iPhone USB cable can be used to download photos to Windows PC via file explorer. However, this transfer method is only recommended when you're looking to transfer small photo files from your iPhone.
The guide below explains the step-by-step instruction to download photos to a PC via USB cable.
Step 1: Connect your iOS device to a Windows computer using its USB cable. Then launch the Windows File Explorer to begin the operation.
Step 2: Now, locate your iOS device from the left-hand side of the file explorer interface and navigate to the file or folder where you stored the photo files.
Step 3: Finally, select the photos you want to transfer and add them to a location on your PC. You can also drag-n-drop the photo files to make it easier.
Part 5: Send Photos from iPhone to Mac
Sending photos from iPhone to Mac is quite easy. You can either use the Photos app transfer method or AirDrop.
Anyway, irrespective of the transfer method that you prefer, we've helped prepare the simple guides to send photos from iPhone to Mac using either Photos app or AirDroid. So, read on.
Method 1: Import iPhone Photos to Mac using Photos App
Besides using iTunes or cable to import iPhone photos to Mac, you can also use Photos app to execute your transfer operation perfectly.
Read on to find out the steps to import iPhone photos to Mac using the photos app.
Step 1: Connect your iOS device to the PC using it's a USB cable. Then launch the Photos app on your Mac system.
Step 2: Navigate to the upper menu of the Photos app and select ‘Import’. Then choose the photos you want to send to your Mac PC and click on ‘Import selected’.
Step 3: The transfer process would take only a few minutes to be completed.
Method 2: AirDrop iPhone Photos to Mac
Have you ever thought of transferring files from iPhone to Mac without needing to connect your iPhone using USB or through any software setup process? AirDrop allows Apple device users to transfer files between different iOS devices including Mac just within a few seconds. All you just need is to ensure both devices are within Bluetooth range and are using the same WiFi network.
See steps to use AirDroid transfer to move photos from iPhone to Mac below;
Step 1: Launch Photos app on your iPhone and select the photos you want to transfer to Mac.
Step 2: Hit the share button and select ‘AirDrop’ from the Menu option that appears on the screen.
Step 3: On doing that, AirDrop will instantly scan for all Apple devices whose AirDrop is turned on.
Step 4: Click on your Mac device from the option and click on Send. Then, click Done when the transfer process is finalized.
Conclusion
Transferring photos from phone to PC doesn't come easier than this. From the methods mentioned above, it's obvious you don't require any technical knowledge to execute phone to computer photo transfer. It doesn't matter the method you try to use, chances are you'll get the job done without compromise.
From email transfer to USB transfer, Software transfer, etc, you'll surely find a method that you find suitable for yourself. However, we’d recommend choosing the transfer method using MobileTrans, as it's more effective and fast. Plus, the Wondershare MobileTrans doesn't just allow you to transfer photos, it offers you a plethora of features to execute different types of phone and PC data-related operations handily.
New Trendings

Top Stories
All Categories


Axel Nash
chief Editor