


 TL;DR:
Transferring photos from an iPad to a Mac is most effectively handled via a USB connection to securely preserve original image resolutions, or wirelessly through AirDrop for bulk transfers without file size restrictions.
● Routing USB transfers through Mac built-in tools like Image Capture and the Photos App, or software like Wondershare MobileTrans, requires the iPad to be unlocked to grant the computer file access.
● iCloud synchronization automates wireless photo access across devices but strictly requires both the iPad and Mac to be signed into the identical Apple ID with backup and syncing enabled.
● Sending photos via email serves only as a fallback for minor transfers, as this method restricts attachments to a strict file size limit of under 30 MB per message.
Ask AI for a summary
 ChatGPT
 Perplexity
 Gemini
 Claude
 Grok
Grok
There are several possible reasons to want to send photos from your iPad to your Mac. Maybe you want to organize your photos, send them to a specific folder on your MacBook, or edit the images on your Mac using photo-editing apps. Whatever the reason, there are two main methods to transfer photos from an iPad to a Mac computer.
You can transfer photos via USB or wirelessly and in this tutorial, you’ll discover the easiest ways to transfer important photos from your iPad to a Mac via USB and without USB.
In this article
Can you Transfer iPad Photos to MacBook?
Yes, you can transfer iPad photos to a MacBook computer because both devices operate within the same ecosystem. Since iPads and MacBooks are both Apple devices, sending photos between them is not only possible but easy. You can even sync iPad photos to your MacBook as well. In addition, it's also possible to send videos between Mac and iPad.
There are two main ways to send photos from an iPad to a Mac; USB transfer and wireless transfer. We’ll cover both ways and check out different methods to send and receive photos between your iPad and Mac computer.
How to Transfer Photos from iPad to MacBook via USB
The conventional way of sending photos from a mobile device like an iPad to a computer like your MacBook is via a USB connection. This method of photo transfer from iPad to Mac is the best and most secure because you don’t have to worry about hackers gaining access to your photos or sensitive files.

Also, photo transfer via USB retains the original resolution of the photo, unlike other file transfer methods that downsize the image resolution to save data and improve transfer speed. That said, here are quick and easy methods to transfer iPad photos to MacBook via USB.
Export Photo Album from iPad to MacBook via MobileTrans
One easy way to transfer photos from an iPad to a Mac via USB is with MobileTrans - Phone Transfer.
Wondershare MobileTrans is an easy-to-use file transfer and management tool that is compatible with all mobile devices and computers including devices running the latest iOS, macOS, Windows, and Android versions.
With MobileTrans, you can send and receive photos and image folders between your iPad and MacBook in no time. The tool also allows you to back up, access, and restore images from your iPad to a new device.
Wondershare MobileTrans
Transfer Photos to Mac Easily
- • No data loss. No data leaks.
- • Support various data, including files, photos, videos, apps, contacts, etc.
- • Compatible with over 6,000 types of devices acorss Android and iOS.
 4.5/5 Excellent
Once you download and install MobileTrans on your MacBook, follow these simple steps to transfer photos from iPad to MacBook via MobileTrans:
- Launch MobileTrans on your Mac and connect your iPad to the Mac via a USB or lightning cable. You’ll see a list of file transfer options on the MobileTrans home interface. Select Phone Transfer and click Export to Computer.
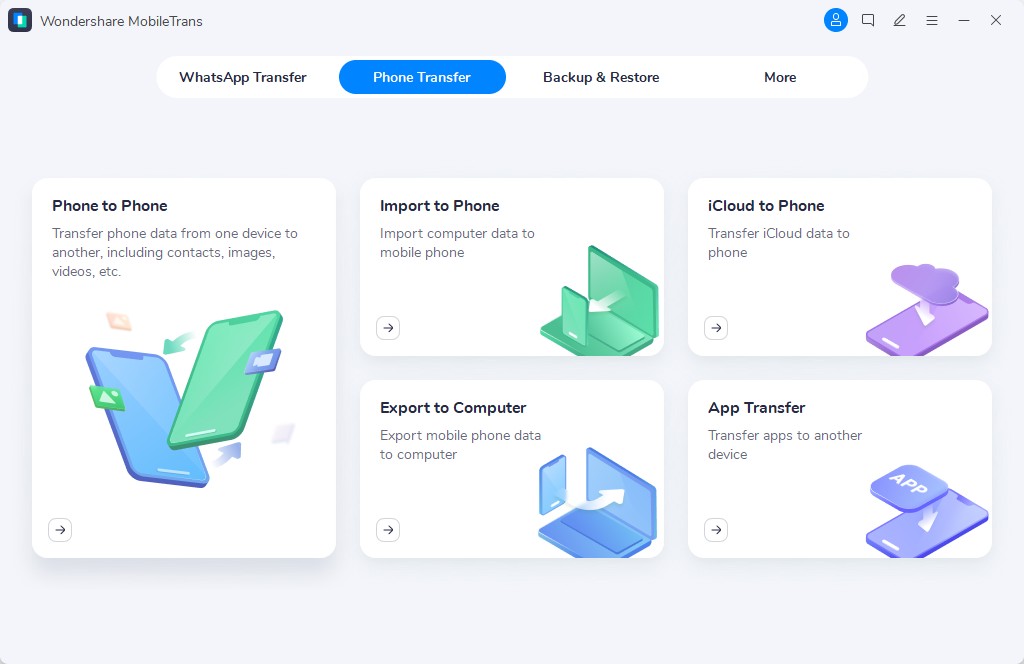
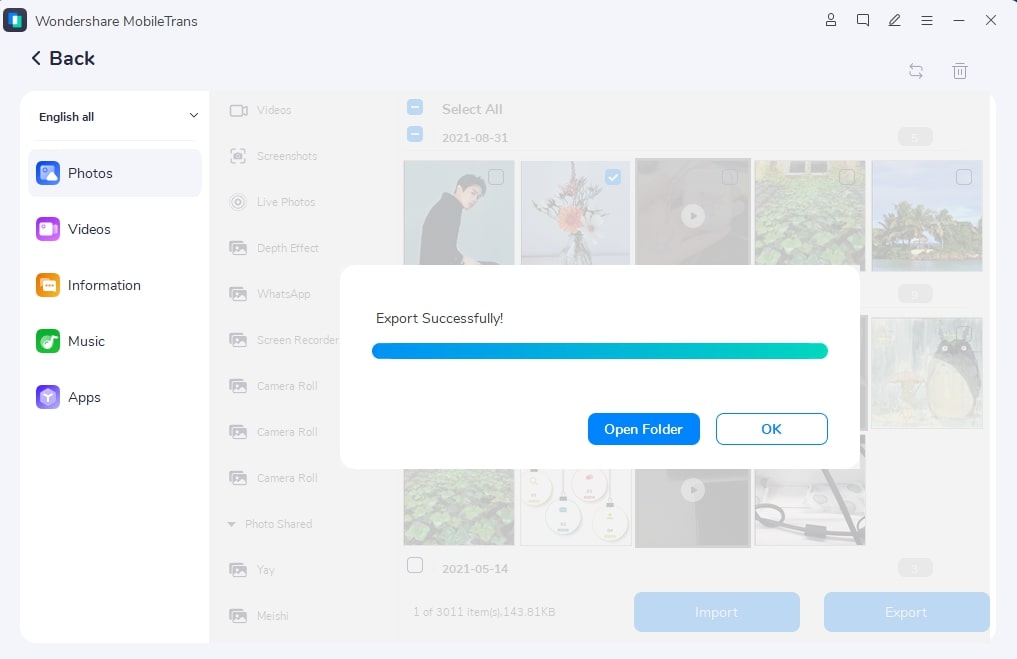
- MobileTrans will display the file categories available on your iPad. Select Photos and select the pictures you want to send from your iPad to the Mac computer.

- Then click Export at the bottom of the screen to send your iPad photos to the MacBook. MobileTrans will notify you once the photo transfer is complete and you can unplug your device from the computer.
Did you know that you can also send photos from your Mac computer to your iPad via MobileTrans? All you have to do is select Import to Phone from the MobileTrans home interface and follow the same steps as discussed above.
Transfer iPad Photos to MacBook via Image Capture
Image capture is one of the ad-hoc or built-in features on Macintosh computers and it is designed to allow users to import photos and videos from different devices that have a camera including digital cameras, image scanners, and mobile devices like iPad and iPhones.

Here is how to send pictures from your iPad to a Mac computer via Image Capture on your Mac:
- Connect your iPad to your Mac using a lightning/USB cable and unlock your iPad, so Image Capture can access your files.
- Open the Image Capture App and select your iPad in the Devices or Shared List.

- Next, pick the images you want to send from your iPad to the Mac. Then select the Import To menu at the bottom of the screen and select where you want to send the iPad photos.

- Next, click Import at the bottom of your screen or Import All if you selected multiple pictures. This will move your iPad photos to the folder you selected on your Mac.

Transfer iPad Photos to MacBook via the Photos App
You can also send pictures from your iPad to your Mac via the Photos App on your device. The built-in Photos App has an image-sharing feature that allows users to send, receive, and sync images between Apple devices via a USB connection. Before you try out this method, ensure your iPad and MacBook have the updated versions of their OS.
Follow these steps to send pictures from your iPad to your Mac via the Photos App:
- Image name your iPad to the MacBook via a USB cable and wait till the iPad is recognized. You should unlock your iPad, so the computer can detect it.
- Then open your Photos App and click on the Device name. You’ll see a list of your iPad photos and videos on the computer.

- Click the images you want to send and select Import at the top-right corner of the screen.
How to Transfer Photos from iPad to MacBook Wirelessly
Now, if you don’t want to use a USB cable to transfer photos from your iPad to your MacBook, there are wireless methods you can use. Wireless photo transfer from an iPad to a MacBook occurs either via Bluetooth, Wi-Fi, or both depending on the photo transfer method you are using.
That said, ensure to allow connectivity and turn on Bluetooth and Wi-Fi on both devices before trying these methods.
Read on to learn about 4 methods to transfer iPad photos to mac wirelessly.
Transfer Photos from iPad to MacBook via Airdrop
AirDrop is the most common way to send and receive photos between Apple devices. This feature was designed by Apple to allow users to send and receive different types of data and files from one Apple device to the other without the need for a USB connection.
Even more impressive is that there is no file size limit when using AirDrop, so you can send multiple images and photo folders wirelessly from your iPad to your MacBook.
Follow these steps to send photos from your iPad to your Mac via AirDrop:
- Turn on AirDrop on your iPad and Mac and set receiving to Everyone.

- Next, open the Photos App on your iPad and select the image(s) you want to transfer from your iPad to your Mac.

- Next, click on the Share icon at the bottom of the screen and choose AirDrop from the list of sharing options.

- Wait for AirDrop to display the nearby devices you can AirDrop to. Then select your MacBook and click Accept when you receive the incoming file notification on your computer.

- Wait for the photo transfer complete notification and check your MacBook photos app to view your new images.
You can also send photos from your MacBook to your iPad using AirDrop by following the same steps as outlined above.
Transfer Photos from iPad to MacBook via Bluetooth
Want to send Photos from your iPad to your Mac without AirDrop? Then try Bluetooth photo transfer. Bluetooth works in similar fashion to AirDrop and as long as Bluetooth is enabled on both devices, you can send multiple photos as well. Follow these steps:
- Pick the images you want to send from iPad to Mac and select Share.
- Select Bluetooth from the list of sharing options and wait for the list of nearby Bluetooth devices to send to.

- Pick your Mac from the Devices list and Accept the photo transfer on your MacBook. Once the photo transfer is complete, you can view your iPad photos on the Mac computer.
Copy iPad Photos to Mac via iCloud
iCloud is Apple’s default cloud-based file syncing service that enables users to send, receive, view, and manage files across multiple Image nameed Apple devices. With iCloud, you can backup and access the iPad photos on your MacBook via the iCloud website or the Photos App.
Before you go ahead with this method, enable iCloud Syncing on your MacBook and iPad and ensure both devices are signed-in to the same Apple account.
Follow these steps to copy iPad photos to mac via iCloud:
- Connect your iPad and MacBook to a stable Wi-Fi and go to Settings.
- Check if iCloud Backup and Syncing are enabled on your MacBook and iPad. If not, enable both features in Settings.

- Next, go to the iCloud website on your Mac and sign-in using your Apple ID and Password. You may receive a verification code on your iPad. Enter the 6-digit code on your Mac to continue.

- Click on the Photos App and you’ll see your images arranged according to upload dates. You can also browse through the image folders to the left side of your screen.
- Click on the pictures you want to send and import the images to your MacBook directly from iCloud.

How to Transfer Photos from iPad to Mac using Email
Another alternative to Transfer photos from your iPad to your MacBook is to send the images as attachments via your email. However, this method is ideal for when you want to send just a few photos from your iPad to your Mac because email attachments have a file size limit of usually less than 30 MB per email.
Here is how to send iPad photos to your MacBook through your email:
- Open the Email App on your iPad or sign in to your email through Safari or another web browser.
- When you sign in, click on the Pen icon or Compose option at the top-left corner of your screen.

- Enter the email address signed into your MacBook as the recipient and click on the File icon to add attachments.

- Add the images you want to send as attachments and click Send. Next, open your email inbox on your Mac to download the iPad photos to your computer.
Final Words
In summary, it’s possible and easy to send photos from your iPad to your MacBook because both devices run a similar OS and operate within the same Apple ecosystem. You can send photos between your iPad and Mac wirelessly and via USB.
While USB transfer is the conventional method of sharing photos, it is still very secure and less likely for your photos to be hacked or spied on by hackers during your photo transfer. Wireless transfer on the other hand is also secure and the most common method to transfer photos from iPad to Mac wirelessly is via AirDrop.
As long as both devices are up-to-date and connectivity is enabled, you won’t have any problems sending iPad photos to your MacBook.
4.5/5 Excellent

