Well, yes, most users face this problem. Are you wondering how to transfer voice memos from iPhone to computer?
Voice Memos can be really helpful to someone recording lectures for studying, to a musician with song ideas, or to a person interested in audio notes.
In the article, we'll discuss various ways of transferring voice memos from iPhone to PC and copying voice memos from an iPhone to a PC. All free and paid sources have been taken into account, so you're bound to find a method that suits your needs.
So, let's get started and learn how to transfer voice memos from iPhone to computer!
In this article
- Method 1: Use MobileTrans to Transfer Voice Memos From iPhone to PC
- Method 2: Transfer Voice Memos From iPhone To Pc Cloud Services
- Method 3: How To Transfer Voice Memos From iPhone To Pc Using Email
- Method 4: Using iTunes to Transfer Voice Memos From iPhone To Pc
- Method 5: Transfer Voice Memos From iPhone To Pc Using AirDrop (Mac Only)
Transfer Voice Memos From iPhone to PC: Easy Ways
Method 1: Use MobileTrans to Transfer Voice Memos From iPhone to PC
When it comes to how to transfer voice memos from iPhone to computer, MobileTrans is a powerful tool that many users find helpful. But why choose MobileTrans over other methods? Let's look at some top reasons:
Why MobileTrans?
- Ease of Use: User-friendly interface with simple navigation. Easy transfer process with clear instructions.
- Fast and Reliable: Quick transfer speeds. Reliable connections without frequent dropouts.
- Security: Encrypts data during transfer for added security.
- Compatibility: Works with both macOS and Windows computers. Supports various file formats.

 4.5/5 Excellent
Now, let's go through the step-by-step guide on how to copy voice memos from iPhone to PC using MobileTrans:
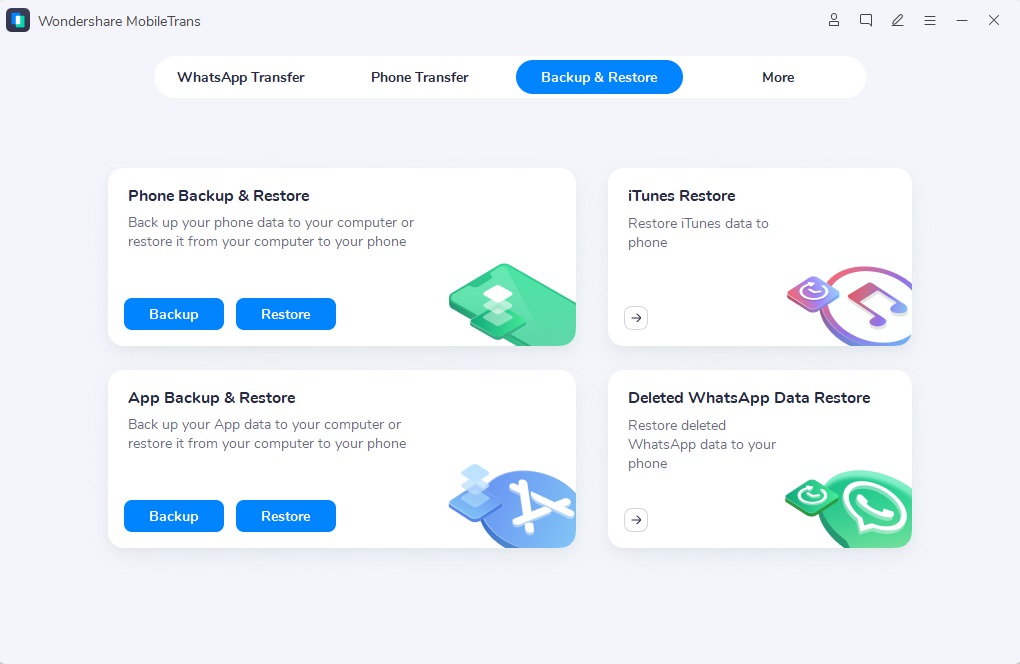
Step 1: Install MobileTrans on your computer. Use a USB lightning cable and connect iPhone to PC. Open MobileTrans on your computer. Select "Backup and Restore”. Hit the “Backup” button placed under the “Phone Backup and Restore” category.

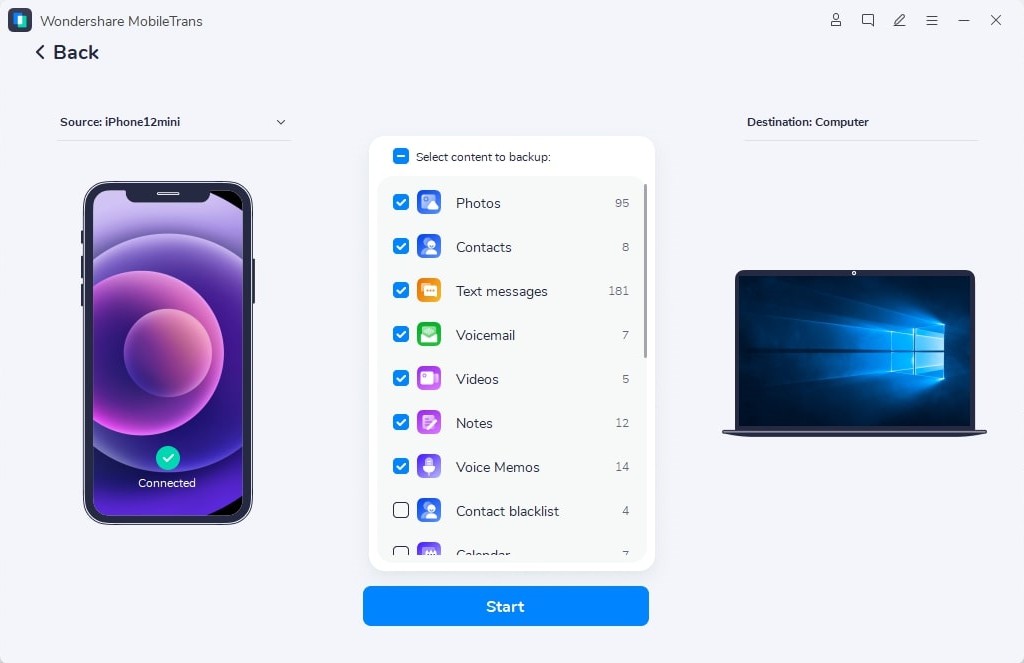
Step 2: Choose "Voice Memos". Click "Start" to begin the transfer process.

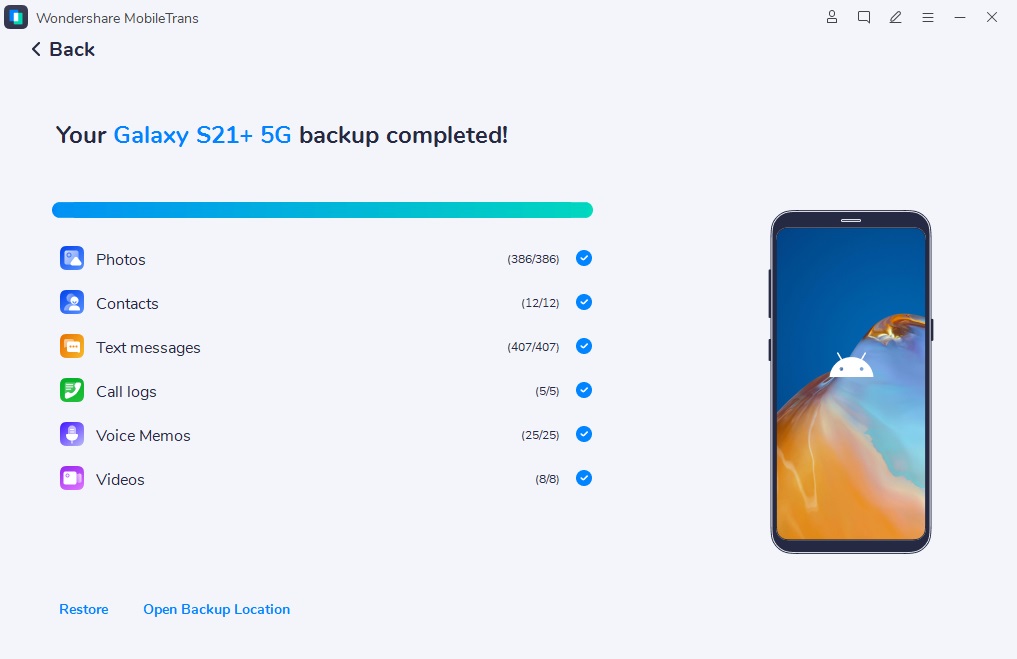
Step 3: Wait for the transfer to complete. Find your transferred voice memos in the designated folder on your computer.

Using MobileTrans is a great option if you're looking for a reliable way to transfer voice memos from iPhone to PC. It's especially useful if you have a large number of memos or if you transfer files frequently.
Method 2: Transfer Voice Memos From iPhone To Pc Cloud Services
Another popular method for how to transfer voice memos from iPhone to computer is using cloud services like iCloud. This method is built into your iPhone and is free to use (up to a certain storage limit).
Here’s how to transfer voice memos from iPhone to PC:
Step 1: On your iPhone, go to Settings > [Your Name] > iCloud. Enable "Voice Memos".

Step 2: Wait for your voice memos to sync to iCloud. This might take a while if you have many memos.
Step 2: Launch the Voice Memos app on your Mac with macOS Mojave or later. When the iCloud Syncing popup appears, click on Enable.

And that’s it! You should now see all your synced voice memos.
This method is great if you're wondering how to transfer voice memos from iPhone to computer wirelessly. It's simple and doesn't require any extra tools, making it a good choice for those who want an easy solution.
Method 3: How To Transfer Voice Memos From iPhone To Pc Using Email
If you're looking for a quick way to transfer just a few voice memos, email can be a simple solution. Here's how to copy voice memos from iPhone to PC using email:
Step-by-step guide:
Step 1: Open the Voice Memos app. Select the memo you want to transfer. Tap the three dots (...) next to the memo. Choose "Share".

Step 2: Select "Mail" from the sharing options. Enter your email address and send the email to yourself. On your computer, open your email and download the attached voice memo.
This method is handy when you need to know how to transfer voice memos from iPhone to computer quickly and don't mind doing it one at a time.
Method 4: Using iTunes to Transfer Voice Memos From iPhone To Pc
For those who prefer using official Apple software, iTunes (for Windows) or Finder (for Mac) can be used to transfer voice memos from iPhone to PC. Here's how:
Step-by-step guide:
Step 1: Make sure your iPhone is connected to PC via a USB lightning cable Open iTunes. Select your iPhone when it appears on iTunes. Click on "File Sharing" option.

Step 2: Scroll down to find "Voice Memos" in the list of apps. Select the voice memos you want to transfer. Click "Save to" and choose a location on your computer.
This method is reliable if you're comfortable with iTunes or Finder and want to know how to download voice memos from iPhone using official Apple software.
Method 5: Transfer Voice Memos From iPhone To Pc Using AirDrop (Mac Only)
If you have a Mac computer, AirDrop offers a quick and wireless way to transfer voice memos from iPhone to computer. Here's how:
Step-by-step guide:
Step 1: Make sure both your iPhone and Mac have Wi-Fi and Bluetooth turned on. On your iPhone, open the Voice Memos app. Select the memo(s) you want to transfer. Tap the share icon. Choose "AirDrop" from the sharing options. Select your Mac from the list of available devices.

Step 2: On your Mac, accept the incoming file(s). The voice memos will be saved to your Downloads folder by default.
AirDrop is a great option if you're wondering how to transfer voice memos from iPhone to computer without any cables or extra apps, provided you have a Mac.
Conclusion
In this guide, we've explored various methods on how to transfer voice memos from iPhone to computer. From cloud services and email to specialized software like MobileTrans, there's a solution for every need.
Choose the method that works best for you based on your technical comfort level, the number of memos you need to transfer, and whether you prefer wireless or wired transfers.
FAQ
-
How do I transfer voice memos from iPhone to computer without iTunes?
There are several ways to transfer voice memos from iPhone to computer without iTunes. You can use cloud services like iCloud, email your voice memos to yourself, use AirDrop if you have a Mac, or try third-party software like MobileTrans. Each method has its pros and cons, so choose the one that best fits your needs. -
Can I transfer multiple voice memos at once?
Yes, you can transfer multiple voice memos at once using several methods. iCloud syncs all your voice memos automatically. When using iTunes/Finder or MobileTrans, you can select multiple memos to transfer. AirDrop also allows you to send multiple memos in one go. Email is less practical for multiple transfers, as you'd need to send separate email0s or compress the files. -
Is there a way to transfer voice memos wirelessly?
Absolutely! There are several wireless methods to transfer voice memos from iPhone to computer. iCloud syncs your memos wirelessly to all your devices. AirDrop offers a quick wireless transfer option for Mac users. You can also email voice memos to yourself, which doesn't require a physical connection between your devices. -
What is the best app for transferring voice memos?
The "best" app depends on your specific needs, but MobileTrans is a popular choice for how to transfer voice memos from iPhone to computer. It offers a user-friendly interface, fast transfer speeds, and works with both Windows and Mac. However, it's a paid app. For free options, iCloud is built into your iPhone and works well for wireless transfers. If you prefer official Apple software, iTunes (Windows) or Finder (Mac) are reliable choices.


