


 TL;DR:
You can transfer photos from any Google Pixel device to a computer by syncing through a Google Account, manually moving files via a USB connection, or using a desktop tool like MobileTrans - Backup.
● Syncing via Google Backup & Sync or Google Drive provides wireless cloud access, but free storage is capped at 15 GB, making it necessary to optimize photo quality to avoid exceeding limits.
● Manual USB transfers require you to select the media/file transfer option on your Pixel's notification bar to access the DCIM folder via Windows Explorer, though this method is susceptible to connectivity issues and halted transfers.
● MobileTrans - Backup provides a one-click desktop alternative that allows you to maintain multiple, non-overwriting backup versions of your photos, which can later be extracted to any device using MobileTrans - Restore.
Ask AI for a summary
 ChatGPT
 Perplexity
 Gemini
 Claude
 Grok
Grok
“How to transfer photos from Google Pixel to a computer? I want to reset my Pixel 3, but don’t want to lose my photos in the process.”
This is one of the many queries that we get these days about connecting Pixel 3 to a computer. Ideally, it doesn’t matter if you have a Pixel 3, Pixel 4a, Pixel 5, Pixel 6 or Pixel 6 Pro, the process to transfer photos from Google Pixel to a computer is the same for all the devices. Since Pixel phones run on a pure Android version, you can easily connect them to your computer or your Google account. In this post, I will let you know you how to transfer pictures from Google Pixel to a computer easily.
![]()
Method 1: Transfer Photos from Google Pixel to Computer via your Google Account
Since all Pixel devices are linked to a Google account, you can use the same to transfer your photos. While the process is not that seamless, it will give you the freedom to backup your data and make it available on Google all the time. If you want, you can upload selected photos to Google Drive or can sync the entire gallery of your device. Let’s take a look at these two methods to transfer photos from Google Pixel 3 to a computer in detail.
Option 1: Use the Google Backup & Sync Feature
For this option, you can first sync the entire gallery of your Pixel device to your Google account and can later use its desktop application on your computer. If you would retain the quality of your photos, then it will be counted in the cloud storage. Since only 15 GB of space is allocated for free, it is recommended to optimize the quality of your photos instead.
Step 1: Sync your photos with your Google account
At first, you can just unlock your Pixel device and go to its Google account settings. You can also launch the Gmail app and go to its Settings from the sidebar. Now, you can go to the Backup & Sync option and choose to sync your device with your Google account. From its Backup & Sync settings, you can select what you wish to include/exclude as well.
![]()
Step 2: Sync Google Account on your Computer
Once your photos as synced with your Google account, install the Google Backup & Sync desktop application on your PC or Mac. To transfer photos from Google Pixel 3 to a computer, you first need to log-in to your Google account.
![]()
After logging in to your Google account, you can select a location where the Google data would be synced on your system. There is also an option to adjust the quality of your photos that you wish to sync.
![]()
Option 2: Transfer Selective Photos via Google Drive
Instead of syncing the entire gallery, you can also use your Pixel 3 to transfer selected photos to your computer.
Step 1: Upload photos to Google Drive
You can first launch the Google Drive app on your Pixel phone and tap on the “+” icon from its home. From here, you can choose to upload photos to the Drive by selecting them from your device storage.
![]()
Step 2: Download photos from Google Drive
Whenever you wish to save your photos on your computer, just go to the Google Drive website, and log-in to your account. Now, select your photos (or any folder) and from the provided options, choose to download them on your system.
![]()
Cons
- • Takes a lot of time
- • A bit complicated
- • Limited free storage on Google Drive
Method 2: How to Transfer Photos from Google Pixel to a Computer via a USB Cable
One of the best things about Android devices is that they can easily be connected to a PC via a USB connection. Therefore, connecting Pixel to a computer will only need a working USB cable. Once your phone is connected, you can transfer photos from Google Pixel 2/3/4 to a computer pretty easily.
Step 1: Connect Google Pixel to your computer
Using a USB cable, just connect your Google Pixel phone to your PC and wait for it to be detected. While connecting Pixel to a computer, you will get a relevant option on the notification bar. From here, choose to use the device to perform media/file transfer.
![]()
Step 2: Transfer photos from Google Pixel to a computer
Once your device is connected, you can go to Windows Explorer > This PC or My Computer to view it under the external devices section. Now, just browse to its Internal Storage (or SD Card), find your photos, and move them to your system’s storage. Mostly, you would find your photos in the DCIM folder.
![]()
Cons
- • Connectivity issues
- • Doesn’t work a lot of times
- • The transfer process can be halted in between
Method 3: Transfer Photos from Google Pixel to a Computer with MobileTrans – Backup
If you are looking for a free and seamless solution to transfer pictures from Google Pixel 2/3/4 to a computer, then try MobileTrans – Backup. With just a single click, it will let you take the entire backup of your device on your system.
- • The application is fully compatible with all the Pixel devices like Pixel 2, 3, 4, and so on.
- • It can backup your photos, videos, contacts, messages, call logs, notes, and almost all the other data types.
- • Users can further select what they wish to include in the backup file or can take an entire backup of the device.
- • The tool is freely available and will let you maintain different versions of the backup (without overwriting anything).
- • Later, you can use MobileTrans – Restore to extract the backup content on any device of your choice.
Here’s how you can transfer photos from Google Pixel to a computer with the help of MobileTrans – Backup.
Step 1: Connect Pixel to your computer
To start with, just launch the MobileTrans application on your computer and select the “Backup & Restore” option from its home. Also, use a USB cable for connecting Pixel 3 to your computer successfully.

Step 2: Transfer photos from Google Pixel to a computer
Once your Pixel phone is detected, its snapshot would be displayed on the screen. Now, from the list of the selected data types, you can simply enable the “Photos” option. You can also include any other data type in the backup from here.
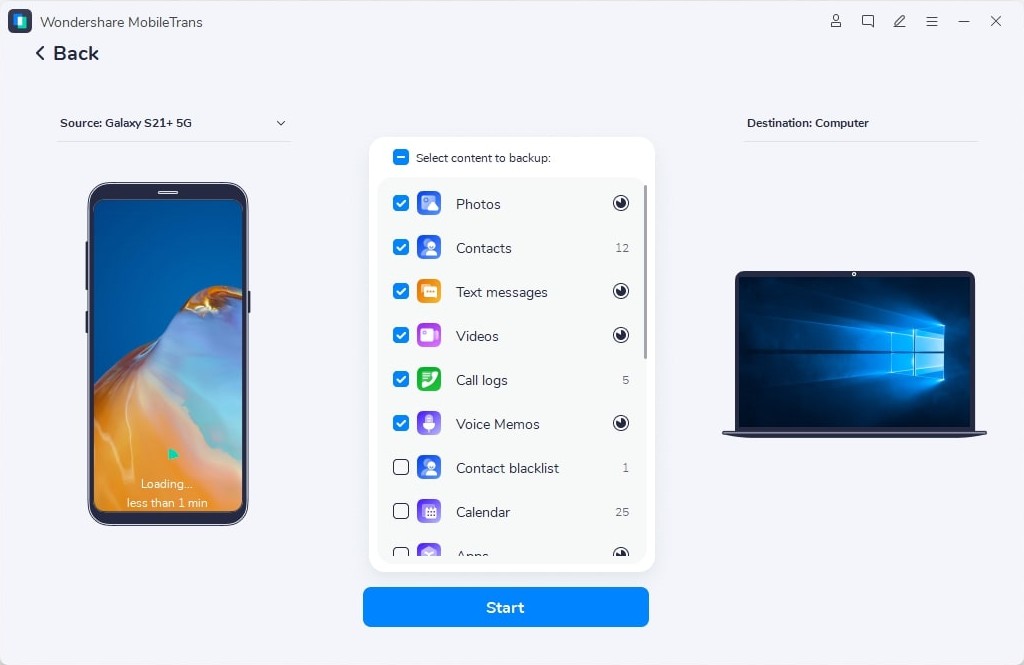
In the end, just click on the “Start” button and wait as your photos would be moved to your computer’s local storage.
Now when you know three different ways to transfer photos from Google Pixel to a computer, you can easily keep your pictures safe. From all the listed options, MobileTrans - Backup has to be the best solution to back up your photos to a computer. Using it, you can maintain different versions of the backup and can later restore it to the same or any other device.
New Trendings

Top Stories
All Categories


Axel Nash
chief Editor