


 TL;DR:
You can restore iCloud notes natively through the iOS Recently Deleted folder or a full device backup, or use Wondershare MobileTrans and Dr.Fone to selectively transfer notes to both iOS and Android devices without a factory reset.
● Native iOS recovery restricts you to retrieving notes from the Recently Deleted folder within a 30-day window or requires executing a full factory reset to restore an older, un-overwritten iCloud backup.
● Wondershare MobileTrans is designed for cross-platform migration, allowing users to selectively transfer saved iCloud notes to new iOS or Android devices without overwriting original data.
● Dr.Fone - Data Recovery (iOS) extracts specific notes and attachments directly from an iCloud account to any preferred device, requiring users to verify their login with Apple's two-factor authentication code.
Ask AI for a summary
 ChatGPT
 Perplexity
 Gemini
 Claude
 Grok
Grok
iCloud storage helps people effectively organize their data, from personal reminders and to-do lists to critical work-related notes. Storing notes in iCloud has become essential for many users since it’s a secure and convenient way to keep important information accessible across devices. Moreover, accidental deletions, device malfunctions, or data loss can lead to the need to restore these notes from iCloud, highlighting the importance of reliable backup options.
Restoring notes from iCloud is a simple way to retrieve lost information. It allows users to recover valuable data without advanced technical skills, saving time and effort to ensure critical information is always within reach. In this article, we’ll guide you through various methods to learn how to restore notes from iCloud.

In this article
Part 1. Bonus Tip. How to Restore iCloud Notes to a New Android or iOS Device?
Since iOS and Android devices operate with different OS, recovering media such as images, videos, or notes can be complicated. This is why we need a one-click solution to seamlessly restore lost notes from one OS to another. Thus, introducing Wondershare MobileTrans, which helps you transfer important saved data from iCloud backup to any of your phones.
It is compatible with the latest versions of iOS and Android devices, helping users avoid compatibility issues. Moreover, this comprehensive tool allows users to transfer many data types from their desktop devices to mobiles and restore previous data.
Key Features of MobileTrans
- Users can export their deleted WhatsApp data from iOS and Android devices.
- It does not overwrite the original data during the backup and restore process.
- Unlike iCloud and Google Drive, MobileTrans lets users pick the data they want to transfer.
Wondershare MobileTrans
Transfer Your Phone Data Easily
- • No data loss. No data leaks.
- • Support various data, including files, photos, videos, apps, contacts, etc.
- • Compatible with thousands of device types acorss Android and iOS.
 4.5/5 Excellent
Instructional Guide on Restoring iCloud Notes to a New Android or iOS Device
In addition to the above discussion, the straightforward steps below will help you understand how to restore iCloud notes in a seamless manner.
Step 1. Launch MobileTrans to Begin Restoring the Notes
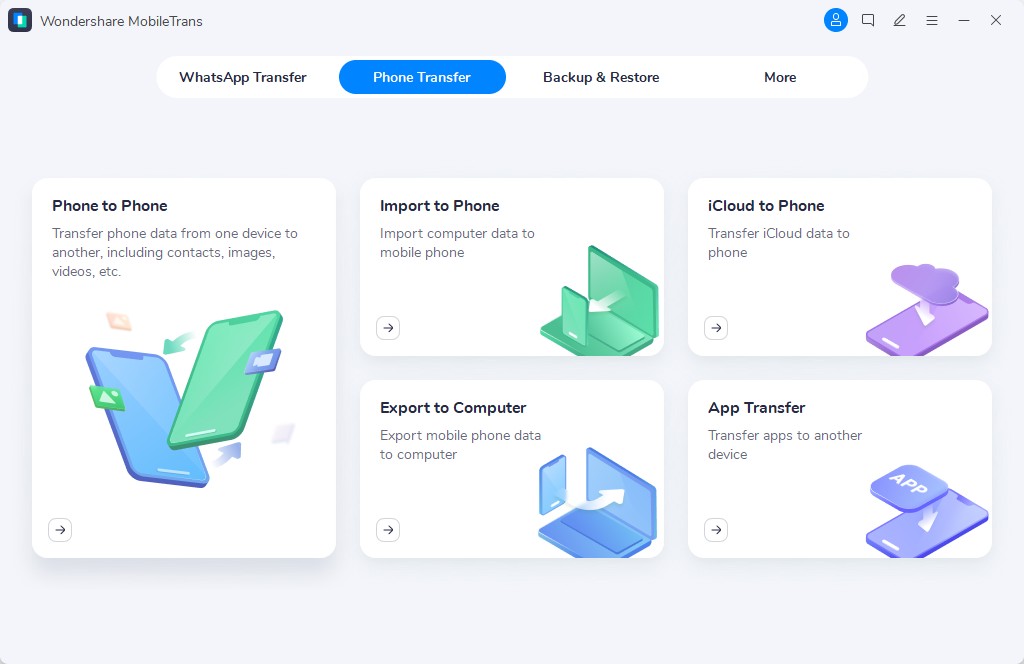
After downloading Wondershare MobileTrans to your device, open the main interface by clicking “Phone Transfer” from the top bar. Then, select “iCloud to Phone” to initiate the process of restoring the iCloud notes.
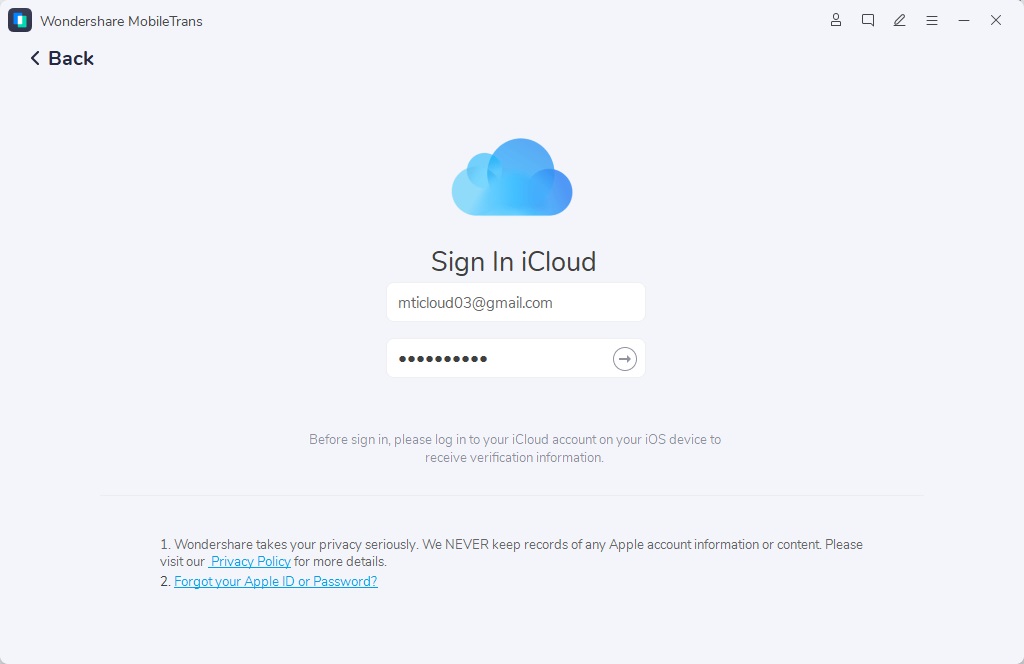
Step 2. Log In With iCloud Credentials
Next, log in with your iCloud credentials and verify the two-factor authentication code so that you can access all the data from your iCloud account.
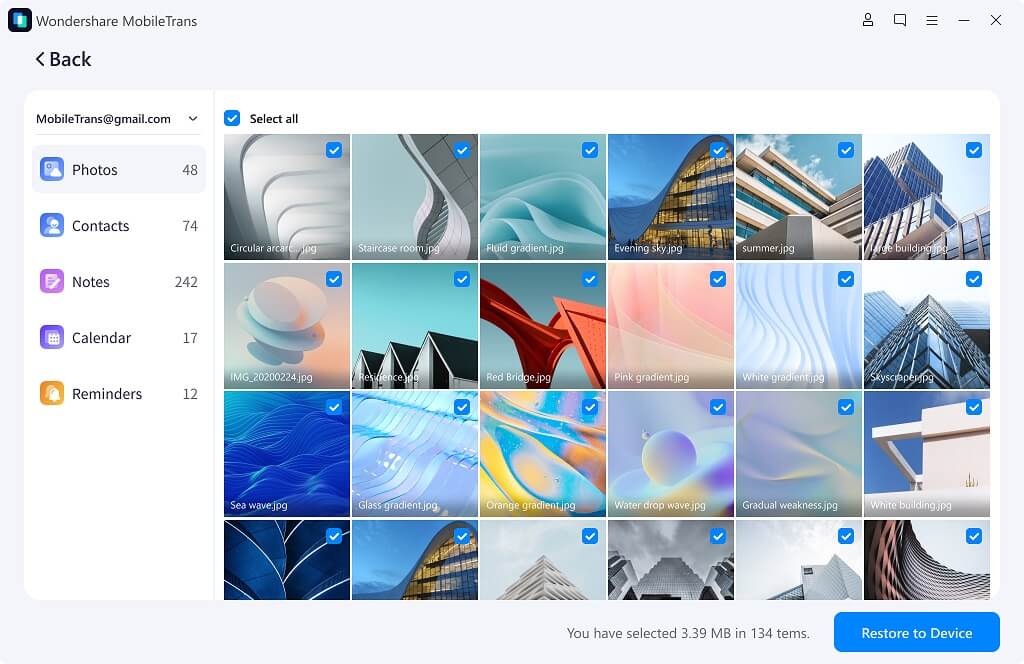
Step 3. Proceed with Choosing the Notes to Transfer
Within the new window of MobileTrans, navigate to the "Notes" tab from the left panel. Here, pick the content that you want to restore by hitting the "Restore to Device" button on the bottom right corner of the screen.
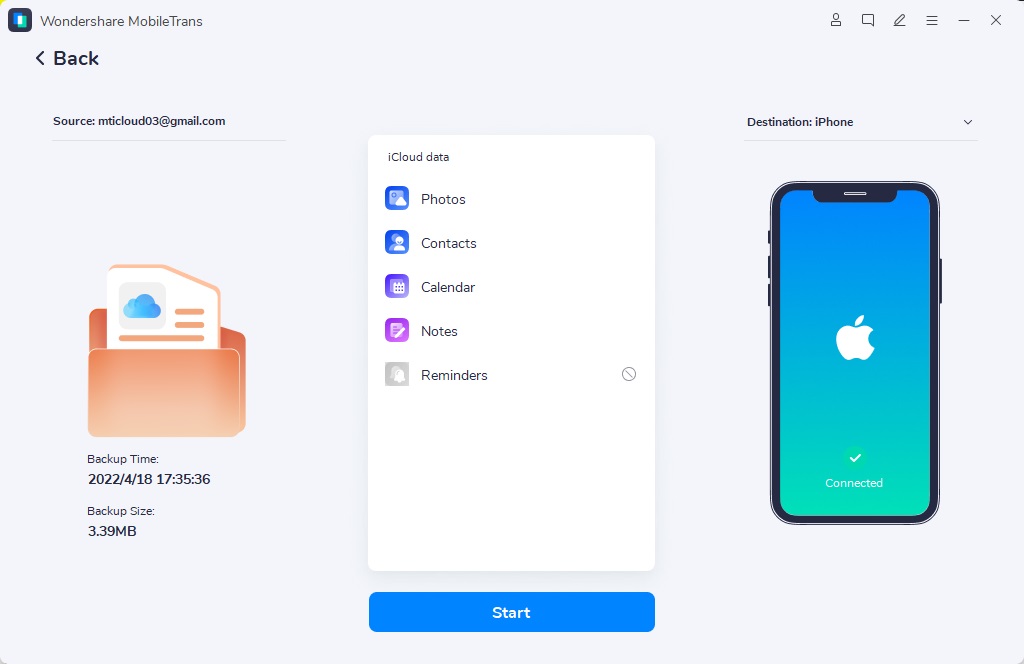
Step 4. Connect Your Device to the Computer and Start the Transfer
After selecting the notes to restore to your device, connect your desired phone to the computer using a USB cable. Next, trust your iPhone or enable USB transfer on Android, then hit the “Start” button to initiate the transfer. Once the process is complete, you can access the iCloud notes on your attached device.
Part 2. How to Restore Notes from iCloud with Data Recovery Software?
Moving on, as a vital feature on Apple devices, iCloud helps manage and back up data efficiently. Yet, occasionally, you might encounter situations where you can't access your account. Wondershare provides users with the perfect solution to recover the notes data through Dr.Fone—Data Recovery (iOS).
This feature lets you restore any data from your iCloud storage within a few clicks. Moreover, you can perform cross-platform restoration processes since this tool supports migrating iCloud data to Android. Look at the steps below to figure out how to restore notes from iCloud:
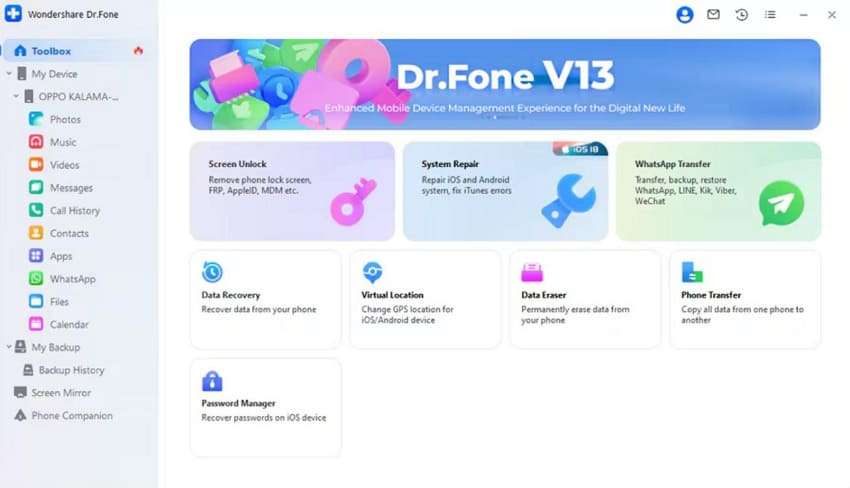
Step 1. Install this data recovery software on your device and navigate to the "Toolbox" tab from the left section. Select the "Data Recovery" option and select the device type that best suits your preferences.
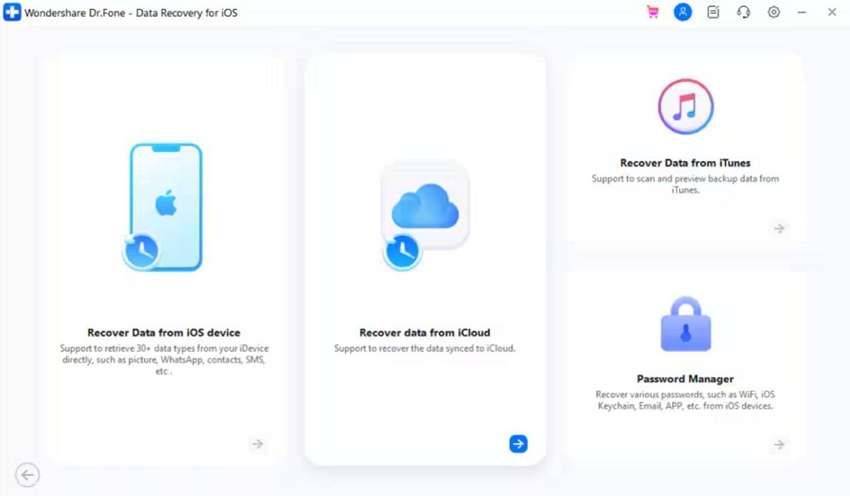
Step 2. Now, click the “Recover Data From iCloud” option to get access to your deleted or lost notes. Afterward, sign in to your iCloud account and verify it through the “Two Factor Authentication” to move to the next step.
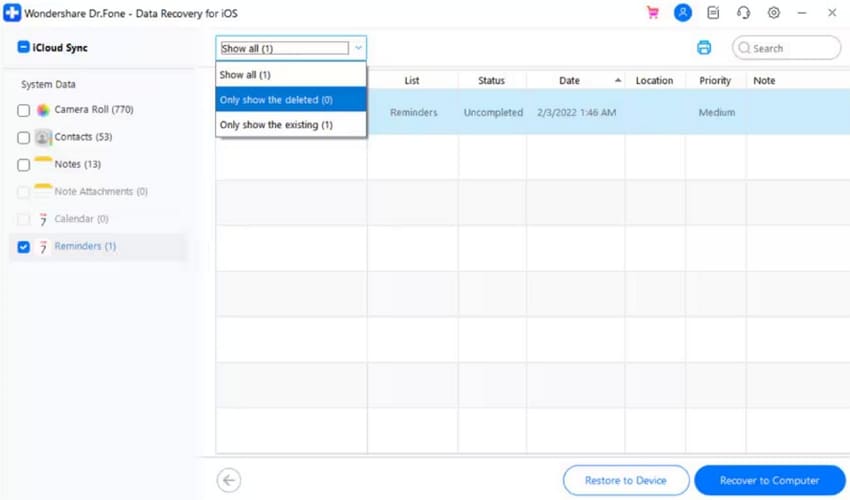
Step 3. Moving forward, tick the box to highlight that you want to extract “Notes & Attachments” from your iCloud. Then, hit the “Next” button to begin the downloading process.

Step 4. Access all the iCloud notes once you are redirected to the next window. Now, checkmark all data you want to recover and click the "Restore to Device" button. From the newly appeared window, select the device where you’d like to restore your data. Upon selecting this location, click the “Continue” button to complete the recovery process.
Part 3. How to Restore Notes from iCloud Through Recently Deleted Folder?
Apart from using Dr.Fone – Data Recovery (iOS), there is a built-in feature to help you explore how to restore notes on an iPhone from iCloud. Within the recently deleted section on your iOS device, you will find deleted notes stored for up to 30 days. This feature acts as a safeguard, ensuring you have ample time to retrieve any notes deleted by mistake.
Step 1. Initiate by navigating to Notes on your iOS and tap the "Recently Deleted" folder from the "iCloud" section. Moving forward, press on the note that you want to restore from the recently deleted file on your Apple device.
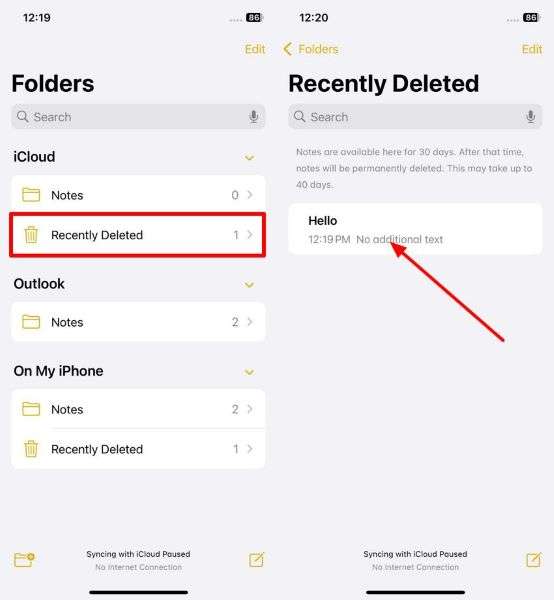
Step 2. Within the pop-up menu, press "Move" to shift the note from the deleted file to a different location. Lastly, a list of options is shown on your screen, from which you can choose which location you want to save your notes file.

Part 4. How to Restore iCloud Notes by Restoring Old iCloud Backup?
Another effective way to restore your notes is to use the iCloud backup created for your iDevice. This method will restore your notes and any other backed-up data. However, remember that you won't be able to retrieve notes from the older backup once the new one overwrites it. So, let's go through the steps on how to restore notes on iCloud using the old iCloud backup:
Step 1. Start by opening the “General” settings on your iPhone to proceed. Scroll down to tap “Transfer or Reset iPhone.” Now, choose “Erase All Content and Settings” from the options that appear to reset your device. Finally, follow the on-screen instructions to reset your device to factory settings.

Step 2. During your iOS device's setup, go to the "Apps and Data" screen and select the "Restore from iCloud Backup" option. Then, sign in to your Apple ID account and select the most recent iCloud backup, including your important notes.

Conclusion
In conclusion, this article has discussed various ways you can learn how to restore notes from iCloud. You can opt for an iOS device's built-in functionalities to restore the deleted media. However, since these functions have drawbacks, users can opt for third-party practical tools such as MobileTrans Desktop or Dr.Fone – Data Recovery (iOS) to restore iCloud notes.


