


 TL;DR:
The ideal method to transfer photos between iPhones depends on your specific conditions: utilize AirDrop for instant local sharing, Quick Start for comprehensive data migration during device setup, or MobileTrans for lossless, offline bulk transfers that bypass iCloud storage limitations.
● MobileTrans establishes a local hotspot connection rather than utilizing Wi-Fi or mobile data, enabling offline photo transfers that are up to 96.34% faster and natively compatible across iOS, Android, Windows, and Mac systems.
● Quick Start wirelessly moves your entire photo library alongside all other data strictly during a new iPhone's initial setup phase when placed nearby, whereas restoring from an iCloud Backup requires a pre-existing cloud save, active Wi-Fi, and sufficient battery power.
● For selective image sharing, iCloud Links generate a private URL for group viewing without direct app connections, while Email should only be utilized as a last resort for small quantities since it is not ideal for large batches or full-resolution files.
Ask AI for a summary
 ChatGPT
 Perplexity
 Gemini
 Claude
 Grok
Grok
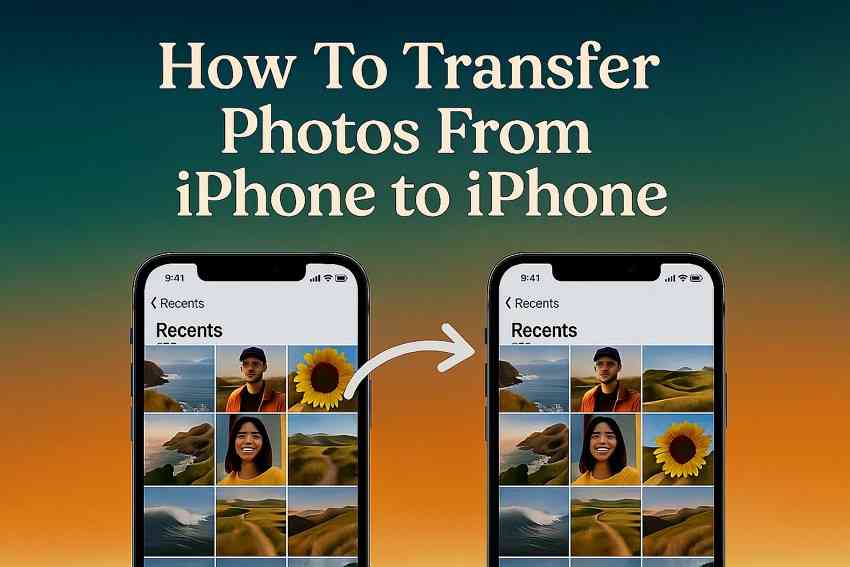
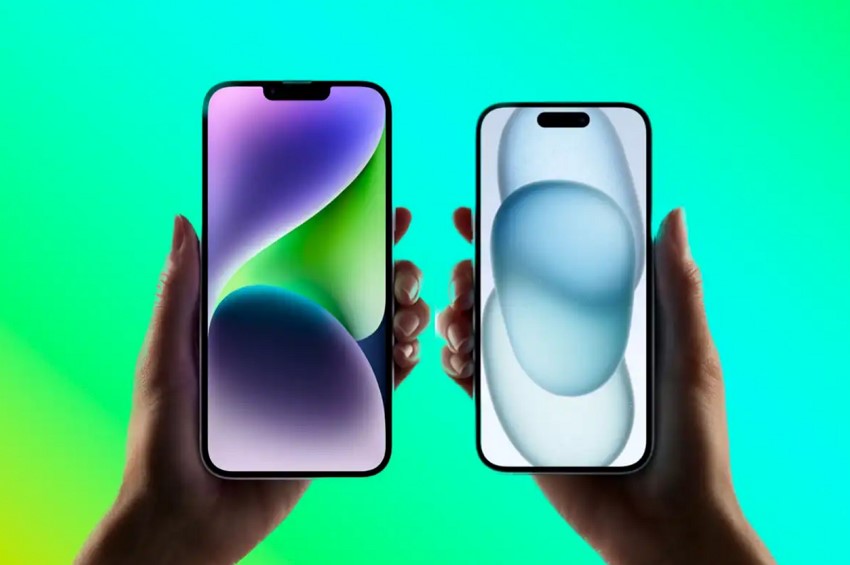
Whether you upgrade to a new device or just want to share memories with family, the fear of losing essential images can be frustrating. Many techniques exist, yet numerous users remain uncertain about which is appropriate for their circumstances. That's why you need a clear and no-fuss guide that breaks down your choices based on what they do best.
There is a perfect option for you, whether you prefer a one-click transfer or seamless sync. Hence, this guide will help you find a suitable method on how to transfer photos from iPhone to iPhone according to your preference.
In this article
-
- Way 1. [Best Method] How to Transfer Photos From iPhone to iPhone With Computer: MobileTrans
- Way 2. Transfer Photos Using iCloud Photos
- Way 3. Use Quick Start to Transfer During Device Setup
- Way 4. Restore Photos From iCloud Backup
- Way 5. AirDrop Pictures From iPhone to iPhone
- Way 6. Share Photos via Shared Albums
- Way 7. Share Photos Between iPhones Using iCloud Link
- Way 8. Use Email to Share Photos Between iPhones
- Way 9. Send Photos from iPhone to iPhone via iMessage
- Way 10. Utilize WhatsApp or Telegram to Send Photos
Part 1. Tabular Comparison of the "Best For" of the Top 10 Methods
Before we learn how to share photos from iPhone to iPhone, the following section covers a comprehensive comparison of these methods to help you make a quick choice:
| Method | Best For |
| MobileTrans | For fast and lossless transfers with no iCloud dependency |
| iCloud Photos | Automatic syncing across devices over Wi-Fi |
| Quick Start | Transferring everything (including Photos) to a new iPhone during setup |
| iCloud Backup Restore | Complete photo restoration when setting up a new iPhone from an iCloud backup |
| AirDrop | Instantly sharing selective photos with only nearby iPhones |
| Shared Albums | Sharing albums with friends or family |
| iCloud Link | Sharing photos with different users who are not in direct connection |
| Sending a few photos quickly when other methods aren’t available | |
| iMessage | Sharing images in conversations with other iOS users |
| WhatsApp/Telegram | Transferring images through chat while ensuring cross-platform convenience |


Part 2. 10 Other Ways on How to Transfer Photos From iPhone to iPhone
Having understood what to expect from the upcoming techniques, let’s delve into how do you transfer photos from iPhone to iPhone using the top 10 simple methods:
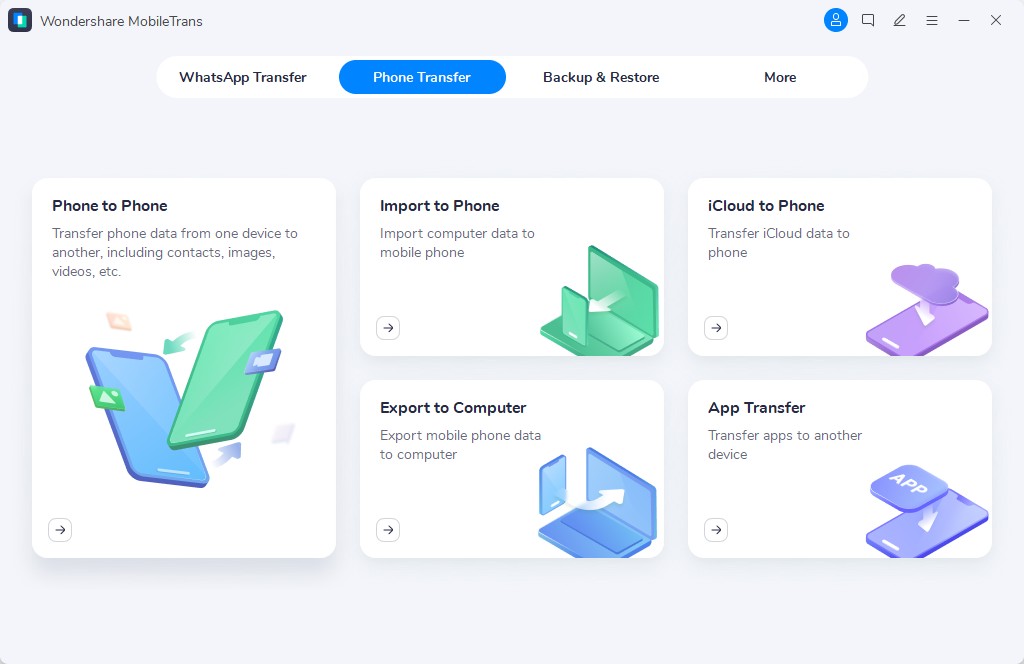
Way 1. [Best Method] How to Transfer Photos From iPhone to iPhone With Computer: MobileTrans
Ease of Use Rating: 4.9/5
Starting with the most reliable option, MobileTrans, it allows you to share your images with over 6,000+ devices running on both Android and iOS. It offers 100% privacy protection and ensures no one can access your private data so that you can have a risk-free sharing process. You can not only share photos between iPhones, but it also enables you to move videos and other data without facing any difficulty.
Not only that, but it also lets you transmit any type of application from one phone to another, which makes it a comprehensive all-in-one solution. For those looking to avoid the lengthy, exhausting process, this is the ideal tool that provides a one-click solution for your limitless data. The tool works with Windows 11/10/8.1/8/7/Vista/XP and Mac 14/13/12/11/10.15 to 10.8.
Key Features
- Transfer Speed: It is up to 96.34% faster than other transfer methods, letting you move large albums in minutes.
- Multiple File Types: You can move 18+ types of data, which include contacts, photos, and more, without any hurdle.
- Use Local Hotspot: MobileTrans relies on a hotspot instead of Wi-Fi or mobile data, so your internet bandwidth stays untouched, and your data remains safe.
A Complete Stepwise Guide to Share Images Between iPhones Using MobileTrans
Below is the step-by-step guide on how to transfer photos from one iPhone to another iPhone for your assistance:
Step 1. Open MobileTrans and Attach the Phones
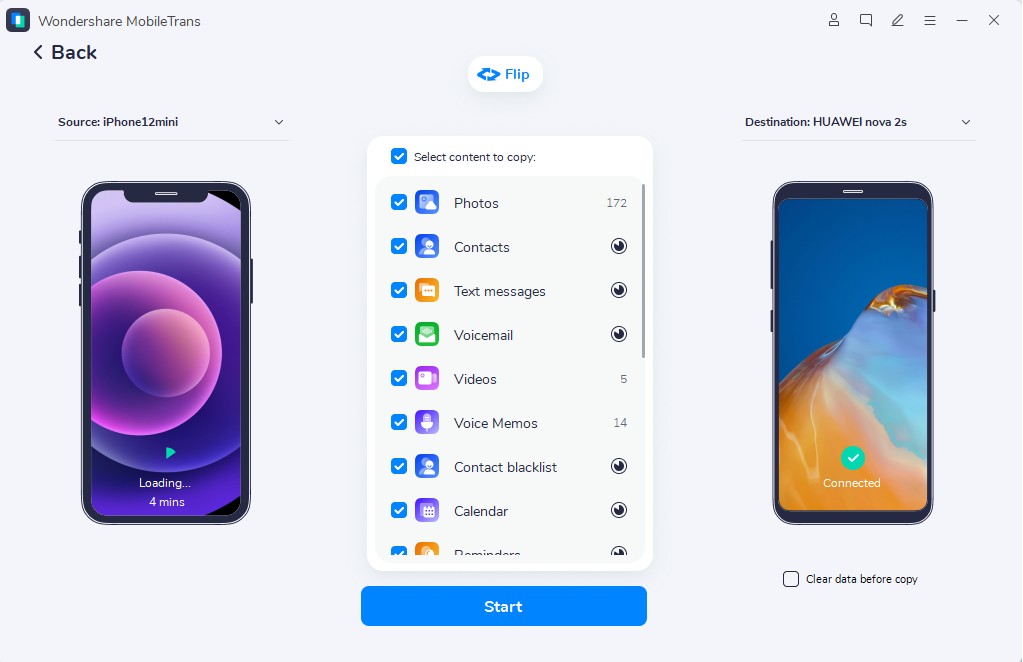
Pick "Phone to Phone"> "Phone Transfer." Choose the models from the "Source and Destination" to determine the devices.
Step 2. Choose The Desired Files
Check the "Photos" option from the list and hit the "Start" button.

Step 3. Stay There Until the Procedure Is Complete
Wait till the process of transferring photos from iPhone to iPhone is finished.
For iOS and Android users, they can also get the MobileTrans App and initiate the transfer process directly from their phone without needing a laptop.
Way 2. Transfer Photos Using iCloud Photos
Ease of Use Rating: 4.0/5
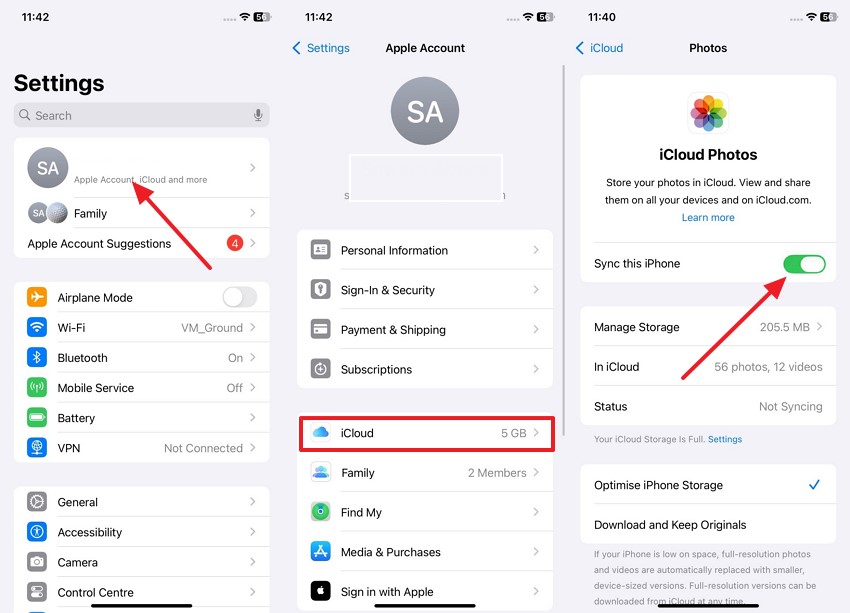
Effortlessly synchronize your images across iPhones using Apple’s cloud-based photo management system that leverages your Apple ID. You have to enable "Sync this iPhone" on both devices to confirm that any pictures uploaded to one device are immediately accessible on the other.
It is an effortless solution that guarantees your complete image collection stays current and backed up. Adhere to the provided instructions to understand how to transfer pics from one iPhone to another using iCloud:
Instructions. Go to "Settings" > Tap "Apple ID" > Select "iCloud" > "Photos." Now, toggle the "Sync this iPhone" when you access "Photos." Sign in with the same credentials on the new device to automatically synchronize the backed-up images into that device.
Way 3. Use Quick Start to Transfer During Device Setup
Ease of Use Rating: 3.0/5
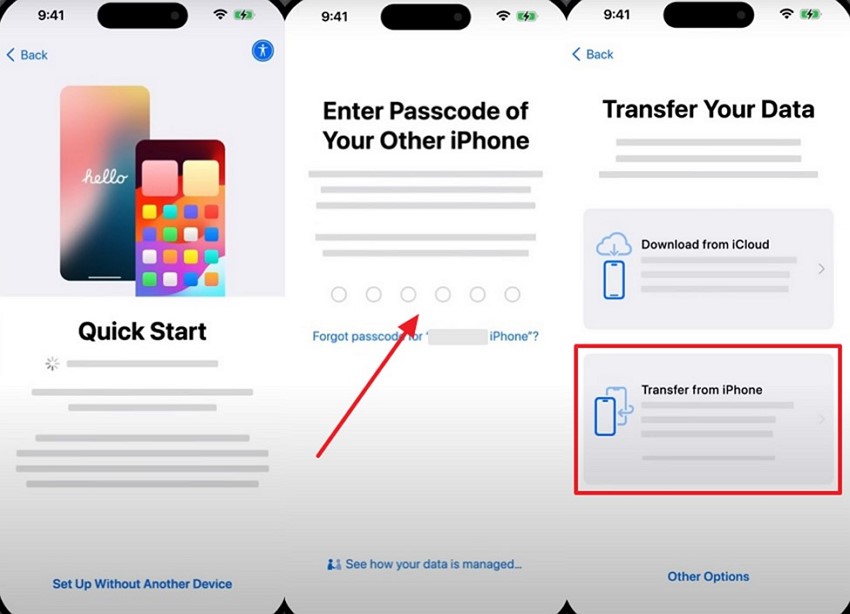
To share photos between iPhones, this feature offers seamless execution when your previous device is nearby. The Quick Start feature enables you to transfer all your data wirelessly, encompassing apps, photos, and settings, from your existing iPhone to your new one. It reduces the need for cloud backup or other software and gives a direct encrypted connection between devices by executing the following steps:
Step 1. Keep both iPhones nearby after you turn on Bluetooth and Wi-Fi. Tap the "Continue" button on the old device.

Step 2. On the new iPhone, enter your old device's passcode and select "Transfer From iPhone."
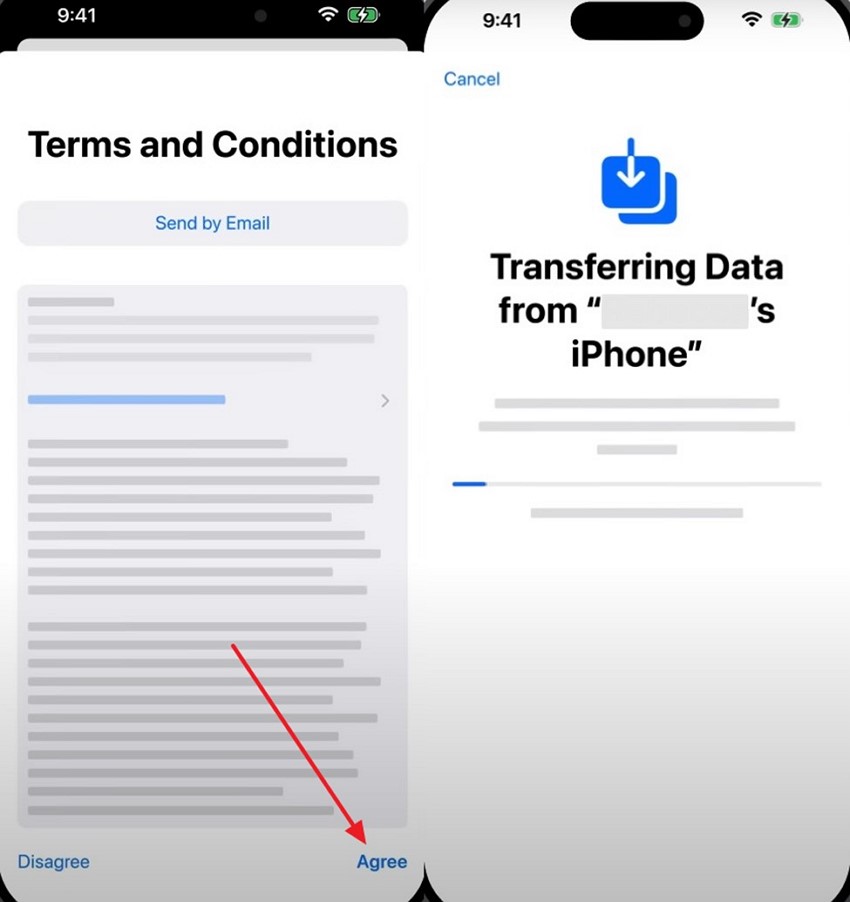
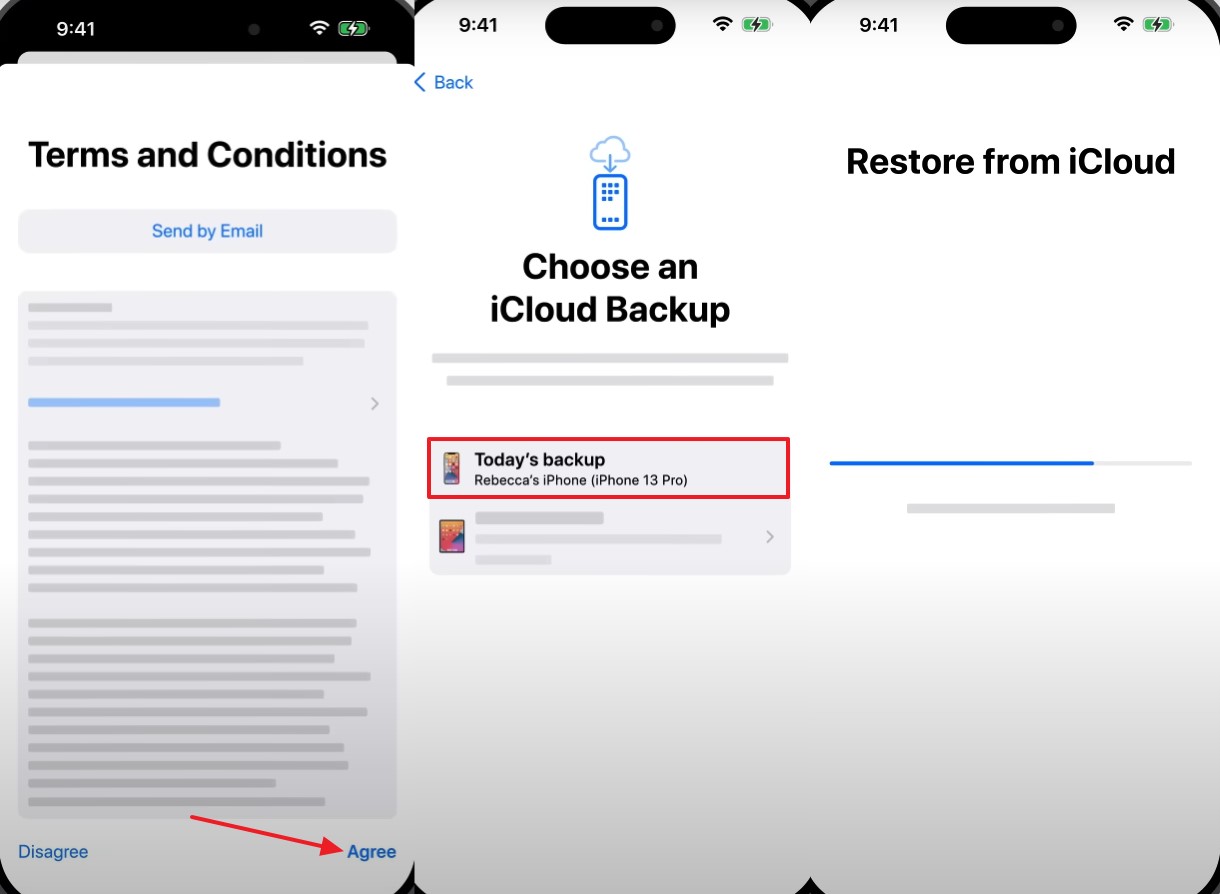
Step 3. Press "Agree" in the "Terms and Conditions" screen to start.
Way 4. Restore Photos From iCloud Backup
Ease of Use Rating: 3.5/5
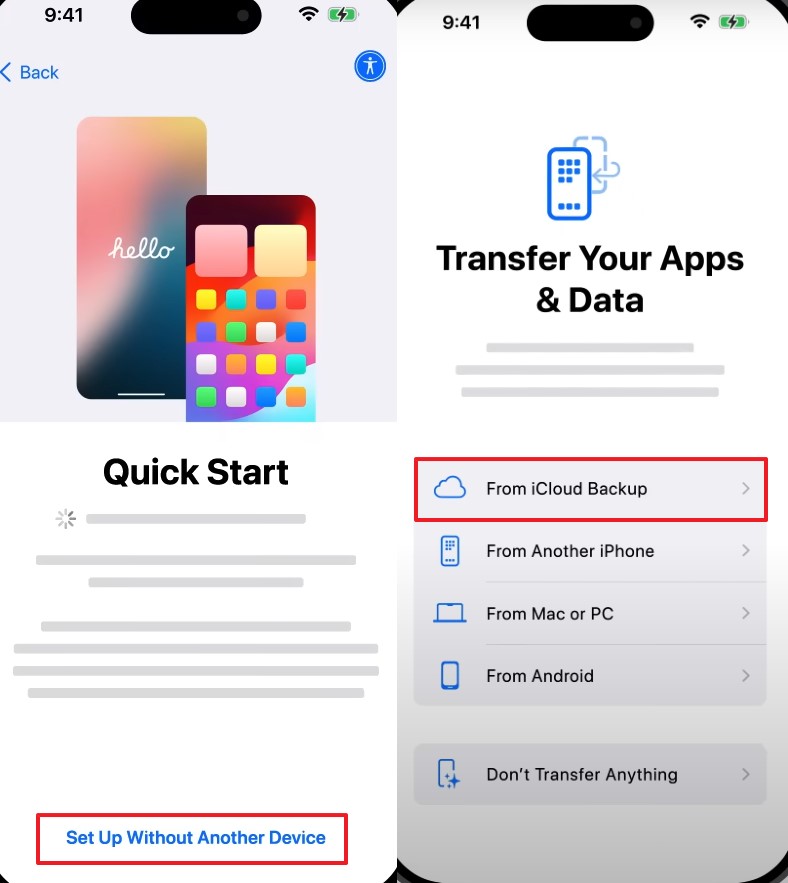
While learning how to transfer photos from iPhone to iPhone with iCloud, consider restoring the images from iCloud Backup while setting up the device. Before that, ensure you have an updated iCloud backup, Wi-Fi is enabled, and your phone is charged enough to download restored data. Unlike other solutions, it provides a complete data transfer once done through the steps mentioned below:
Step 1. Turn on the new iPhone and follow the on-screen prompt to go to the "Quick Start" interface. Choose the "Set up Without Another Device" option and pick "From iCloud Backup."
Step 2. Sign in to your Apple account and press "Agree" to the terms and conditions. Select the recent backup and follow the prompt to set up cellular service and eSIM, after which the data is successfully restored.
Way 5. AirDrop Pictures From iPhone to iPhone
Ease of Use Rating: 4.5/5
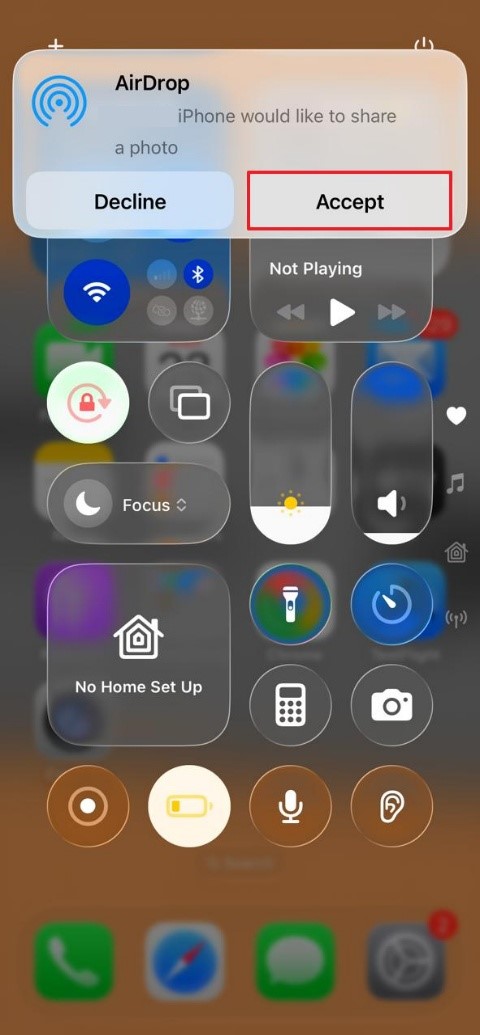
For quick photo sharing without a cable, this method offers a fast and direct solution. Using Bluetooth, it creates a secure peer-to-peer connection between nearby Apple devices, allowing you to send selected photos instantly. You can learn how to AirDrop pictures from iPhone to iPhone with the given guide, which is perfect for a one-time transfer of specific moments with family and friends:
Step 1. Pick the image, tap "Share" > "AirDrop." Choose the nearby device that appears.
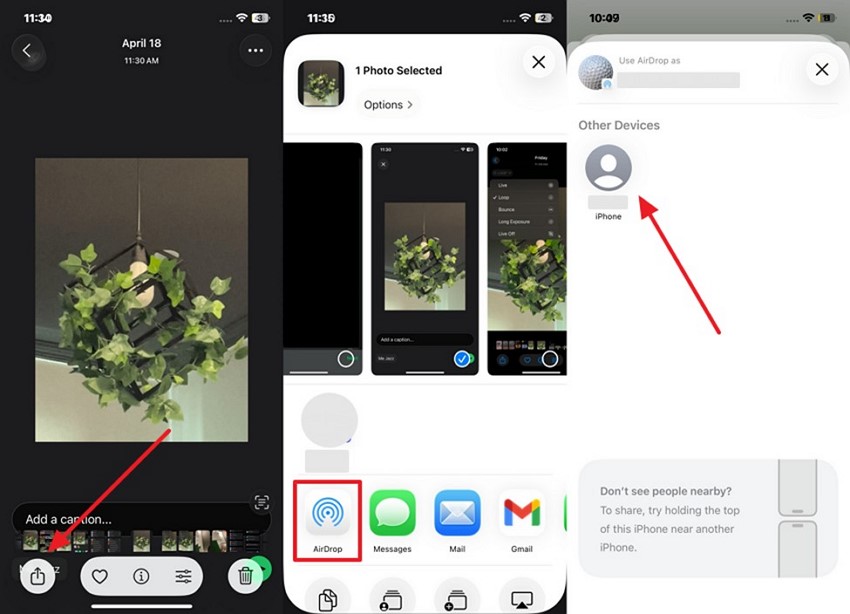
Step 2. When you see an alert on a new iPhone, press the "Accept" button.
Way 6. Share Photos via Shared Albums
Ease of Use Rating: 4.2/5
This is a standard method to confirm that the chosen images are reachable by various individuals on different iPhones. Rather than sharing images one by one, you can assemble an album and invite others to see or add to it. Share photos between iPhones by following the guide, which is ideal for collaborative collections, making it easy to stay connected over time without cluttering the main gallery:
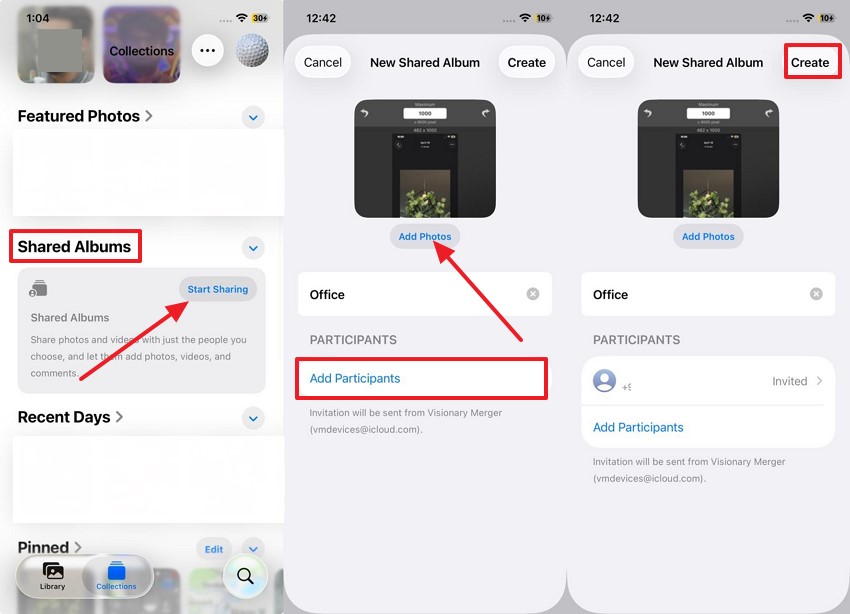
Step 1. Open "Settings" > Press "Apple ID" > Select "iCloud" > "Photos." Now, toggle the "Shared Albums" when you access "Photos."
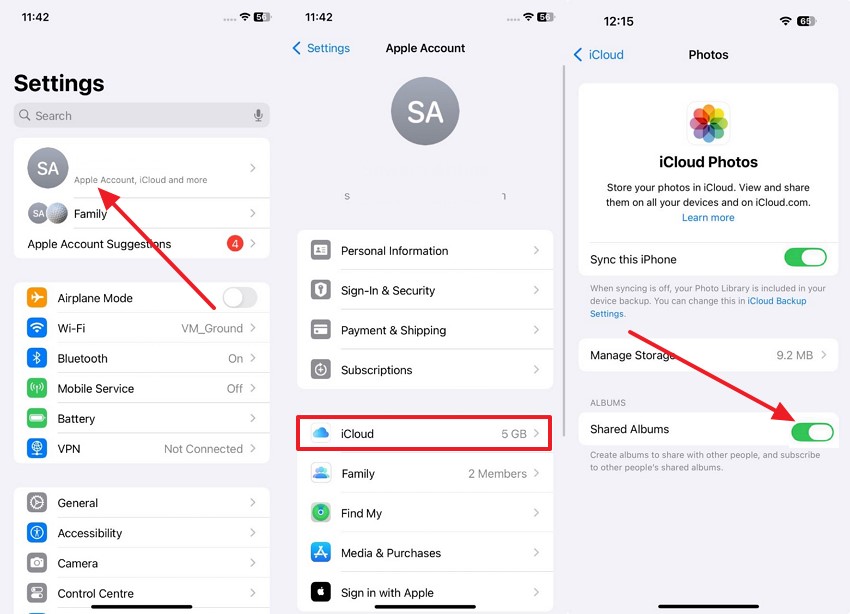
Step 2. Access Photo Library, scroll down to access "Share Albums," > Press "Start Sharing." Click "Add Photos," "Add Participants," and tap "Create."
Way 7. Share Photos Between iPhones Using iCloud Link
Ease of Use Rating: 4.0/5
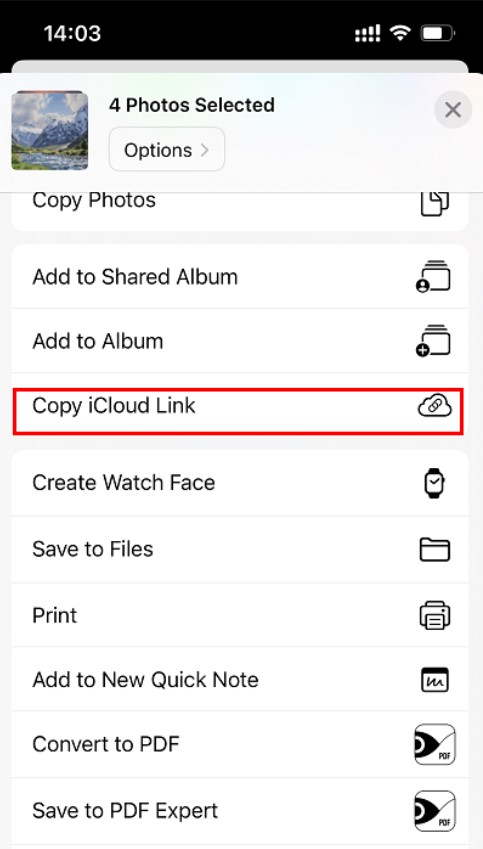
When figuring out how to transfer photos from iPhone to iPhone, use this approach to send images in groups without depending on any app. This function enables you to generate a private link of selective photos, which can be shared through any communication means. The data is accessible for viewing or downloading straight from the link. To know how to do this method, follow the given guidelines:
Instructions. Open the Gallery and select the desired images. Press the "Send" icon > "Copy iCloud Link" to send them to another device.
Way 8. Use Email to Share Photos Between iPhones
Ease of Use Rating: 3.7/5
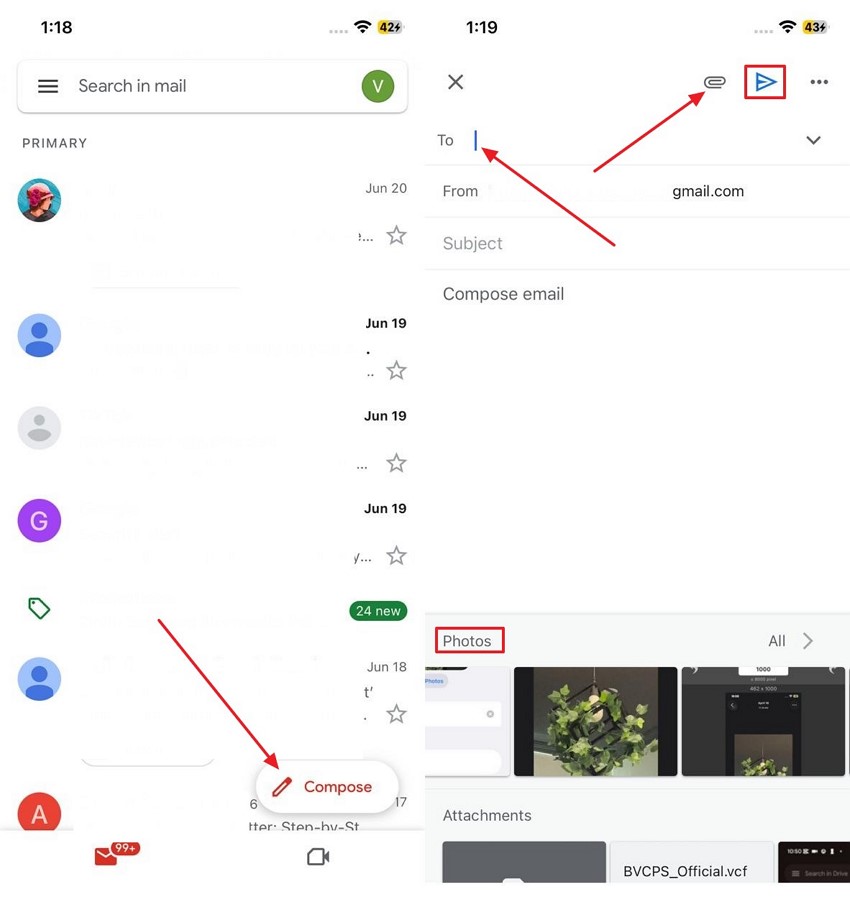
It remains a reliable option to send a few photos between iPhones, especially when other solutions aren't available. Simply attach the image to an email and send it to your own or someone else's address, and no special setup is required. You can learn how to transfer photos from iPhone to iPhone by doing the given steps, but it's not ideal for large batches or full-resolution images:
Instructions. Launch Gmail, press "Compose" > Click "Clip" icon > Select images from "Photos." Enter the recipient's email and tap "Send."
Way 9. Send Photos from iPhone to iPhone via iMessage
Ease of Use Rating: 4.1/5
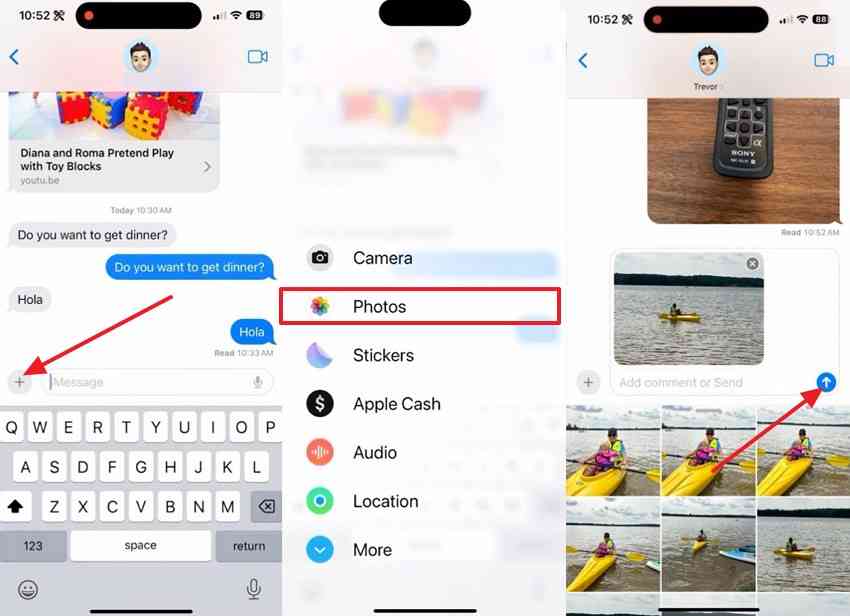
Sharing pictures through iMessage is a simple yet easy way when both iPhones are signed in with Apple IDs and have enabled this service. This method allows you to share photos between iPhones by letting you send full-quality images instantly. You can follow the given process, which is perfect for casually sharing memories with friends or transferring pictures between your own devices:
Instructions. Open the "Message" app > access the chat. Press the "Plus" icon > "Photos" option. Pick the "Upward" arrow to share.
Way 10. Utilize WhatsApp or Telegram to Send Photos
Ease of Use Rating: 4.5/5
Communication apps offer a convenient way to send images between iPhones, especially when you are not using iMessage. Apps like WhatsApp or Telegram allow you to send more than one picture quickly, with optional settings to preserve data. They are perfect for sharing in chats and groups, and for better assistance, here is how to transfer pics from one iPhone to another by following the given steps:
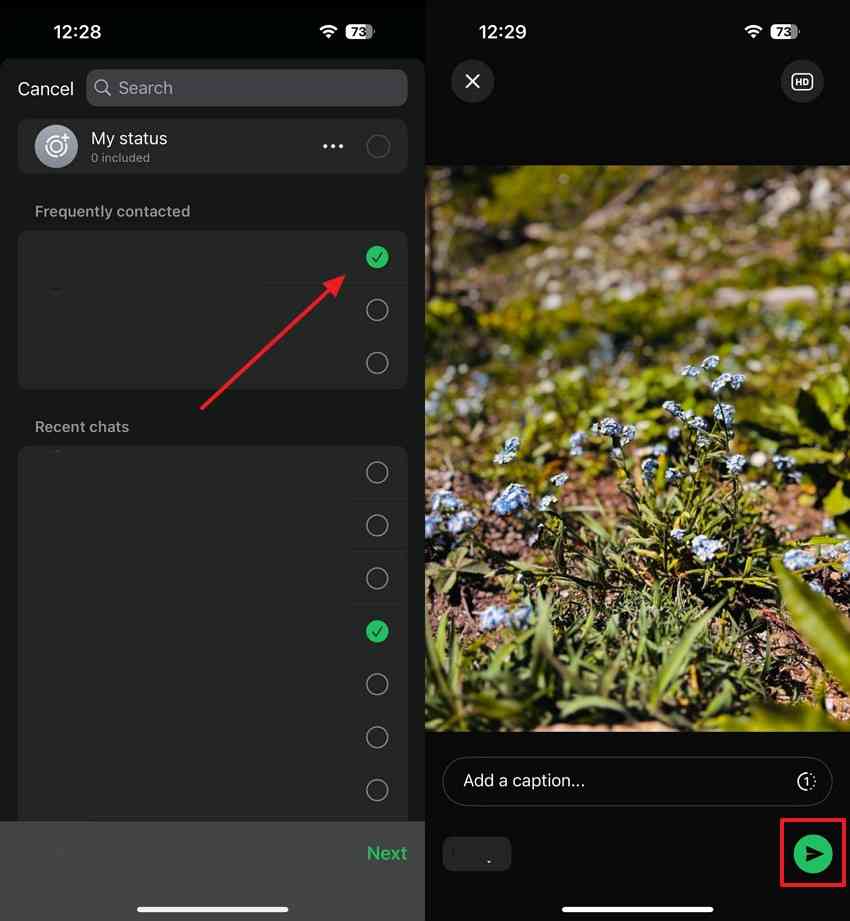
Step 1. Open the gallery and press the "Share" icon. Choose the "WhatsApp" application.
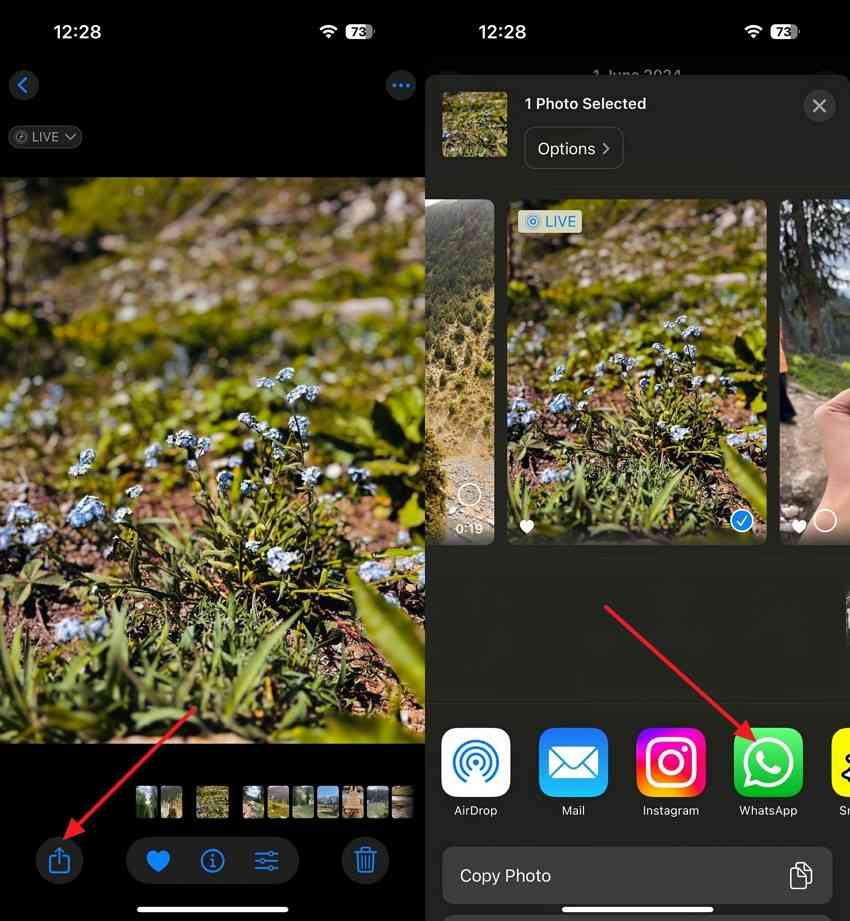
Step 2. Select the desired contact and hit the "Send" button.
Conclusion
In conclusion, this guide has provided you with the top 10 methods to share photos between iPhones. From AirDrop to using a third-party tool, you can explore all the methods with a detailed, step-by-step guideline. Among all, it is suggested that MobileTrans is the best option, allowing you to get high-quality transfers from one device to another without any hindrance.


