


 TL;DR:
To transfer photos from Google Drive to Google Photos, you can directly import them through the Google Photos web interface, automate the process using the Google Backup and Sync desktop application, or manually download and re-upload the files on mobile devices.
● For direct web transfers, log into Google Photos, click the Upload button, select Google Drive, and choose the desired files directly from the MY DRIVE tab.
● Windows and Mac users can automate transfers by installing Google Backup and Sync, checking the Upload photos and videos to Google Photos preference, and dragging local files into the dedicated desktop folder.
● Transferring on an iPhone requires a manual two-step process of using the Send a copy feature in Google Drive to save images to local device storage before uploading them via the Google Photos app.
Ask AI for a summary
 ChatGPT
 Perplexity
 Gemini
 Claude
 Grok
Grok
Do you ever feel lost in Google Drive, searching for your photos? I've been there, sifting through countless files, desperately trying to find important pictures. It used to be a pain until I discovered this simple method to move photos from Google Drive to Google Photos.
This step-by-step guide will teach you how to transfer your photos from Google Drive to Google Photos. So, the mess of scattered memories will turn into a neatly organized collection.
We'll walk you step by step through this seamless transition. We'll simplify your digital life and make sure your precious memories are safe and sound in Google Photos.
In this article
Part 1: How to Move Photos from Google Drive to Google Photos?
Transferring photos from Google Drive to Google Photos is easy!
If you've got pictures in Google Drive that you want to move to Google Photos, here's what to do.
Method 1: Directly Upload from Google Drive to Google Photos
This is a very straightforward method. Follow these steps to directly transfer photos from Google Drive to Google Photos:
Step 1: Open a web browser and go to Google Photos. Sign in with your Google account.
Step 2: At the top-right corner of the Google Photos interface, you'll find the Upload button. Click on this to kickstart the transfer process.
Step 3: Select Google Drive to continue.

Step 4: Once you've connected to Google Drive, you'll notice a tab labeled "MY DRIVE." Click on it to access the files and photos stored in your Google Drive account.

Step 5: Select the photos or files you wish to back up to Google Photos. You can choose individual items or multiple items at once.

Step 6: After you've made your selection, press the Upload button. Google Photos will now begin uploading the selected photos from Google Drive.
Method 2: Transfer using Google Backup and Sync
If you are wondering how to sync Google Photos with Google Drive, then Google Backup and Sync is here to help you with that. It is an official application that easily backs up photos to both your Google Drive and Google Photos. The backup does not come only from the computer, but you can also upload from external sources, such as hard drives or SD Cards. Below, you'll find a step-by-step guide to using Google Back & sync:
Step 1: Install the Backup and Sync app on your computer (compatible with Mac and Windows). Once installed, log in using your Google account.

Step 2: Now, it's time to select the folders you wish to back up. While configuring your preferences, be sure to check the box that says, "Upload photos and videos to Google Photos." Afterward, click Next.

Step 3: Upon this setup, the app will automatically create a dedicated Google Drive folder on your PC. Just drag and drop your desired photos into this folder, and the app will take care of the rest.

Step 4: To initiate the sync process, you have the option to Sync everything in My Drive. You can also specify particular folders for synchronization. Choose your preference and click START.
For this method to work, you need to have a Google Drive desktop downloaded, with the relevant photos stored on your local device. This setup enables you to opt for backing up the pictures in Google Drive to Google Photos during the synchronization process.
Part 2: How to Transfer Photos from Google Drive to Google Photos on iPhone?
If you are an iPhone user, here’s how to transfer photos from Google Drive to Google Photos on your iPhone. Follow these simple steps:
I. Download Photos from Google Drive
Step 1: Open the Google Drive app on your iPhone. Sign in to your Google account.
Step 2: Go to the folder that has your photos. You'll find three dots; tap on them to access the options menu.
Step 3: Choose Send a copy from the options menu. Select Save Image/Video to download the selected file.

II. Upload Photos to Google Photos
After saving photos and videos to your iPhone, you can now transfer them to Google Photos. Follow the instructions:
Step 1: Open the Google Photos app on your iPhone.
Step 2: If you wish to organize the transferred photos, tap the "+" sign at the bottom to create a new album. Give the album a name and tap Create.

Step 3: Tap the album you created or the main library. Select Upload and then Photos and Videos to add photos.

Step 4: Select the photos you've downloaded from Google Drive and tap UPLOAD.

The selected photos will begin uploading to Google Photos. The time it takes depends on the number and size of the photos and your Internet connection.
A Convenient Solution: Back Up Photos to PC
Another way to save your memories is to back up your photos to your PC. Especially for iPhone users, backing up photos to a personal computer serves as a smart and convenient solution.
It not only offers data security but also serves as an efficient solution for transferring photos from Google Drive to Google Photos. It simplifies the process and provides a larger and more user-friendly interface. It also offers better organization, and faster transfer speeds compared to mobile devices.
 4.5/5 Excellent
There are various tools and methods available to help you with this process. The Wondershare MobileTrans Backup & Restore feature is one of them. It offers a user-friendly solution to back up and restore your valuable photos. With just one click, you can secure your visual memories and have them readily accessible on your PC. Here's how:
- Download and install Wondershare MobileTrans on your computer.
- Connect your smartphone or camera to your PC using a USB cable.
- Launch the MobileTrans software and choose the Backup & Restore feature.

- Select the types of data you want to back up, including photos.
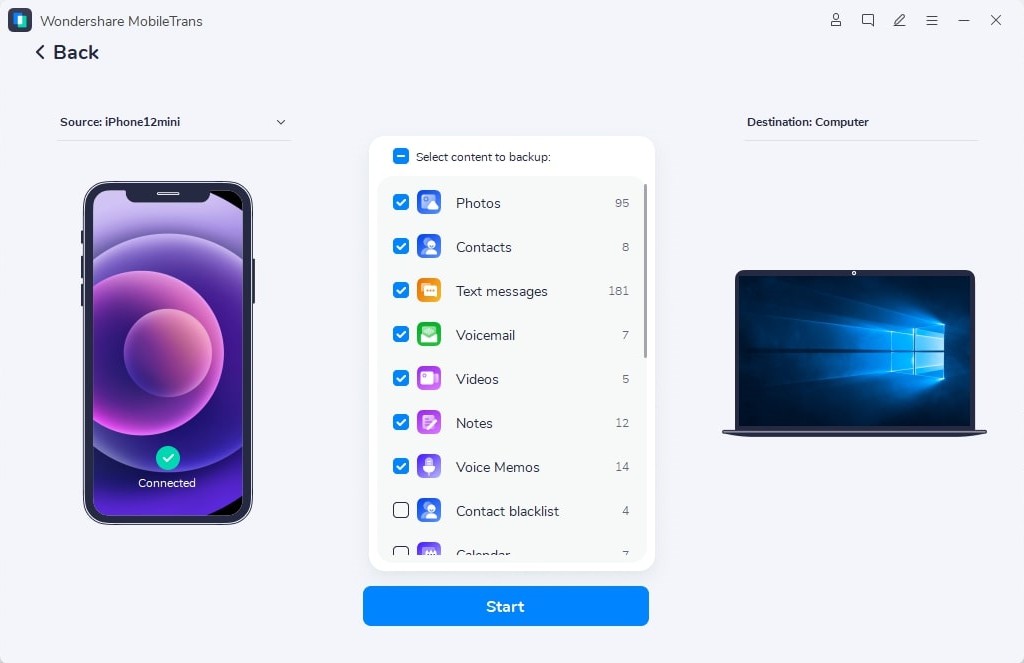
- Click the Start button to begin the backup process. Your photos will be securely stored on your PC.
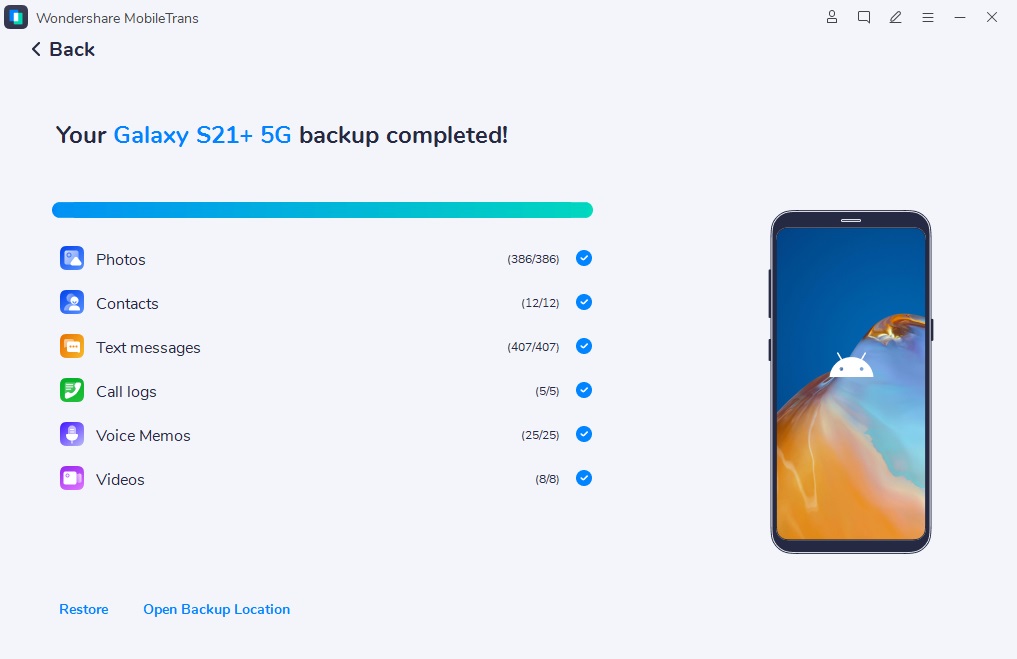
Now, your special photos are safe on your computer, and you can look at them anytime. It's an easy way to make sure your memories are always there for you.
Conclusion
In summary, moving your photos from Google Drive to Google Photos is important for keeping your memories safe and organized. The guide gives you easy steps for how to transfer from Google Drive to Google Photos. Plus, using the Wondershare MobileTrans Backup & Restore feature makes it even simpler. It helps you store your photos on your computer, and from there, you can easily put them on Google Photos. This way, you can make sure your photos are safe and you can enjoy them whenever you want.
FAQ
-
1. How do I move photos from Google Drive to Gallery?
To move photos from Google Drive to your device's gallery, open Google Drive. Select the photos you want to move, tap the three dots (options) icon, and choose "Download" or "Save to device." Next, open your device's gallery app to find and access the downloaded photos in your local storage. -
2. How do I download all photos from Google Drive?
To download all photos from Google Drive: open Google Drive, and navigate to the folder containing the photos. Select all the photos, click the three dots (options) icon, and choose "Download." This creates a zip file with all selected photos. Unzip the file to access your photos.


