Having trouble with your notes not syncing between iPhone and Mac? Usually, your iPhone will automatically sync notes to your Mac. However, imagine needing an important note, but it's not there when you switch devices. Frustrating! That's why fixing this syncing problem is a big deal.
In this blog, we'll dig into why notes might not be syncing and show you easy ways to fix it. iCloud syncing is very convenient for Apple users, and you will learn all about it in this article. Keep reading!
In this article
How to Solve Notes Not Syncing Between iPhone and Mac Issue
Are you facing the frustration of your notes not syncing between your iPhone and Mac? We've got straightforward solutions to get things back on track. Follow these steps to troubleshoot and resolve the syncing problem:
Ensure iCloud Notes Syncing Is Enabled for Mac and iPhone
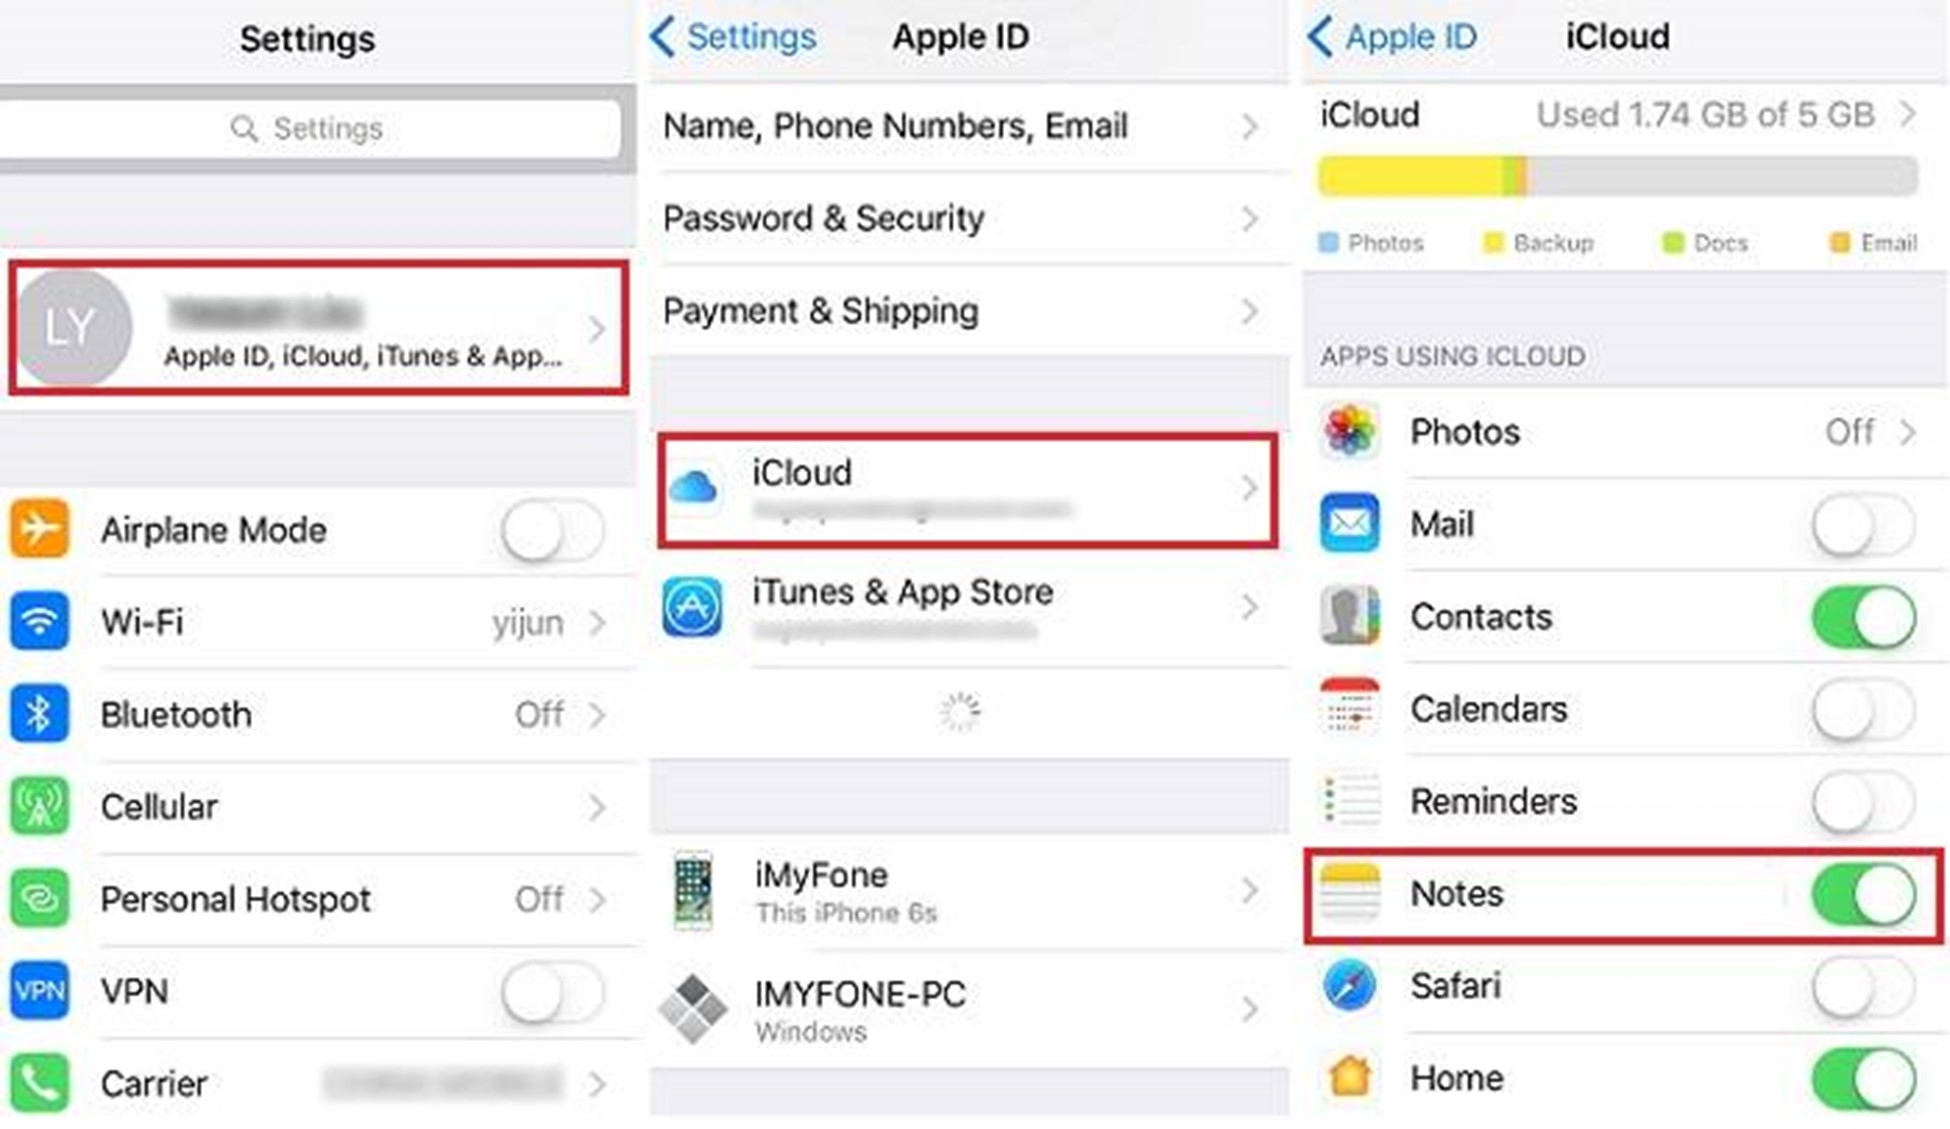
One reason for iCloud Notes not syncing between Mac and iPhone is that the iCloud syncing option is off. Head to your device settings, and make sure iCloud syncing is enabled for both your Mac and iPhone. This ensures that your notes are up to date on both devices.
Check iCloud Storage Availability
Insufficient iCloud storage can also hinder note syncing. If your iCloud storage is full, your notes won't sync properly. Ensure you have enough space by managing your iCloud storage settings. Delete unnecessary items or consider upgrading your storage plan if needed.
Update iOS and macOS to the Latest Version
Running outdated operating systems can lead to syncing issues. Ensure both your iPhone and Mac are running the latest iOS and macOS versions. Updates often include bug fixes and improvements in syncing functionality. This addresses potential issues with note synchronization.
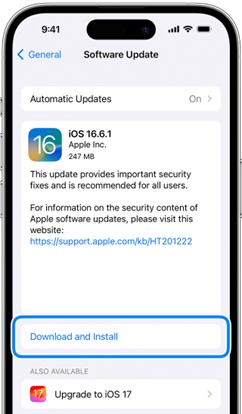
For your iPhone, connect to Wi-Fi, go to Settings, tap on General, and then select Software Update. If there's an update, tap Download and Install, and when it's done, restart your iPhone.
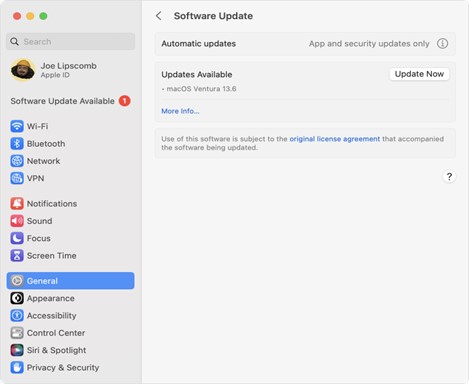
For your Mac, connect to Wi-Fi, click the Apple logo in the top-left corner, choose System Preferences, and click on Software Update. If there's an update, click Update Now, and when it's done, restart your Mac.
Verify Network Connectivity on Both Devices
A stable internet connection is crucial for easy note syncing. Check the Wi-Fi or cellular connection on both your iPhone and Mac. If one of them has a weak or no connection, it could be the cause of the syncing problem. Ensure both devices are connected to a reliable network.
Restart iCloud and Notes on Both Devices
Sometimes, a simple restart can do wonders. Restart iCloud on your Mac and iPhone, along with the Notes app. This helps refresh the syncing process and resolve any temporary glitches. After restarting, check if your notes are syncing as expected.
Check Account Settings for iCloud on Mac and iPhone
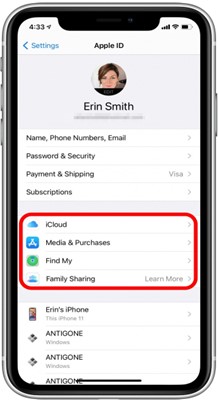
Incorrect iCloud account settings may lead to syncing issues. Verify that you are signed in with the correct iCloud account on both your Mac and iPhone. If there are discrepancies, sign out and sign back in with the correct account details to ensure proper synchronization.
Disable and Re-enable iCloud Notes Syncing
A quick way to kick-start the syncing process is to toggle off and then on the iCloud Notes syncing feature. Disable iCloud Notes on both your Mac and iPhone. wait for a moment, and then re-enable it. This action triggers a fresh attempt at syncing your notes. It potentially resolves any issues in the process.
Resolve Conflicts in the Notes App
Conflicts in the Notes app can interfere with syncing. Open the Notes app on both your Mac and iPhone and resolve any conflicting changes manually. This ensures that the content aligns correctly. This promotes smoother synchronization across devices.
Check for Software Updates on Mac and iPhone Apps
Besides updating iOS and macOS, ensure that both the Notes app on your iPhone and the Notes application on your Mac are updated to the latest versions. Incompatibility due to outdated app versions may contribute to syncing issues.
Contact Apple Support for Further Assistance
If all of these troubleshooting tips above fail, reaching out to Apple Support is a viable option. They can provide personalized assistance based on your specific situation.
Before contacting support, ensure you've tried the aforementioned solutions. This is important so that you can provide relevant information about your efforts to resolve the issue.
Tackling notes not syncing between iPhone and Mac involves checking some settings. It also requires you to ensure connectivity and perform simple troubleshooting steps like the ones we have discussed above. By following these solutions, you'll likely find the cause of the problem and get your notes syncing once again.
Save Your Important Notes on Mac/PC
Now that your iPhone and Mac are syncing notes smoothly, let's make sure your important information stays safe. While syncing helps you access things instantly, creating a backup gives you extra protection in case something unexpected happens.
Let's talk about an easy way to back up and bring back your notes using Wondershare MobileTrans - Backup & Restore.
It's a reliable tool that makes the backup and restore process safe and quick. It does this with the help of its Backup & Restore feature. It is compatible with over 6,000 devices across iOS and Android platforms. It supports you to back up and restore notes, photos, videos, files, music, etc.
Wondershare MobileTrans
Move Your Data to Computer Easily
- • No data loss. No data leaks.
- • Support various data, including files, photos, videos, apps, contacts, etc.
- • Compatible with over 6,000 types of devices acorss Android and iOS.

 4.5/5 Excellent
Follow these simple steps on your Mac or PC to keep your notes secure.
Step 1: Download and launch Wondershare MobileTrans on your computer.
Step 2: Use a USB cable to connect your iPhone to your computer. MobileTrans will detect your device automatically.
Step 3: On the main screen, select the Backup option. This will initiate the process of creating a backup of your iPhone data, including your important notes.
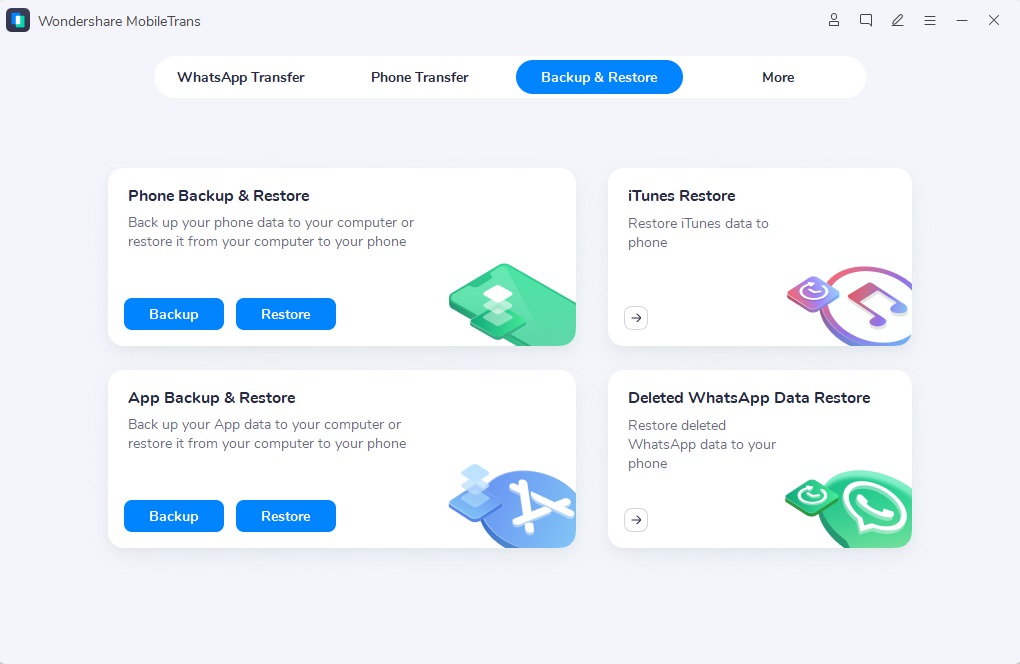
Step 4: MobileTrans allows you to select specific file types for backup. Ensure Notes is selected to include your important notes in the backup.
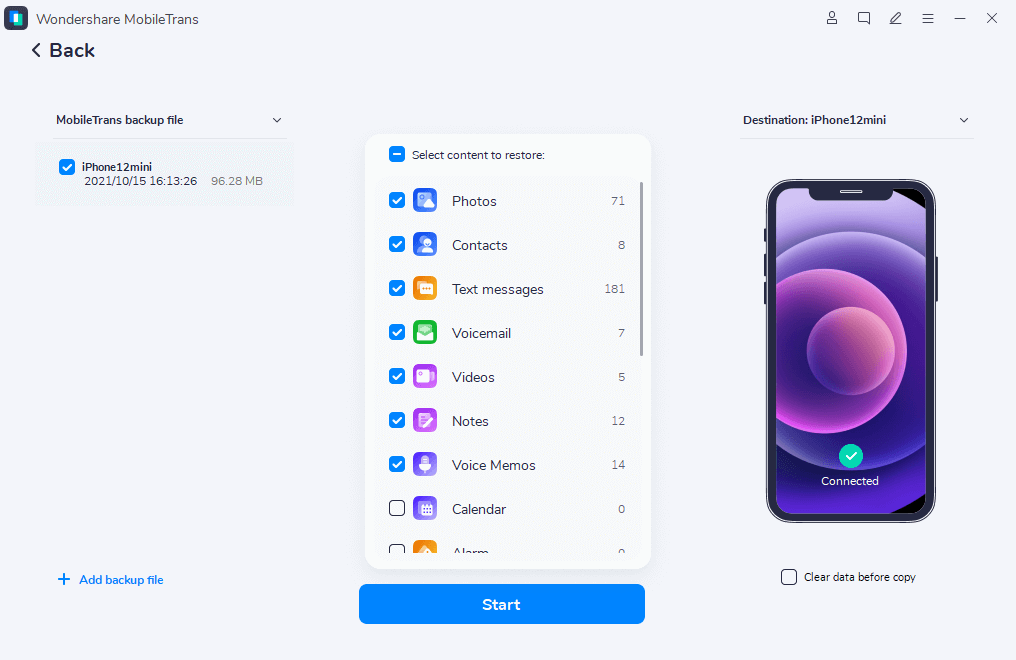
Step 5: Click on the Start button to begin the backup process. MobileTrans will efficiently create a backup of your selected data, including notes.
Wait for the backup process to complete. Once finished, MobileTrans will notify you. You now have a secure backup of your notes on your Mac or PC.
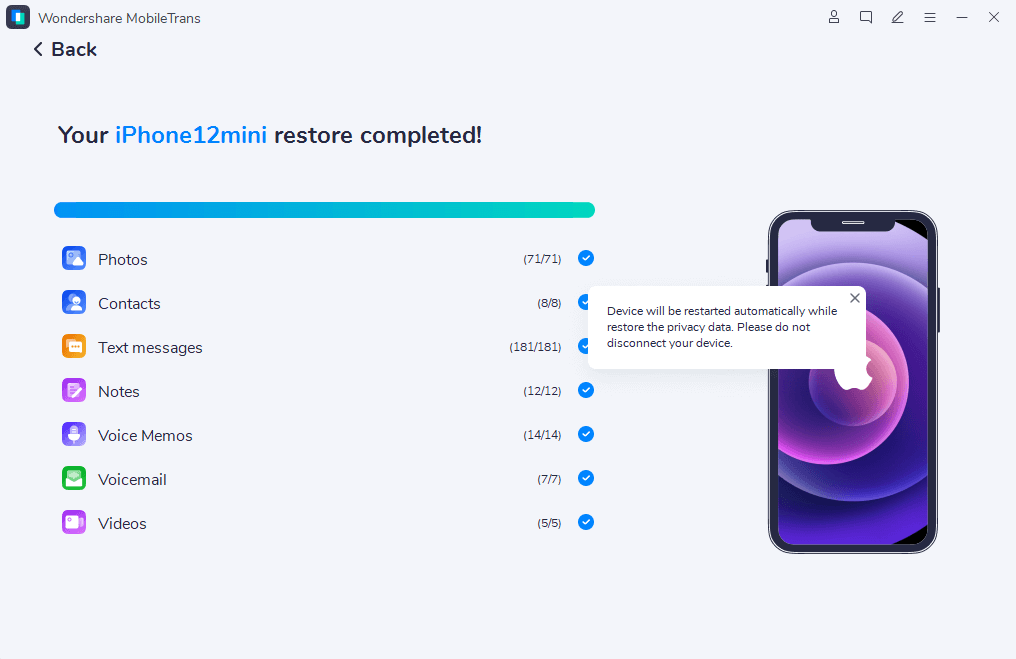
By using MobileTrans, you will be able to secure your notes. You will also have a convenient solution for restoring them when needed. Regularly creating backups adds a layer of protection to your data. It provides peace of mind in case of unexpected events or device issues.
Conclusion
Now that you've sorted out syncing and backup, you've got a strong system for handling your notes. By using the simple solutions that we provided in this article, you make sure your important info smoothly goes between your devices. To keep your notes safe, it's important to have a backup plan.
MobileTrans is an easy-to-use tool that helps you backup your notes on both Mac and PC. Just follow the easy steps we talked about earlier. Your important notes will be safe and easy to get back to whenever you need them.
These practical steps will make it easier to get to your notes. It will also protect them from possible losses. Use these methods to keep your notes organized, easy to reach, and safe, so you can focus on your tasks and ideas without worries.

 4.5/5 Excellent


