


 TL;DR:
You can sync notes from an iPhone to a Mac automatically using iCloud, perform bulk offline backups via Wondershare MobileTrans, or transfer individual notes wirelessly using AirDrop, Gmail, or the Messages app.
● To enable continuous iCloud syncing, both devices must run the latest OS versions to prevent sync failures, connect to a stable Wi-Fi network, and have the Notes toggle enabled in their respective Apple account settings.
● Wondershare MobileTrans requires a USB or Lightning cable connection and is best suited for users who need to back up a large volume of notes locally or transfer data across different operating systems.
● Sharing notes via AirDrop, Gmail, or Messages bypasses iCloud synchronization entirely, making these methods optimal for users who only need to manually import specific, individual notes.
Ask AI for a summary
 ChatGPT
 Perplexity
 Gemini
 Claude
 Grok
Grok
It can be truly annoying to sometimes write notes on Mac and other times on your iPhone, because then the notes will be scattered across both devices and hard to find. Several notes are here, and others are there.
Are you also frustrated with this situation? Don’t worry. We have got you covered.
The solution is the same as transferring iPhone photos to Mac. You can put them in the same place by syncing your notes from your iPhone to your Mac. But how can you do this?
This guide is here to help you easily sync your iPhone notes with your Mac. You will learn how to use both built-in features and third-party tools. Keep on reading to find out more.
In this article
How to Sync Notes from iPhone to Mac Fast
One of the best methods to sync iPhone notes with Mac is via Wondershare MobileTrans. This versatile tool offers a quick and efficient solution. You can finish the syncing process within minutes through its Backup feature under Backup & Restore.
The following features give it a competitive edge over other methods:
-
Simple Interface
The beauty of Wondershare MobileTrans lies in its simplicity. You don't need to be a tech wizard to use it. With just a few clicks, you can ensure that all your notes are securely backed up and ready to sync.
-
Backup & Restore Feature
The Backup feature is a game-changer. It provides a reliable way to safeguard your notes. It streamlines the syncing process and acts as a safety net. This helps prevent any accidental loss of crucial information.
-
Efficient Data Transfer
Wondershare MobileTrans enables quick and reliable transfer of data. It can transfer over 18 types of data, including contacts, messages, and media, between devices.
-
Cross-Platform Compatibility
MobileTrans supports over 6,000 types of devices across both iOS and Android platforms.
Wondershare MobileTrans
Sync iPhone Notes to Mac with a Few Clicks!
- • No data loss. No data leaks.
- • Support various data, including files, photos, videos, apps, contacts, etc.
- • You can import a large number of notes and other data to Mac.
 4.5/5 Excellent
In addition, the steps for using it are quite easy. Follow the steps below to safely sync iPhone notes to Mac with only a few clicks:
-
Step 1: Begin by downloading and installing Wondershare MobileTrans on your computer.
-
Step 2: Connect your iPhone to your Mac using a USB or lighting cable. MobileTrans will automatically detect your device.
-
Step 3: Launch Wondershare MobileTrans. Select the Backup & Restore option from the main menu. This is where the magic happens.
-
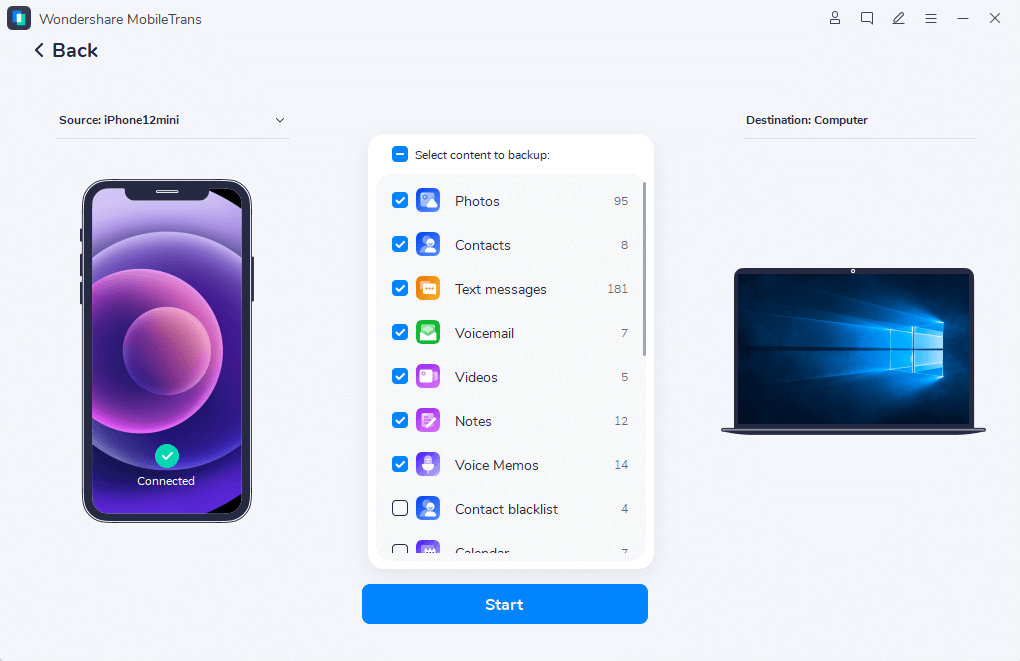
Step 4: Click on the Backup option to initiate the backup process. Wondershare MobileTrans will prompt you to select the types of data you want to back up. Check the box next to Notes.

-
Step 5: Hit the Start button, and Wondershare MobileTrans will begin the backup process. The speed is impressive.
-
Step 6: Allow Wondershare MobileTrans to complete the backup. The progress will be visible on the screen. Once done, you're all set.
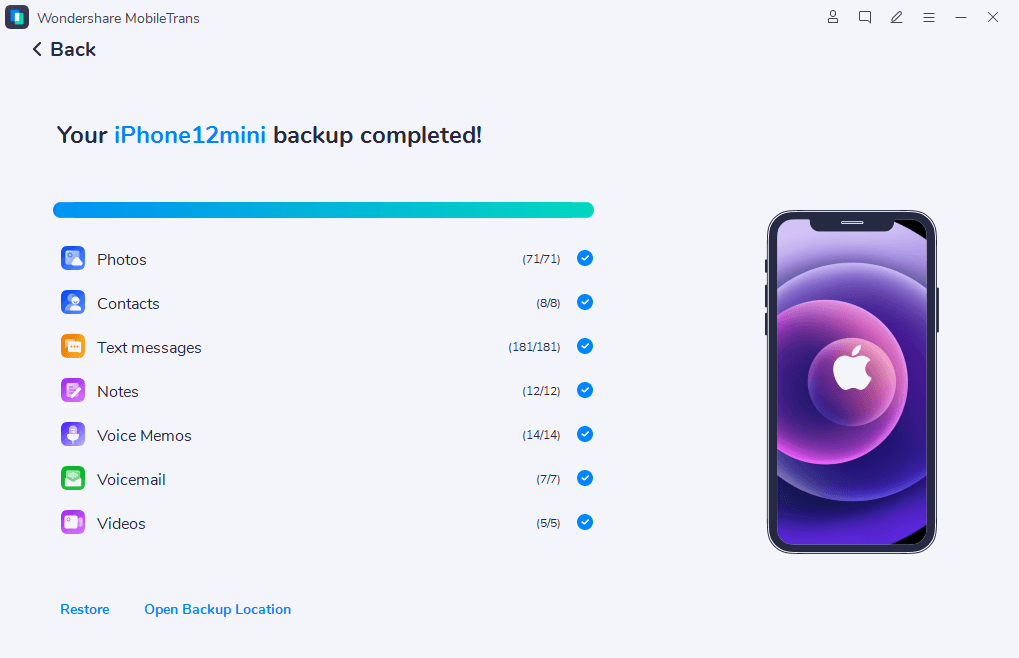
Congratulations! You've successfully backed up your notes from your iPhone to your Mac using Wondershare MobileTrans. Now, your iPhone notes are ready to be seen on your Mac computer. You can use the same tool to move Mac notes onto your iPhone.
How Do I Sync Notes from iPhone to Mac With iCloud
Aside from MobileTrans, you can also choose to sync iPhone notes with Mac with iCloud. It ensures easy access to your notes across devices. But before you start the process, there are some preparations that you have to put in place.
Turn on iCloud on your iPhone
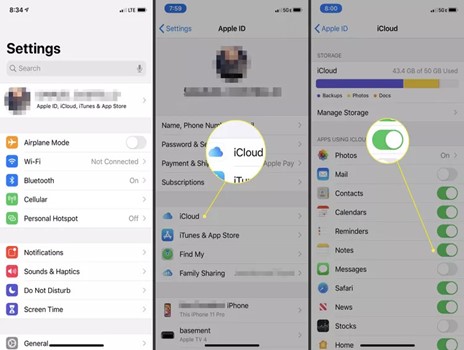
Ensure iCloud is enabled on your iPhone. Go to Settings, tap your name, select iCloud, and switch on the Notes toggle.
Enable iCloud on Mac
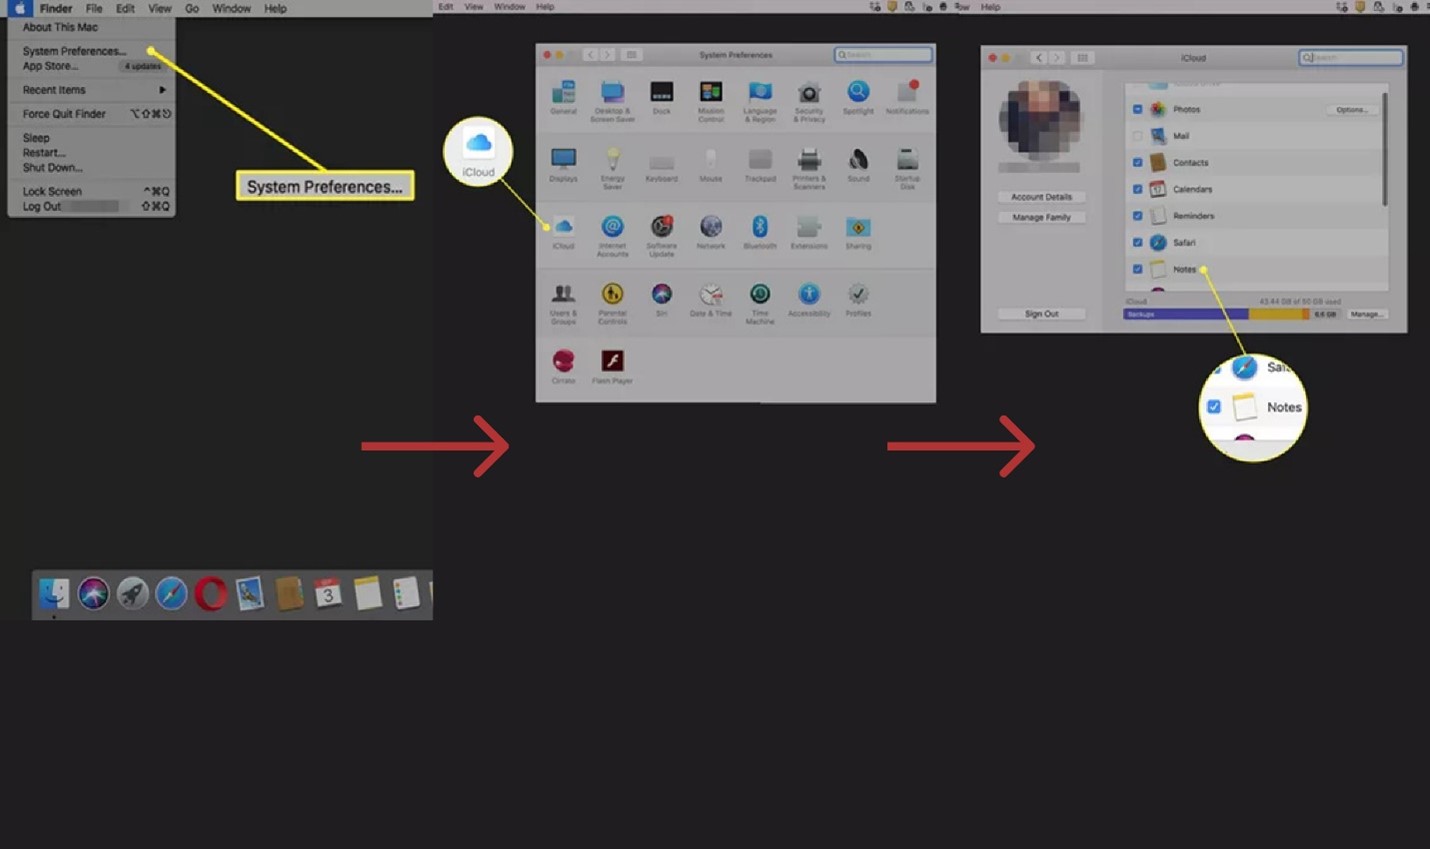
On your Mac, navigate to the Apple menu. It is in the top left corner of the Apple menu. open System Preferences. Click iCloud, and tick the Notes box. This ensures iCloud synchronization.
Update Software
Make sure both your iPhone and Mac have the latest iOS and macOS versions. Updates often include improvements for easy syncing. If you are stuck in Update Requested, try solving it first and finish the update, because a wrong system version might result in iCloud syncing failure.
Once you've put these in place, you can continue the process. Here's a step-by-step guide to help you navigate through the process:
-
Step 1: Open Settings on your iPhone, tap [your Apple account], and select iCloud. Ensure that the Notes toggle is switched on.

-
Step 2: On your Mac, open the Notes app. In the top-left corner, click Notes and then Accounts. Confirm that iCloud is selected. This is a confirmatory step.

-
Step 3: Open the Notes app on your iPhone. Create a new note or select an existing one you want to sync.
-
Step 4: After creating or updating a note, wait a moment. iCloud automatically syncs your notes in the background. Confirm the sync by checking if the note appears on both devices.
-
Step 5: If notes aren't syncing, check your Internet connection. Ensure both devices are connected and iCloud syncing is not paused. After solving all issues, check again.
Now, you can check out your notes on your iPhone and Mac. The power of iCloud lies in its ability to easily connect your devices. This helps you create a unified note-taking experience across your Apple ecosystem.
How to Transfer Notes from iPhone to Mac Without iCloud
If you don’t want to use iCloud to sync your notes from iPhone to Mac, we also got you covered. Let's explore three efficient methods that require no iCloud involvement.
How to Import Notes from iPhone to Mac Using AirDrop
AirDrop is a swift wireless option for transferring data between your iPhone and Mac. Apart from notes, you can also AirDrop other data from iPhone to Mac.
Here are the easy steps to import notes from iPhone to Mac via AirDrop:
-
Step 1: Open the Notes app and locate the specific note you want to transfer.
-
Step 2: Tap the share icon within the note interface, often represented by a box with an arrow pointing upward.
-
Step 3: Choose the AirDrop option from the list of sharing methods.

-
Step 4: Your Mac should appear in the AirDrop menu. Select it to initiate the transfer.
-
Step 5: On your Mac, a notification will prompt you to accept the incoming note. Click Accept to complete the transfer.

And with that, you have successfully imported notes from iPhone to Mac using the AirDrop option.
How to Transfer Notes from iPhone to Mac via Gmail
If you're not using Airdrop, Gmail is another available option. Using your Gmail account is also a straightforward method. Here are the steps to transferring notes from your iPhone to your Mac using Gmail.
-
Step 1: Open the Notes app and locate the note you wish to transfer.
-
Step 2: Tap the share icon and choose the Mail option from the sharing menu.

-
Step 3: Enter your Gmail email address. You can add a subject or additional information if desired.
-
Step 4: Tap Send, and the note will be emailed to your Gmail account.
-
Step 5: Open your Gmail on your Mac, and you'll find the note in your inbox.
There, you should be able to see the imported notes in your Gmail account on Mac.
Transfer Notes from iPhone to Mac with Messages
It’s fine if you don’t want to adopt the two methods above. The Messages app is another practical option for syncing iPhone notes with Mac. Here's how to go about it.
-
Step 1: Navigate to the Notes app and open the note you want to transfer.
-
Step 2: Tap the share icon, and then choose the Messages option from the sharing menu.
-
Step 3: Select your Mac from the contacts list within the Messages app.

-
Step 4: Click Send to transfer the note to your Mac.
-
Step 5: On your Mac, open the Messages app and find the note in the conversation thread.
Instead of using iCloud, you can transfer notes from your iPhone to your Mac via these three methods. These alternatives offer versatility and ensure that your notes are quickly accessible across your Apple devices. Choose the method that best fits your preferences and workflow.
Conclusion
We offered you a comprehensive guide to syncing notes from iPhone to Mac. You can easily access all your notes across both devices by following the methods above.
Besides a convenient backup tool, we also introduced iCloud, AirDrop, Gmail, and Messages. You can always pick one based on your preference. Now equipped with a range of efficient alternatives, you have the tools to make syncing less stressful. Happy syncing!
FAQ
-
Why is my Mac not syncing with my iPhone?
Check your Internet connection first if your Mac isn't syncing with your iPhone. Sometimes, a simple network issue can disrupt the syncing process. Ensure both devices are connected to the same Wi-Fi network, as syncing relies on a stable connection.
Confirm that you've enabled iCloud syncing on your Mac and iPhone. Go to iCloud settings and make sure Notes syncing is turned on.
If the problem persists, restart both devices. This basic step often resolves syncing hiccups. If you're still facing issues, verify that your devices have the latest software updates installed. Updating can fix compatibility problems causing sync issues.
4.5/5 Excellent

