Move to iOS is an App designed for new iPhone users to transfer Android files to their new iPhones easily. However, the app only works for Android-to-iPhone transfer when the iPhone is still new or has not yet been setup. If you have setup your iPhone, you can’t use Move to iOS until you reset the device. Or can you?
Is it possible to use Move to iOS after Setup on iPhone? and how can you use Move to iOS after setup without resetting your iPhone or erasing personal settings. This guide reveals the answers to all these questions including pro tips that allow you to use Move to iOS after setup.
In this article
Can I Use Move to iOS After Setup?
The simple answer is No. You can’t use Move to iOS after setup because the app only works for new iPhones and iPhones in Reset Mode. Move to iOS allows new iPhone users to move all their Android data and personal files to a new iPhone over a private Wi-Fi network, so the new iPhone is configured like their old device but with new modifications and features.
Once you complete the iPhone setup, you can’t use Move to iOS to transfer your Android files because the app’s features are integrated into the iPhone setup process. As such, you’ll have to move your Android data to the iPhone manually or via third-party phone transfer tools. If you still want to use Move to iOS after setup on your iPhone, you’ll have to erase the device and this will cause permanent data loss.
Use Move to iOS After Setup [Will Cause Data Loss]
Well, the good news is you can still use Move to iOS after setup on your iPhone. The bad news is that doing so will cause permanent data loss. Since you have to reset your iPhone and reboot it as a new device for Move to iOS to work, this means you’ll have to delete all the data, preferences, settings, and personal files on the iPhone first.
It’s important to back up your iPhone data to prevent a permanent loss. This way, once you reset the iPhone and complete the Move to iOS, you can still restore your iPhone data from your backup archive.
Once you have backed up your iPhone data, follow the steps below to use Move to iOS after setup:
- Go to Settings on your iPhone and tap on General. Then scroll down and click on Transfer or Reset iPhone. Click on Erase all Content and Settings.
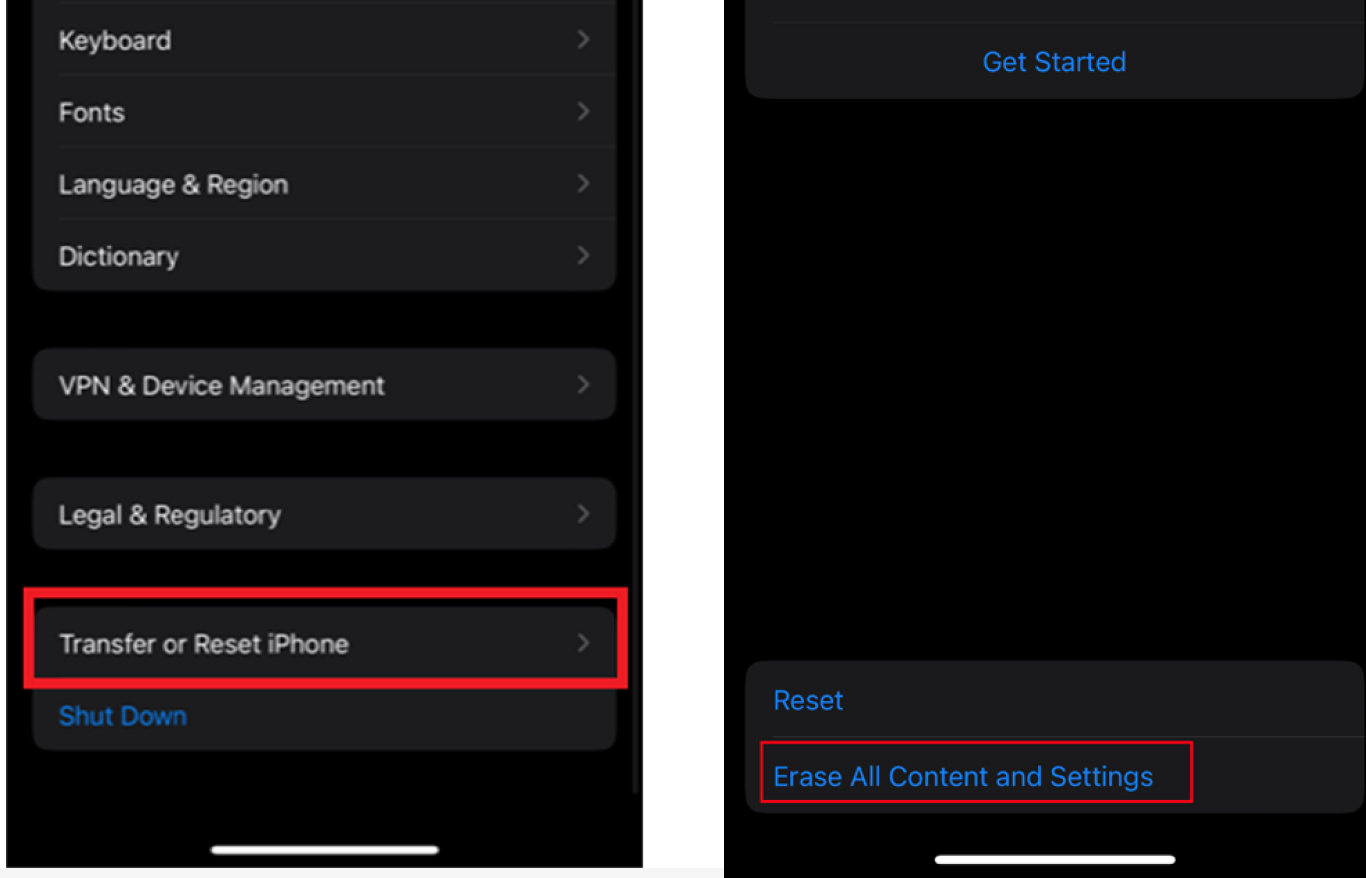
- You’ll receive a prompt asking if you want to erase this iPhone content. Click Erase Now and enter your iPhone passcode to authorize the prompt.
- Download the Move to iOS App on your Android phone. Then continue your iPhone setup till you reach the Apps and Data Screen. Next, choose Move Data From Android.
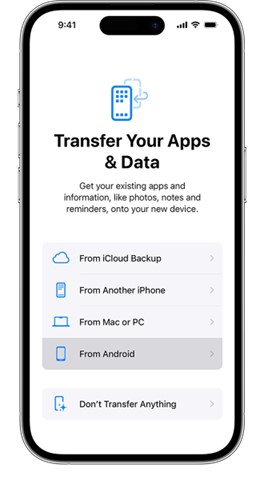
- Then open the Move to iOS App on your Android phone and click Continue after the Terms and Conditions page.
- Tap Next in the right corner of the Find Code screen on your Android phone. Click Continue on your iPhone and wait for a code to appear on the screen.
- Enter the numeric code that appears on your iPhone on the Android phone and wait for the data transfer screen to appear.
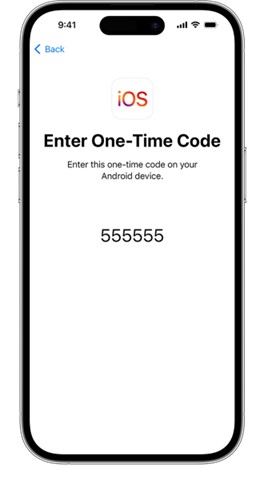
- Next, click the files you want to Move to iOS and leave both devices till the transfer is complete.
Once complete, restore your iPhone data from your backup and enjoy your new device. Next, let’s check out how to Move to iOS after setup without resetting your iPhone or erasing personal data.
How to Move to iOS After Setup Without Reset
Though it’s true that Move to iOS only works with new iPhones and iPhones in Reset mode, you can still Move to iOS after setting up your iPhone without resetting your device. To do this, you’ll have to use a Move to iOS alternative.
Several alternative phone transfer tools allow you to transfer all your Android data to your new iPhone even after setting up your iPhone. Let’s check out the best of these methods.
Move from Android to iOS After Setup Via MobileTrans Mobile App
The MobileTrans App is a great phone-to-phone file transfer tool in 2024.
The app allows you to transfer over 10 types of phone data, including WhatsApp data, contacts, texts, documents, videos, photos, and gaming data from your Android phone to your iPhone. MobileTrans aids phone-to-phone transfer via USB and wirelessly, so you have full control of which method to use.
Android transfer to iOS is also encrypted, safe, and swift on the MobileTrans app with file transfer taking just 3 steps to complete.
Are you ready to Move to iOS after setup without erasing your data? Then follow the steps below:


Now, you can browse and manage your Android data from your new iPhone without having to erase your data.
Move to iOS After Setup Using a PC
Did you know that you can also transfer data from Android to iOS after setup via your PC with Wondershare MobileTrans?
Wondershare MobileTrans is one of the most secure ways to move Android data to an iOS device and it supports over 6000 mobile devices including devices running the latest Android and iOS software. Also, the software doesn’t overwrite existing data, so you can merge old and new data on your iPhone with MobileTrans.
Are you ready to Move to iOS after setup without resetting your iPhone, then install Wondershare MobileTrans on your PC and follow the steps below:
- Launch MobileTrans on your PC and select Phone Transfer from the MobileTrans main interface. Then select Phone to Phone.

- Connect both your Android phone and iPhone to your computer using USB cables. MobileTrans will instantly recognize both devices but you can change the Source and Destination devices by using the Flip icon at the top of the screen.
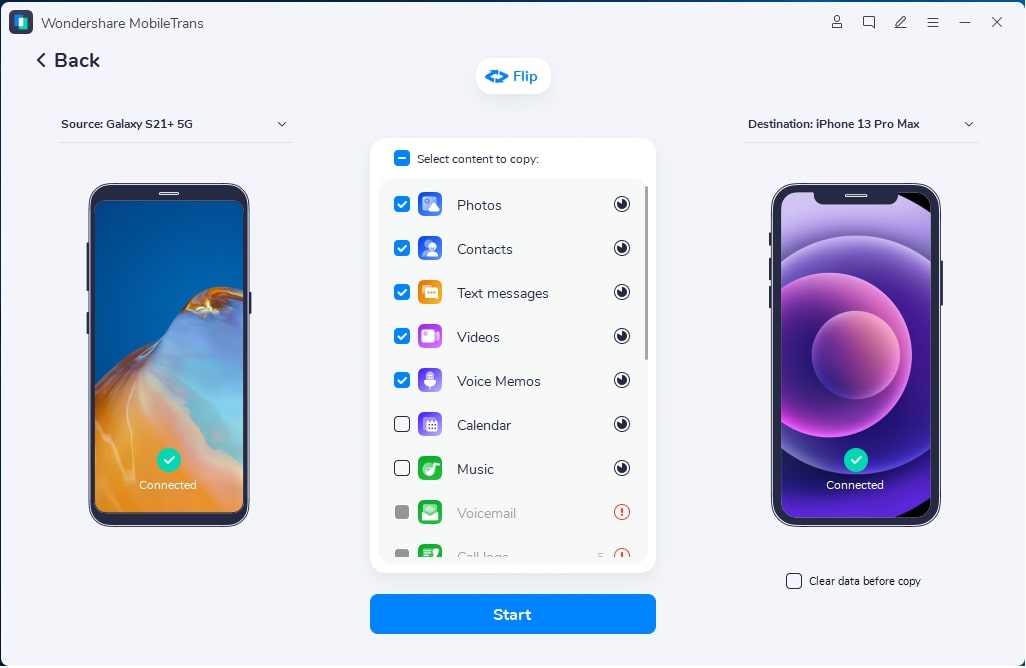
- Next, choose the data you’d like to transfer from your Android phone to the iPhone and click Start.
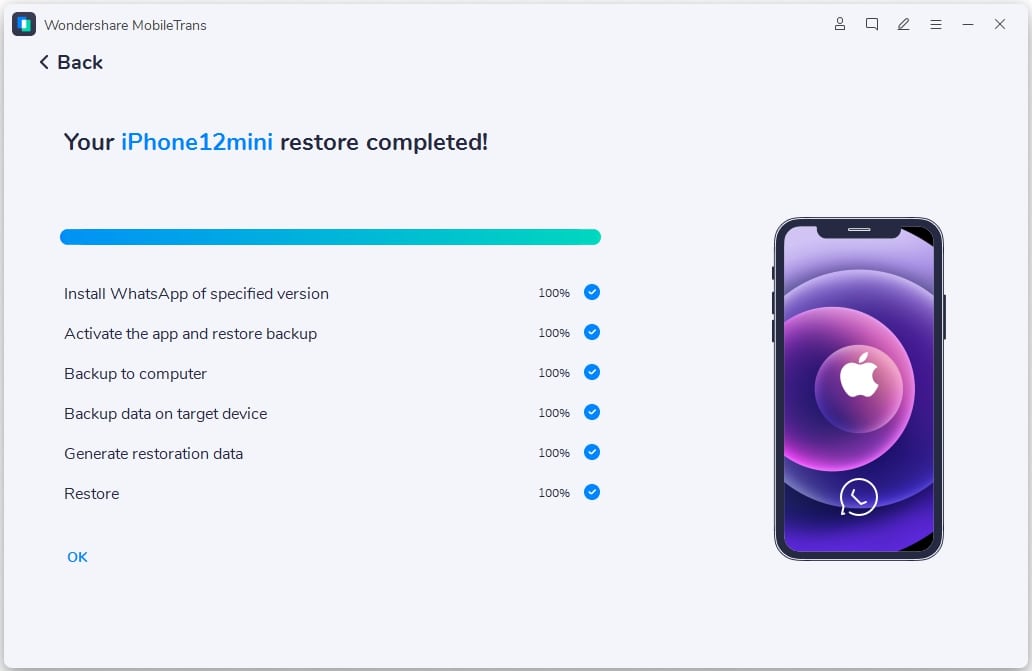
- Once the file transfer is in progress, wait till MobileTrans notifies you that the move to iOS process is complete. Then unplug your phones from the computer and browse your Android files on the iPhone.
Move from Android to iOS After Setup Through Email
Your Gmail or Email address provides another opportunity to Move to iOS after setup. You can upload your Android files as attachments and send them from the email address signed in on your Android phone to the address signed in on your iPhone. Then download the attachments directly from the email app to your iPhone storage.
However, this method is limited in file size since you can only send attachments less than 30MB per mail. If you want to transfer just a few photos or files from Android to iOS, you can use this step but if you want to move larger files to iOS, you should use method 1 or 2 above.
That said, here is how to Move to iOS after setup via Email:
- Open the Email App on your Android phone and click the Pen or Plus icon to compose a new message.
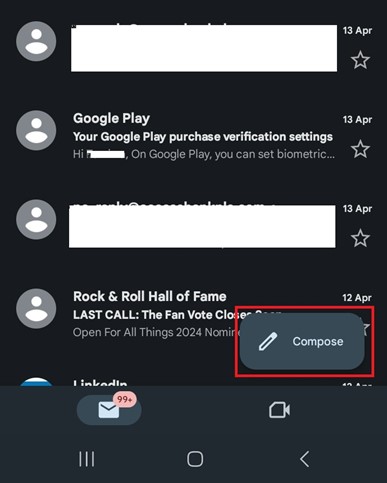
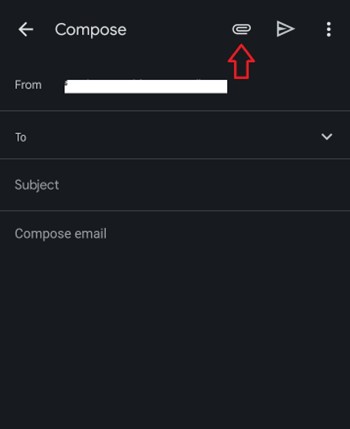
- Enter the Email Address signed in to your iPhone as the recipient. Then tap the Paper Clip or File icon and attach the files you want to move to iOS from Android. Then hit Send.
- Open your email app on your iPhone and check your inbox. You should see a new message with the files you attached from your Android phone. You can choose to browse through or download the files on your device.
Send Android to iOS After Setup via iTunes
iTunes provides another way to Move to iOS after setup. This method works great to send music, photos, and other media from your Android phone to your iPhone. However, you’ll need your PC to use this method.
Here is how to Move to iOS after setup via iTunes:
- Connect your Android phone to the computer and unlock your phone.
- Next, create a new folder on your computer. Then click on your Android Phone Icon and move files from your Android phone to the new folder on your PC.
- After, disconnect your Android phone from the computer and launch the latest version of iTunes on your PC.
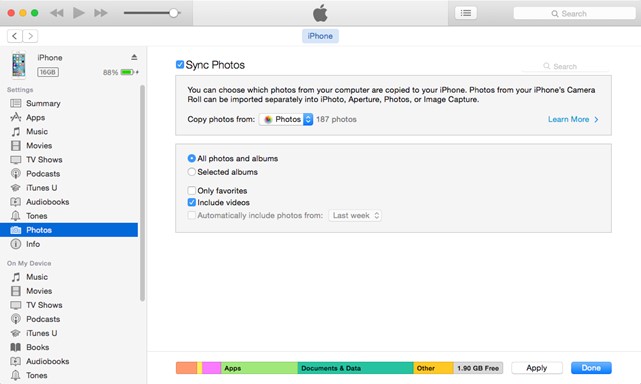
- Connect your iPhone to the PC. Then check to Sync Data from the new folder with your iPhone via iTunes.
Move to iOS After Initial Setup Using Google Drive
Google Drive is an ad-how feature of your Google Account that allows users to upload, store, manage, and collaborate on files easily. As long as you have an active Google account, you can move to iOS after setup and without worrying about erasing your iPhone data. All you have to do is upload your Android files to the drive and download them on your iPhone from the same Google Drive account.
Here is how to Move to iOS after setup with Google Drive:
- Open Google Drive on your Android phone and click the Plus icon. Then click on Upload. If you want a special folder for your files, click Folder and name the folder.
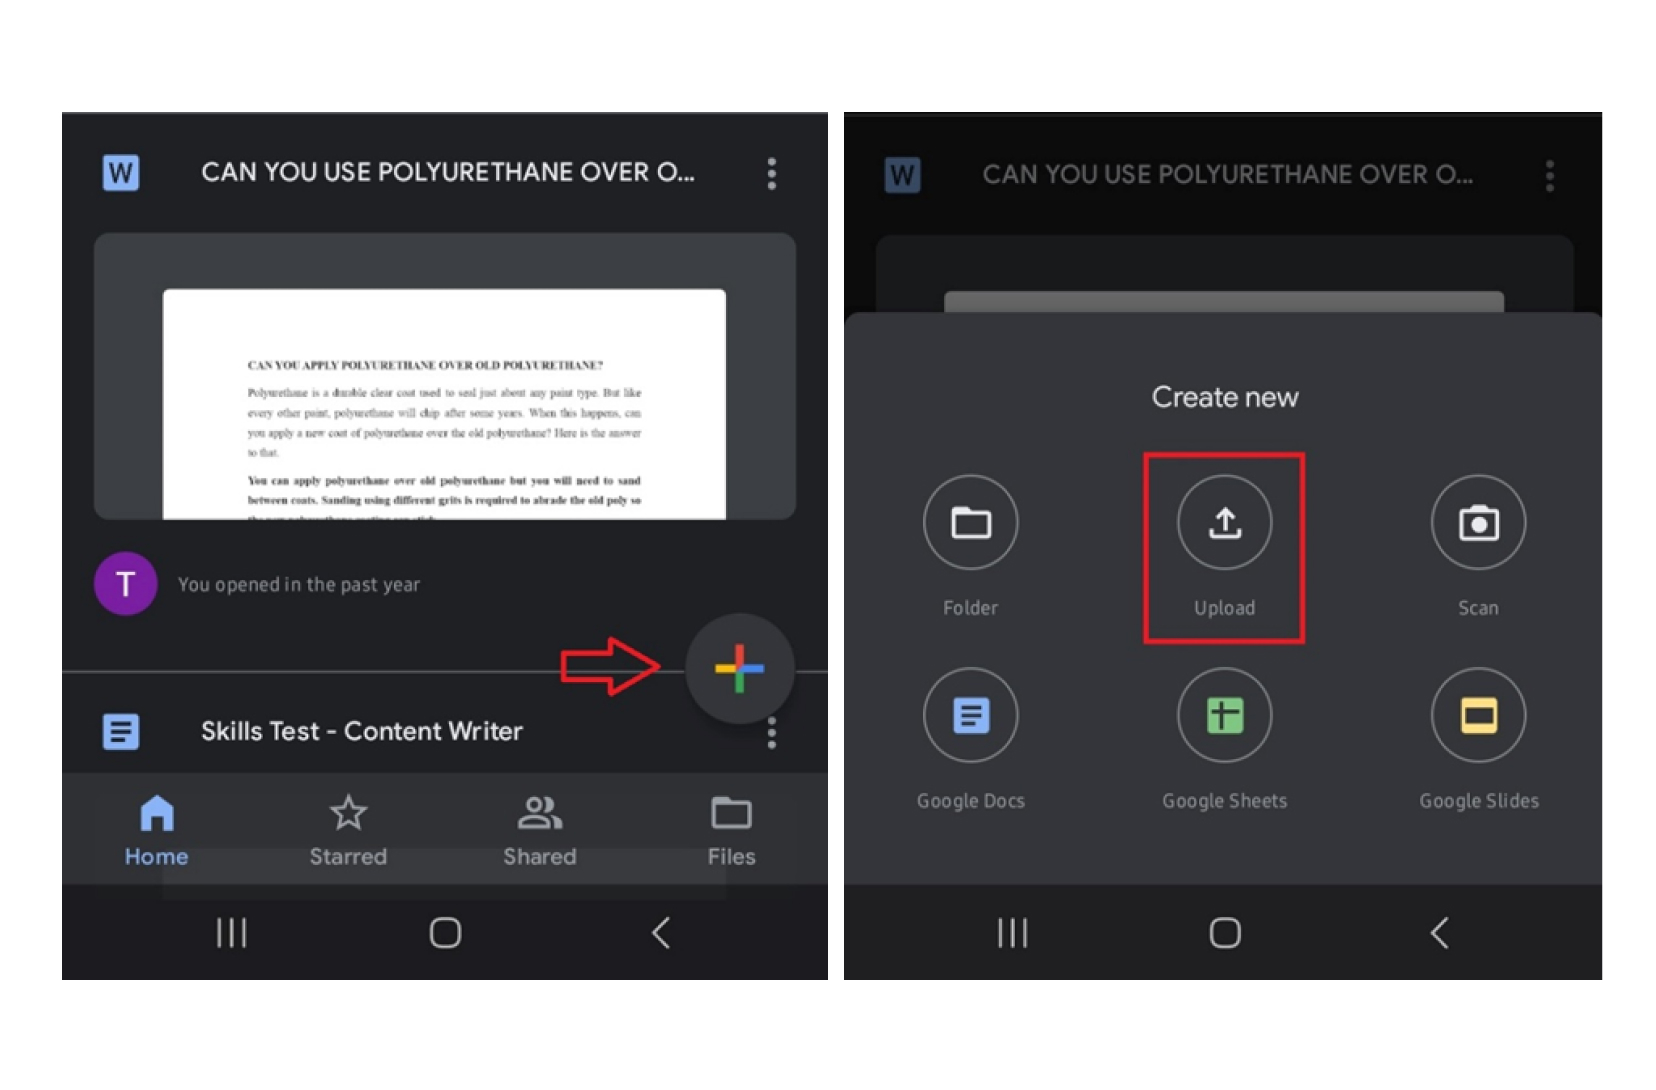
- Then browse through your Android phone data and upload the files you want to Move to iOS to the new folder.
- Once the upload is complete, open Google Drive on your iPhone but ensure you are signed into the same Google account as your Android phone.
- You should see the Android files under your Recent Folder or check the special folder you created earlier.
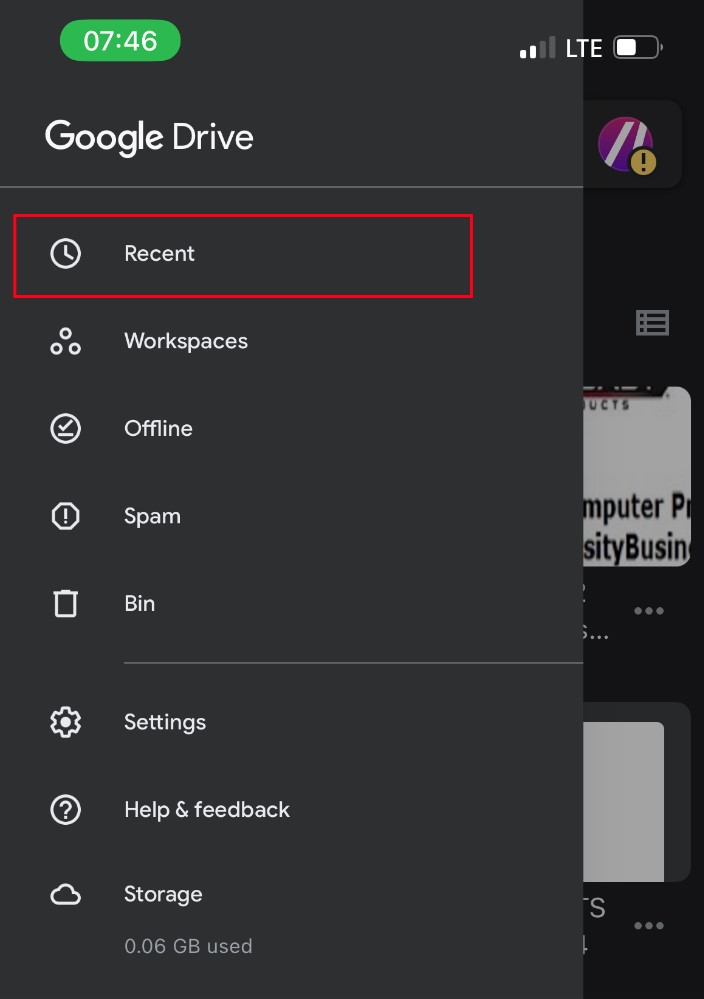
You can view, manage, and download the files to your iPhone from the Google Drive folder.
Final words
In summary, Move to iOS is an efficient app for moving Android data to an iPhone but the app has one setback in that it only allows data transfer from Android to a new iPhone. So, if you already completed your iPhone setup, you’ll have to erase your iPhone and start the setup stage again.
However, there are a few tools that work just as well as Move to iOS to upload Android files to an iPhone swiftly. If you run into any problems while using Move to iOS, try alternatives before erasing your iPhone to prevent permanent loss of data.
FAQ
-
Q: Does Move to iOS App work after iPhone setup?
A: Move to iOS app doesn’t work after iPhone setup because the app is designed to operate within the initial setup stage of an iPhone. Once setup is complete, Move to iOS can’t work again. However, there are suitable alternatives to Move to iOS app that work just as well to transfer Android files to an iPhone easily and quickly. One such alternative is the MobileTrans app.
-
Q: What is the best alternative to Move to iOS App?
A: The best alternative to the Move to iOS app is the MobileTrans app. This is because MobileTrans works even after iPhone has been set up and it allows you to send files securely in just 3 steps.


