


 TL;DR:
You can establish a WhatsApp Business presence by verifying a new phone number, converting an existing personal account, or integrating the Business API for scaled automation.
● Converting an existing personal account retains current contacts and media, provided you restore your chat history from a prior backup immediately after verifying the same phone number on the new application.
● Securing data before conversion using Wondershare MobileTrans enables selective chat backups and PDF/HTML exports, but requires Android users to first disable the native Google Drive backup to prevent system conflicts.
● Unlocking the WhatsApp Business API for automated messaging requires meeting strict eligibility criteria, including an active Facebook Business Manager account and a paid connection add-on processed through platforms like SleekFlow.
Ask AI for a summary
 ChatGPT
 Perplexity
 Gemini
 Claude
 Grok
Grok
Many users rely on messaging applications for both personal and business communication. As everyone is in a hurry nowadays, customers expect prompt responses, making efficient communication tools crucial for businesses. This is where a business messaging account proves invaluable. It provides advanced features designed to help businesses improve response times.
Plus, a business account provides tools like automated replies that streamline customer interaction. Users can personalize interactions and respond to customer inquiries by creating a business account. Thus, this article will explain how to create a WhatsApp Business account to establish a digital presence.
In this article
Part 1. How to Create a WhatsApp Business Account from Scratch?
Upon understanding the importance of a dedicated account for your business, it’s time to set one up. This setup will help you manage customer interactions effectively and build trust with your audience. Below, we will explore how to make a WhatsApp Business account from scratch:
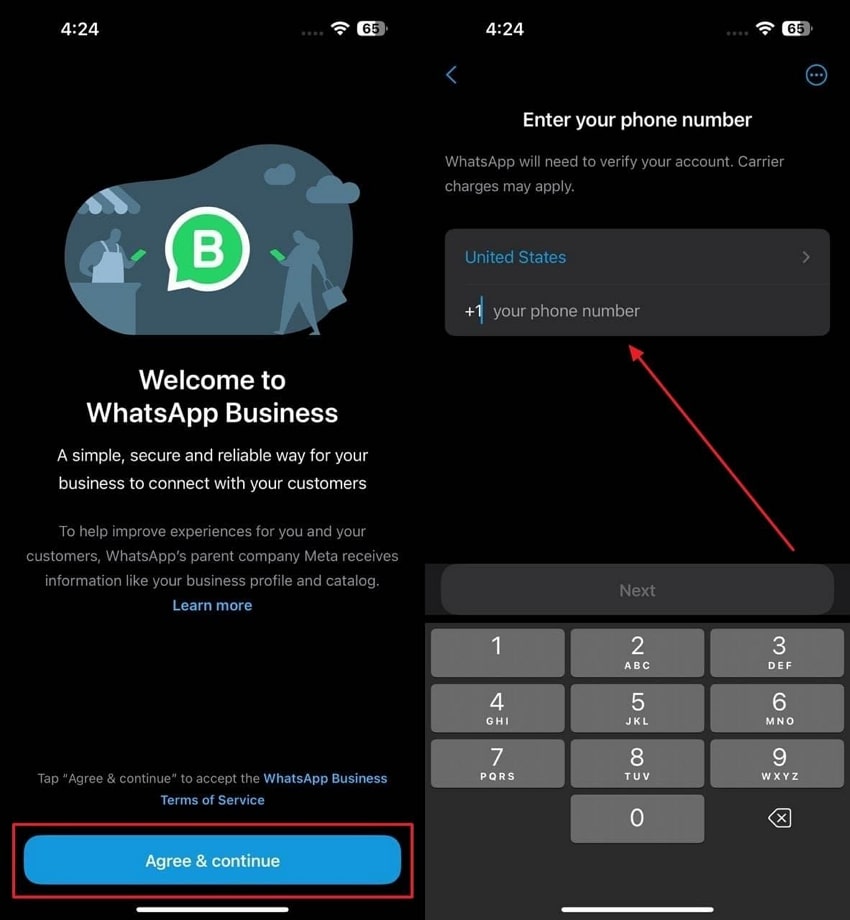
Step 1. Begin by installing and opening this texting business application on your smartphone. Upon seeing the main screen, hit the "Agree And Continue" button to confirm your acceptance. Afterward, enter your country code and phone number, and press the “Next” button.
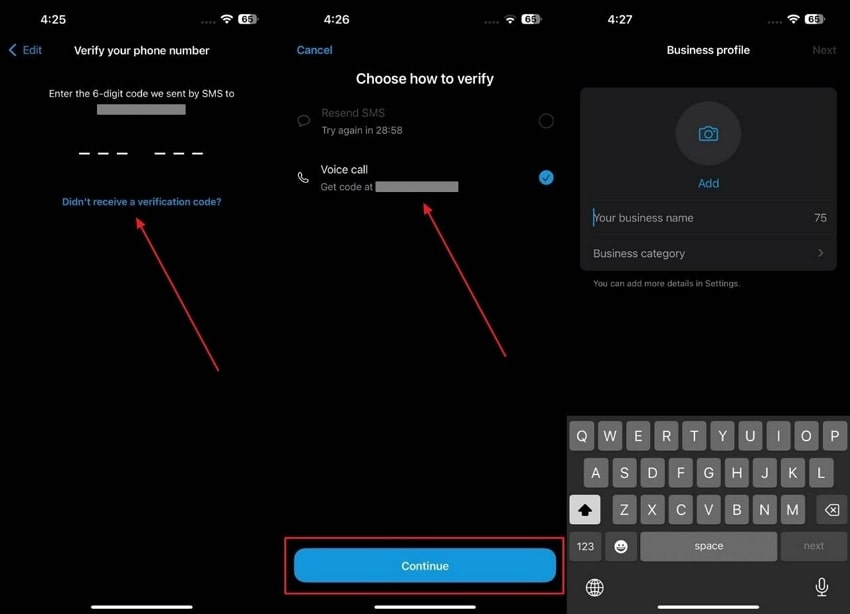
Step 2. Following this, you will be directed to the “Verify Your Phone Number” screen. When you are not receiving the OTP, select "Didn't Receive a Verification Code." Afterward, select the "Voice call" option and press the "Continue" button. Upon doing this, you will receive a new verification code via a voice call to your phone number. Now, enter this code in the provided field to create a WhatsApp Business account.
Part 2. How to Make a WhatsApp Business Account by Converting a WhatsApp Account?
When you already have a personal account, converting it to a business account can save time and effort. Nevertheless, you should back up your data first to restore every file and message while setting up the new account.
Additionally, switching to a professional account allows you to retain your existing contacts while unlocking features tailored for businesses. Let’s dive below to learn how to open a WhatsApp Business account by converting your current account:
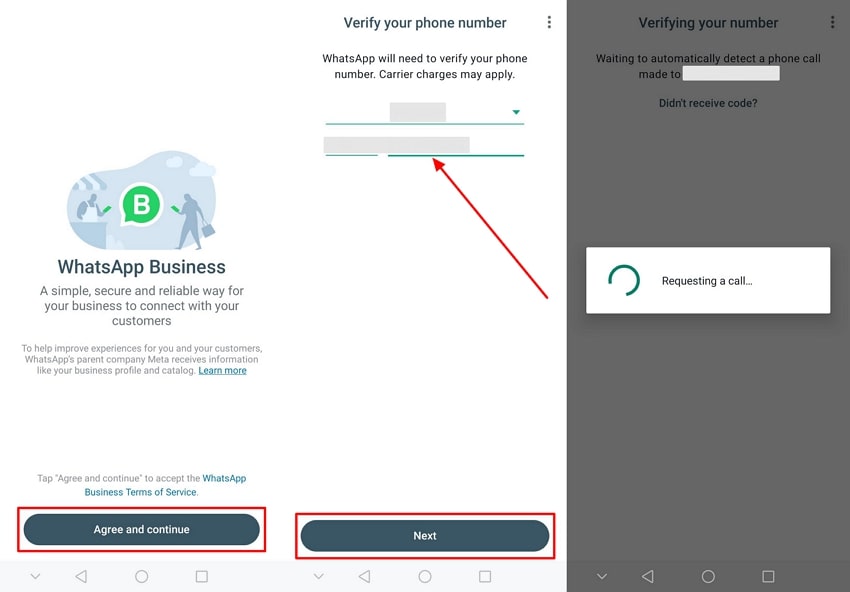
Step 1. To initiate, access this communication app and press the "Agree and Continue" on the welcome screen. Next, select your country from the drop-down menu or enter your country code. Then, type the phone number associated with your previous backup logged into your simple WhatsApp account. Hit the "Next" button, and the app will initiate a request to verify your phone number by sending a code or placing a call.
Step 2. Upon verifying successfully, grant the app permission to access your contacts and media by tapping the "Continue" button. Then, tap the "Restore" button to retrieve your saved chat history from the backup. When the restoration is finished, tap the "Next" button to finalize the process and proceed to the next step.
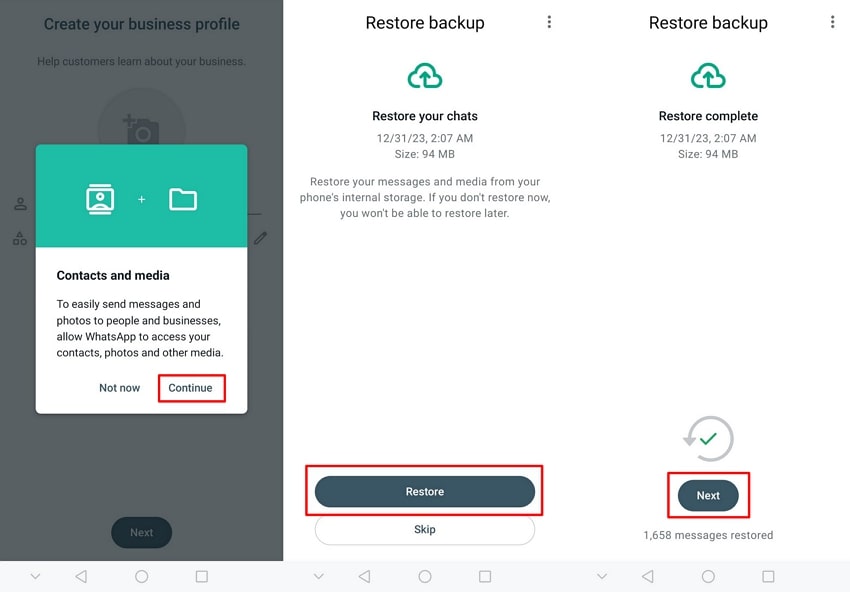
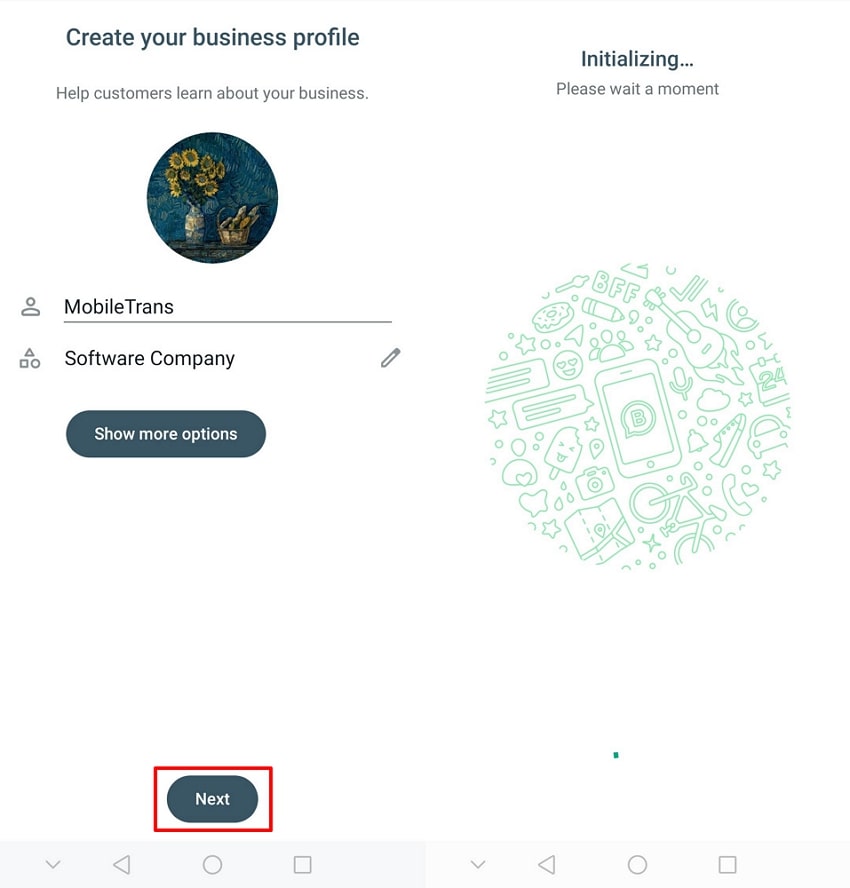
Step 3. When the backup has been successfully restored, you will be prompted to set up your business account. To do this, enter the name and profile picture of your business that will represent your brand or identity. Upon entering all the details, hit the “Next” button to finalize the creation of your business account.
Pro Tip. How to Backup WhatsApp Data Before Converting into WhatsApp Business?
As we discussed earlier, securing your data is important before converting your personal account into a business account. Losing valuable messages or media can disrupt communication and impact your business. Alongside that, a reliable backup ensures your information remains intact and easily accessible. For an effortless and secure backup solution, we recommend you Wondershare MobileTrans.
Before exploring how to create a WhatsApp Business account, this software simplifies data backup with just a few clicks. It has the ability to back up your important chats and multimedia to your computer without data loss. Additionally, the tool works seamlessly with various devices, which makes it a versatile option for users.
Powerful Features
- Selective Backup: Users can choose specific chats and multimedia to backup and optimize storage for important data.
- Regular Updates: It offers consistent software updates to support the latest devices and improve performance for reliable data handling.
- Data Integrity: The tool ensures data is backed up without corruption and maintains the original quality of data files.
- Quick Restoration: It lets you restore backed-up data to any device quickly and ensure uninterrupted communication.
Wondershare MobileTrans
Back Up Your Data to Computer Easily
- • Back up All WhatsApp contacts, chats history, and media in 1-click.
- • Support WhatsApp, GBWhatsApp, and WhatsApp Business data.
- • Supports exporting WhatsApp chats to PDF and html documents on PC.
- • Supports maintaining different versions of your WhatsApp backup instead of overwriting your data.
 4.5/5 Excellent
Simplified Step-by-Step Tutorial to Use Wondershare MobileTrans to Backup WhatsApp Data
When you are ready to back up your WhatsApp data, follow the instructions below to learn how to do it using this advanced tool.
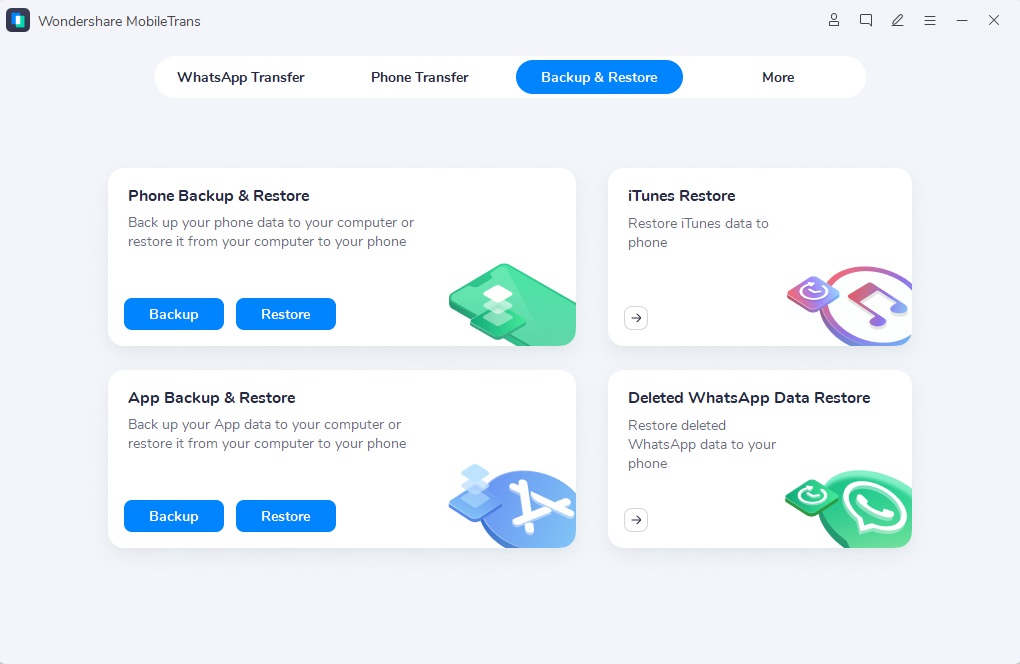
Step 1. Open MobileTrans on Your Preferred Desktop
Start downloading this WhatsApp backup software to your computer and complete the installation process. Then, launch it and navigate to the “Backup and Restore” tab from the main interface. From the displayed features, click the “Backup” button under the “App Backup and Restore” section.
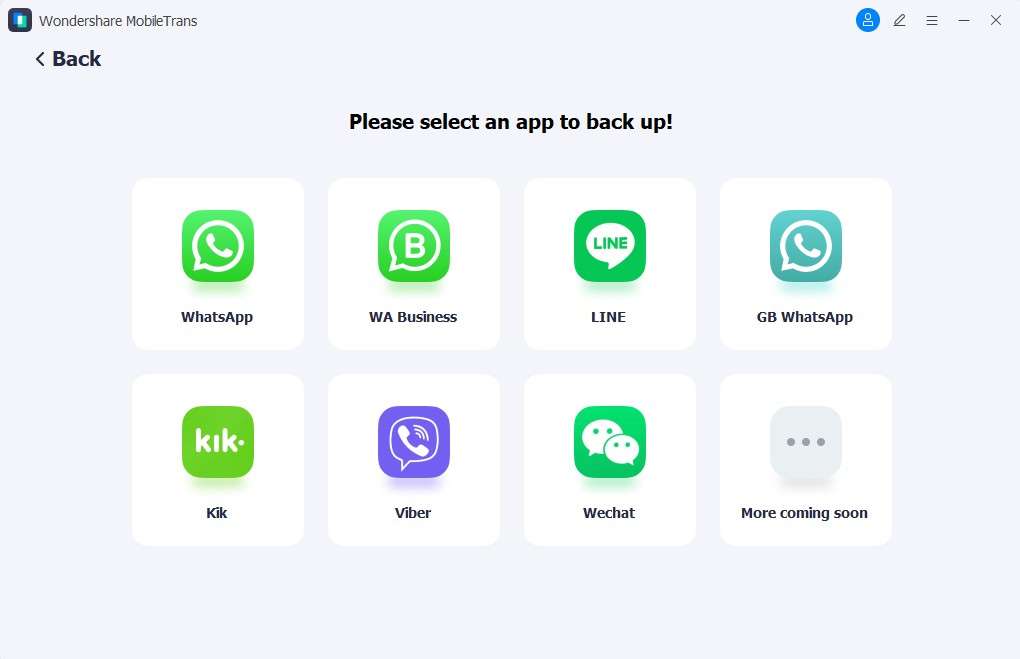
Step 2. Choose WhatsApp to Proceed Further
Upon reaching the new window, you will be presented with various applications. So, you need to select the “WhatsApp” option to move further. This option lets you create a backup of your conversations and securely store it on your computer.
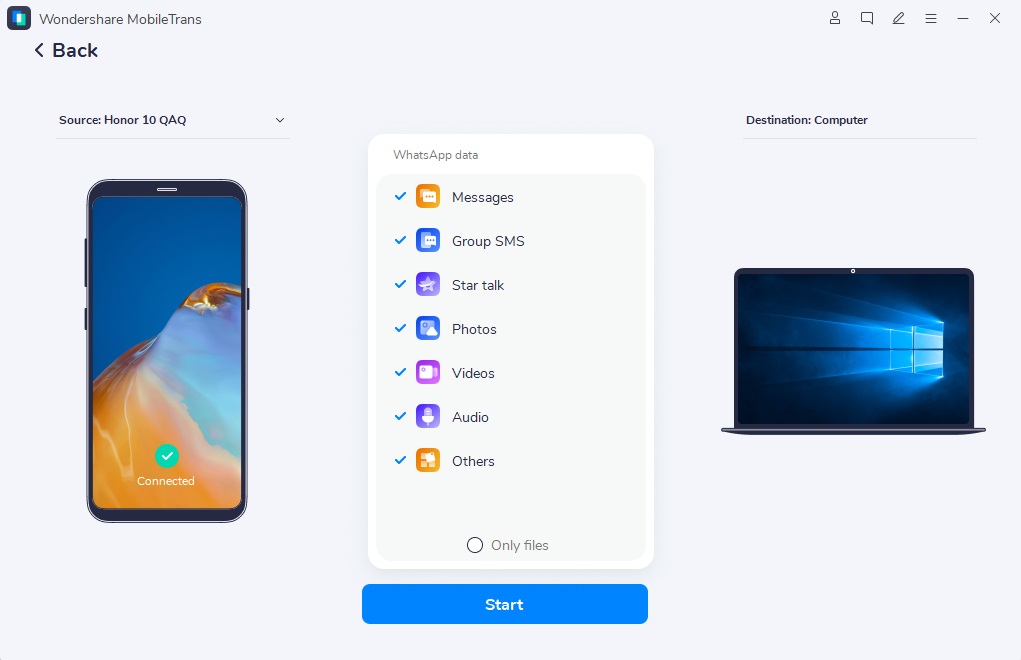
Step 3. Select the Data Files to Backup
Connect your mobile device to the computer using a compatible USB cable when you access the next screen. Next, review the available data categories for backup, such as photos or videos, and select the ones you want to save. Upon selecting, press the “Start” button to begin the backup process.
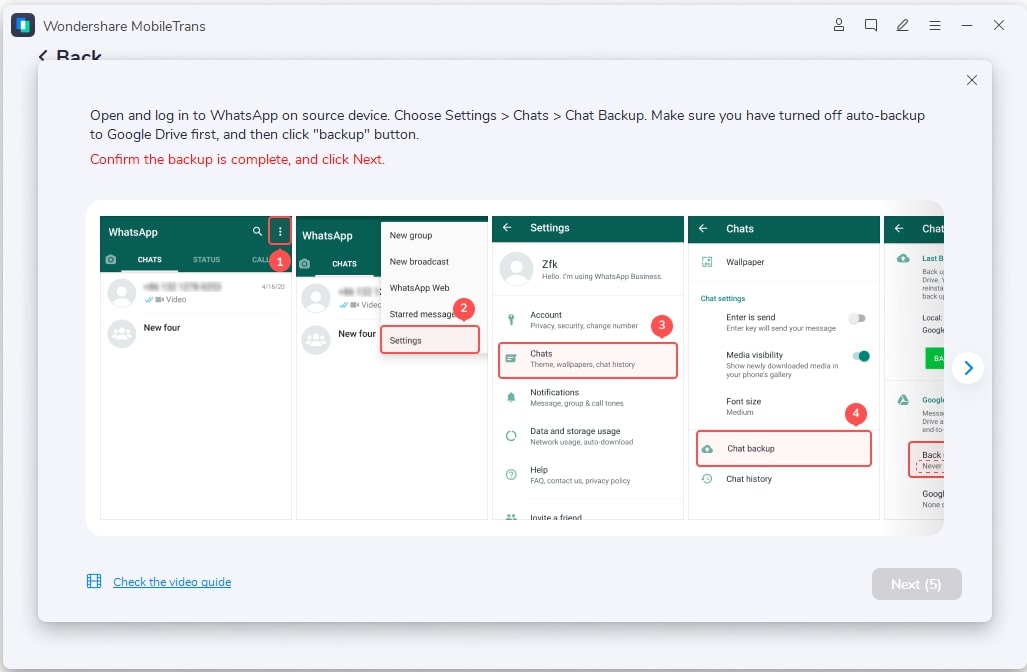
Step 4. Backup Your WhatsApp Data Safely
When backing up your Android phone, additional steps may be required to ensure the process runs smoothly. Follow the guidance provided in the attached screenshot to disable Google Drive's backup feature. This step is important for avoiding conflicts and enabling MobileTrans to operate seamlessly.
Part 3. How to Get the API for Your WhatsApp Business Account?
Upon setting up your business account, you need to access the API for advanced features and integrations. The API enables businesses to automate messages and manage communication at scale. It also supports advanced messaging features, including sending notifications and catalog templates. However, obtaining the API requires meeting specific requirements to ensure compliance and functionality.
To get a WhatsApp Business API account, your business must meet certain eligibility criteria. Furthermore, a valid phone number and Facebook Business Manager account are mandatory for this process. Thus, follow the steps below to get the API for your WhatsApp Business account:
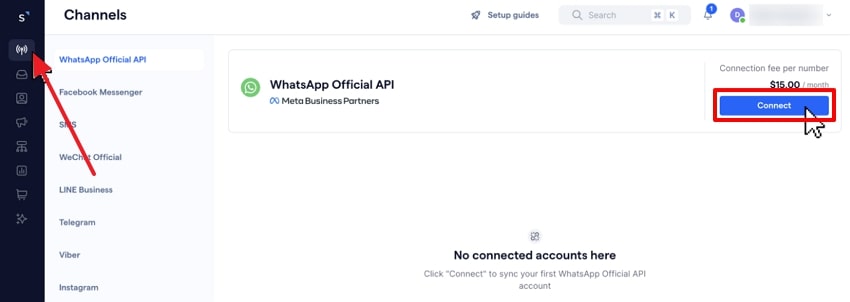
Step 1. Initiate the process by logging in to your SleekFlow account and navigating to the “Channels” section. Next, open the settings page for the WhatsApp Official API channel and click the “Connect” button to move further.
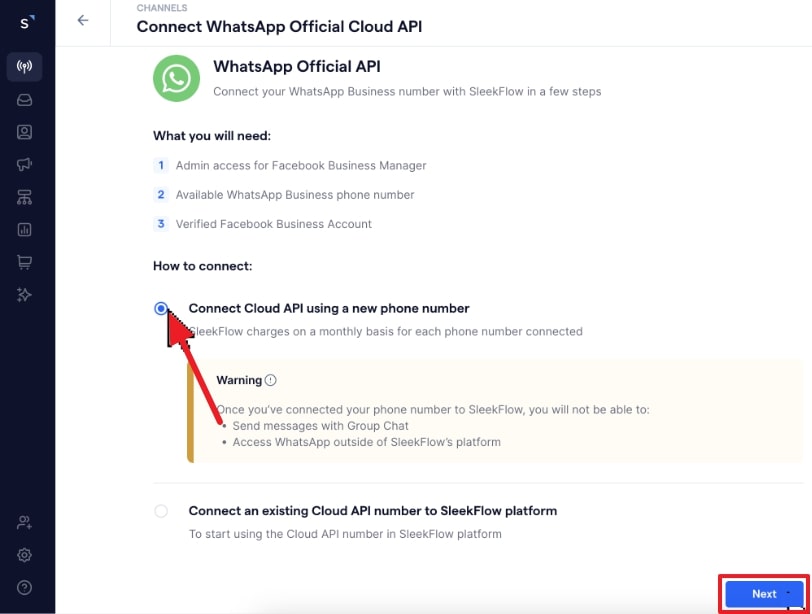
Step 2. You will be prompted to purchase the Business API connection add-on through Stripe. So, you need to enter your credit card details and click “Subscribe” to complete the payment. Next, you need to tap the “Connect Cloud API Using a New Phone Number” option to proceed. Afterward, press the “Next” button to acknowledge the limitations of the Official API and proceed with the application.
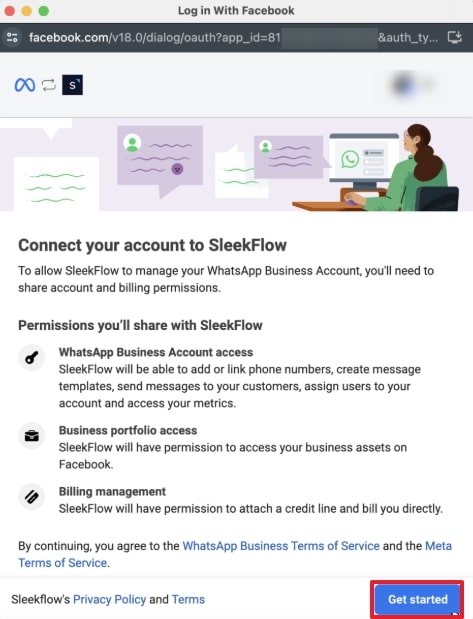
Step 3. Moving forward, enter your personal Facebook account password and click the “Continue” button to access full rights. Upon signing in, select “Continue as Your Name” to move forward. Then press the “Get Started” button after reviewing the permissions that will be granted to SleekFlow.
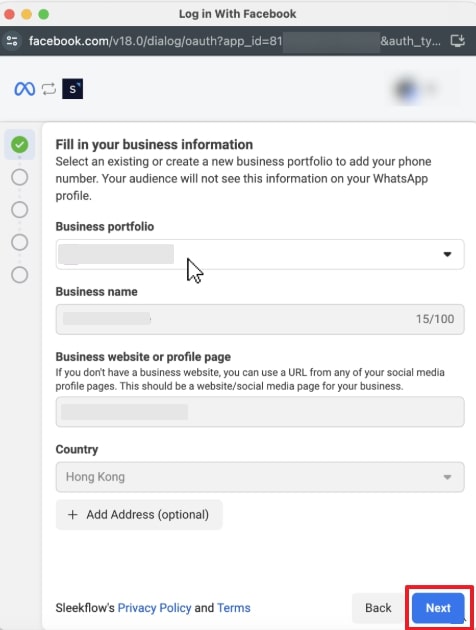
Step 4. Afterward, you need to provide your business information, including your business portfolio. Next, hit the "Next" button after filling in all the necessary details, according to your preference.
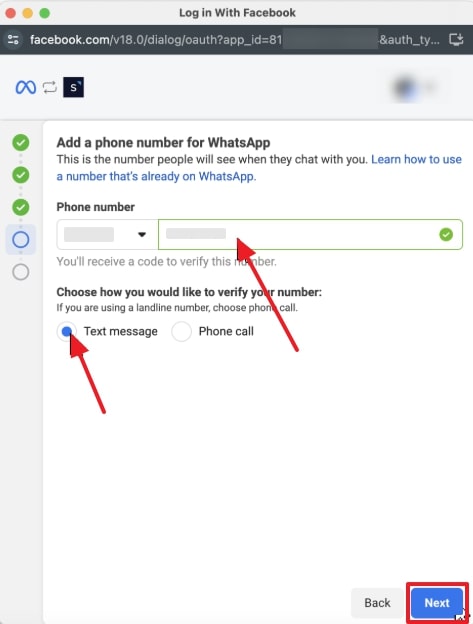
Step 5. To connect, select the correct country code and enter your phone number. Next, choose a preferred method to receive the verification code: either via "Text message" or "Phone call." Moving forward, just tap "Next" to request the code, and a notification will confirm it has been sent successfully. Upon receiving the code, enter it in the provided field and click "Next" to continue with the setup.
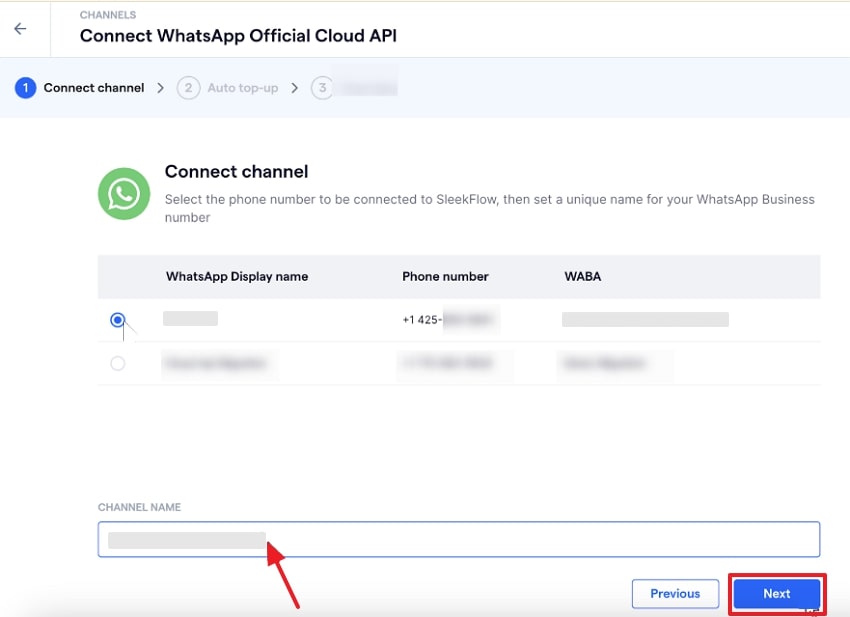
Step 6. Following this, tap the "Finish" button after completing all the steps. Upon seeing the next screen, select the business profile you just created and enter the "Channel" name. Now, you need to click “Next” to finish the procedure.
Conclusion
To sum up, a professional business account is ideal for managing customer interactions. Whether starting from scratch or converting your personal account, the steps are simple for all business sizes. As we have explored, taking a backup before converting to a business account is important. It ensures you don’t lose important data and keep your business communications intact.
Wondershare MobileTrans is the ultimate solution for reliable and secure data backup. It ensures your data is safe and easily accessible on all your preferred devices. So, download and use MobileTrans before transitioning to a business account.


