

![Quick Fix For iPad Unable to Check for Update [2026]](https://mobiletrans.wondershare.com/images/images2023/ipad-unable-to-update.png)

 TL;DR:
Resolve the "iPad unable to check for update" error caused by incompatible hardware, insufficient storage, network drops, or Apple server downtime by using Wondershare Dr.Fone's iOS System Repair tool to reinstall the device firmware.
● Start with the Standard Repair mode to fix the update failure without data loss, reserving the in-depth Advanced Repair mode for persistent issues because it completely erases all device data.
● Both Dr.Fone repair methods require connecting the iPad to a computer, manually putting the device into Recovery Mode, and downloading the compatible iOS firmware package through the software interface.
● Before attempting system repairs, verify your specific iPad model supports the targeted iOS version, clear sufficient local storage space, and check the Apple System Status page to rule out active server outages.
Ask AI for a summary
 ChatGPT
 Perplexity
 Gemini
 Claude
 Grok
Grok
Ever had the issue of your iPad not checking for updates? Keeping your device updated in today's tech world isn't a bonus but a requirement. You are trying to update, but you're hit with error messages like “iPad unable to check for update” on constant update attempts. These problems disrupt your device usage and stress the need for quick updates for security, improved operating, and new features on your trusty iPad.
Let's dig into why this happens and, even better, figure out solutions so your iPad stays up-to-date and fine-tuned for you to use.
In this article
Why Can't My iPad Check for Updates?
- Device incompatibility
Older iPad models might be the problem. They can't work with the newest iOS updates. Your once-new device may now have limitations, so it struggles to stay updated with the always-changing iOS system.
- Insufficient Storage
Think about your iPad as a packed closet. What happens when you try to make new clothes fit? There's no room! That's how your iPad feels when it's out of storage space. It won't have room for new features when you try to update it.
- Network Issues
Updates need a good network connection. If your connection is weak or keeps dropping, your unable to check for update iPad. This makes checking for updates fail.
- Server Downtime
Even top-notch systems can have downtime. This includes Apple servers, which your iPad needs for checking updates. If they have problems, your device can't Image name with them. And what happens is that you simply can't connect.
Can't Update Your iPad? Try the Fix!
Have you ever had trouble updating your iPad? Failures can hitch a ride on different problems, from your device not playing nice with the update to your network deciding to take a nap. But don't freak out! There's a way out - Dr.Fone. This all-around tool for iOS system fixes is ready to tackle any hurdle in the way of your iPad updates. Here’s how to use Dr. Fone if the iPad is unable to check for an update.
iOS Standard Repair
Step 1: Launch Dr. Fone on your computer.

Open Wondershare Dr.Fone once you've downloaded it. Head over to the Toolbox, found on the top-left corner. Once there, click on System Repair.
Step 2: Connect your device.

Attach your iPad using a cable. A new window will pop up. Select your device type - in this case, can go for iOS because you want to fix your iPad.
Step 3: Continue with the repair.

A new window will appear. It shows different repair tools for your iOS device. Pick iOS Repair to keep going.
Step 4: Pick Standard Repair.
You get to choose a mode for repair. Go with Standard Repair to avoid data loss.
Step 5: Get your device in Recovery Mode.

Follow what's on your screen to get your iOS device into Recovery Mode. Once you've done that, hit "Enter Recovery Mode." If needed, click the Guide button if your device isn't responding or is acting up.
Step 6: Download the iOS Firmware.

When your device is in Recovery Mode, the system will pick up on the right iOS firmware. Click "Download" on the one you want.
The system will begin the download of the iOS firmware. Once it's done, the firmware is checked, ready for an iOS update.

Step 7: Set Up on your iPad.

Select "Repair Now" to move forward with the fix after the iOS software has finished downloading.
Step 8: Wait for the repair finished.
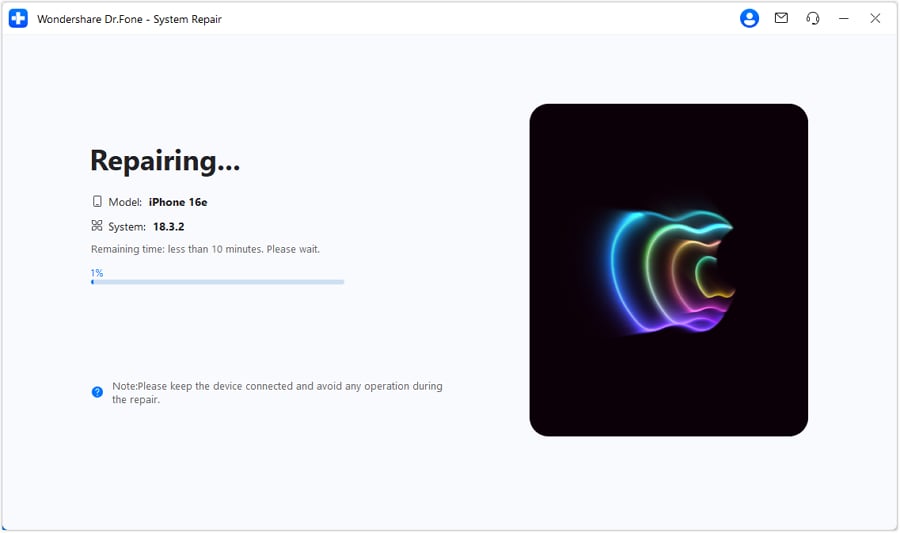
Watch the progress bar on the next display to follow the end of the install. Keep your iOS gadget Image nameed to the PC the whole time.

The last display shows the end of the operation. Select 'Done' to close out the repair and get your iOS gadget up and running. See the activity meter as the iOS program grabs and gets checked by the system. Hit Repair Now to initiate the process.
By using these simple processes, Dr.Fone's Regular Fix option effectively solves the 'iPad Can't Check for Updates' problem. Therefore, your iPad is heading towards hassle-free updates and best performance.
In-depth iOS Advanced Repair
If the standard repair cannot solve iPad unable to check updates, try Dr.Fone's Comprehensive Repair. It runs thorough checks on your iOS device, ensuring no stone is unturned. In this mode, an intensive check of your iDevice takes place, solving more intricate system problems.
But, remember you'll lose all data during Advanced Repair. So, backup your iDevice data before you start.
Step 1: Select Advanced Repair.
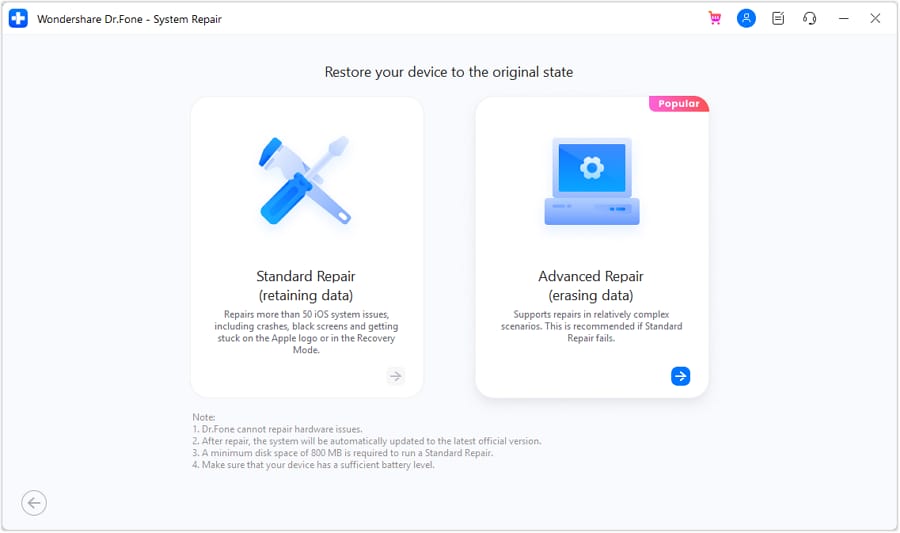
Snap on Advanced Repair from the choices, and don't forget to back up your data before this.
Step 2: Get your device in Recovery Mode.
Next, follow the guide to switch your iOS device into Recovery Mode. Hit "Enter Recovery Mode" if all went well. But, if the screen doesn't react, hit the Guide button for more instructions on starting Recovery Mode.
Step 3: Select iOS Firmware.
After setting up Recovery Mode, pick the correct iOS firmware for download. To start, click Download next to your chosen iOS firmware.
Step 4: Download and install your iOS Firmware.
The selected iOS firmware begins downloading, and it verifies before device installation.
Click "Repair Now" to begin the repair process when the firmware's ready to install.
Step 5: Wait for the repair finished.
Once the operation concludes, an alert box shows a finished message. Press "Done" and check if your iOS gadget is fixed right.
4 Tips to Avoid iPad Update Issues
Dealing with technical issues can be frustrating. Maintaining your device's software is important for security, compatibility, and new features. Let's explore some helpful advice to make updating go smoothly from now on.
- Regularly Check Device Compatibility: Before hitting the update button, spend a minute to verify if your gadget is compatible with the most recent forms of iOS. More advanced iPad models may not be compatible with the most recent product improvements, saving you from failed updates.
- Manage Storage Efficiently: Having an efficient system to maximize available space is crucial. You can prioritize keeping your device clutter-free by going through your apps, photos, and files to remove anything unnecessary. This pruning process will help ensure there is ample storage available so your iPad can smoothly install updates without encountering frustrations from a lack of available space. Storage-related issues can create hurdles when trying to install the latest features, so taking some time for a little spring cleaning on your iPad is worthwhile.
- Stable Network Connection: Having a reliable Wi-Fi connection is essential for any updates to go smoothly. Prior to beginning an update, take a moment to verify that your iPad is connected to a strong, steady Wi-Fi network. This small step can help avoid issues during the update and make the process run without disruption.
- Monitor Apple Server Status: Stay informed by reviewing the Apple System Status page before installing updates can help you avoid frustrations. If their servers are experiencing downtown, it's better to wait for and update again later once everything is running optimally on their end.
By incorporating these proactive tips into your iPad maintenance routine, you'll not only avoid future update issues but also ensure your device stays optimized for the latest features and enhancements.
Conclusion
Solving the “iPad unable to check for update" issue is key to keeping your device running smoothly. Firstly, know the reason when you are unable to check your iPad for updates. Then Dr. Fone will offer a solution to repair iOS updates. To avoid this iPad update issue, remember to check compatibility and storage regularly, have a stable WiFi connection, and check Apple's server status. Most importantly, implement these strategies to optimize your iPad's performance. For enhanced updates, go for Dr. Fone when your iPad fails to update.


