


 TL;DR:
An iPhone stuck on the iOS 26 or iOS 17 Update Requested screen indicates a delay in connecting to the Apple server due to network instability or insufficient storage, which can typically be resolved by manually deleting the stalled update file and restarting the download.
● Before initiating a software update, you must connect the iPhone to a charger, secure a stable Wi-Fi connection, and clear sufficient local storage space to prevent the installation process from halting.
● If network resets and hard reboots fail to clear the stalled screen, navigate to Settings, General, and iPhone Storage to locate the pending software file and select the Delete Update option to force a fresh download.
● For persistent system errors that prevent on-device installation, you can bypass the stuck interface by connecting the device to a Windows PC to update via iTunes or by performing a Standard Repair using Wondershare Dr.Fone - System Repair.
Ask AI for a summary
 ChatGPT
 Perplexity
 Gemini
 Claude
 Grok
Grok
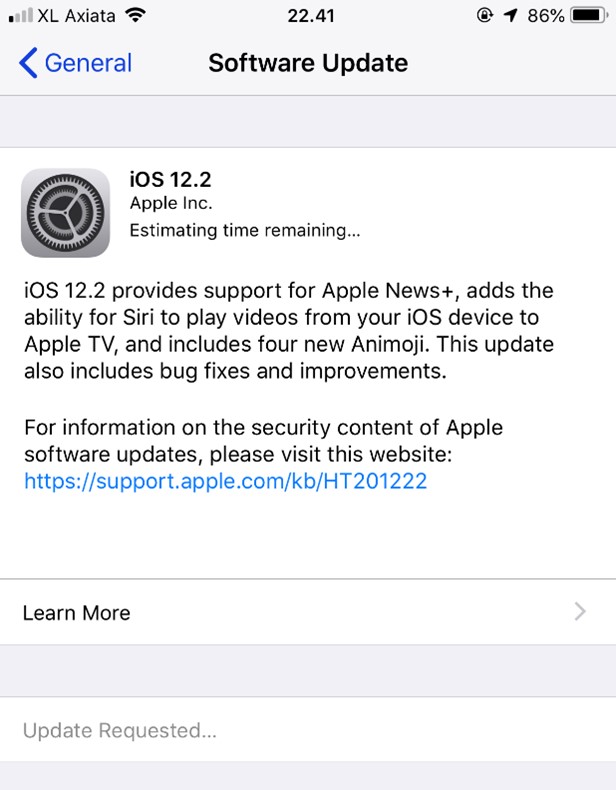
iOS often offers software updates for its users to give them access to new features and systems. While most users say the update completes in 25 to 30 minutes, some have reported being unable to update their systems or seeing the message "stuck update requested on iPhone" on their screens.
Well, there can be several potential causes for an iPhone to become stalled on the iOS 26 update requested screen, such as; you could have a bad Wi-Fi network that stops your iPhone from sending an update request or there could be a small software problem on your phone that stops the process, etc.
This guide will help you figure out what is making your iPhone update says update requested, and also some short 8 fixes to help you easily install the new update on your iPhone.
In this article
Part 1: What It Means When iPhone Says Update Requested?
When you are using the iPhone, sometimes you might come across the issue of iPhone not able to update or iPhone stuck in update requested. You might be wondering what it means when you see iPhone stuck in Update Requested all the time?
It simply means that there is a delay in connecting your device to the Apple server. This can happen for a variety of reasons, including a shortage of storage, a slow Internet connection, or some glitches in the iOS system.
Part 2: How to Solve Update Requested on iPhone? – 6 Solutions
If the update requested on iPhone is bothering you and you want to resolve the issue as soon as possible, then the following are some simple solutions for you!
Check the Wi-Fi Network and iPhone Battery
There are two possible reasons why you might be seeing the message "update requested" on your screen. The first is that your phone's battery may be low, which would prevent you from updating. To fix this, plug your phone into a charger before updating.
The other reason could be a weak Wi-Fi connection. The iPhone needs a stable Wi-Fi network before running a new software update. If you're having trouble updating to iOS 26, make sure your Wi-Fi connection is strong.
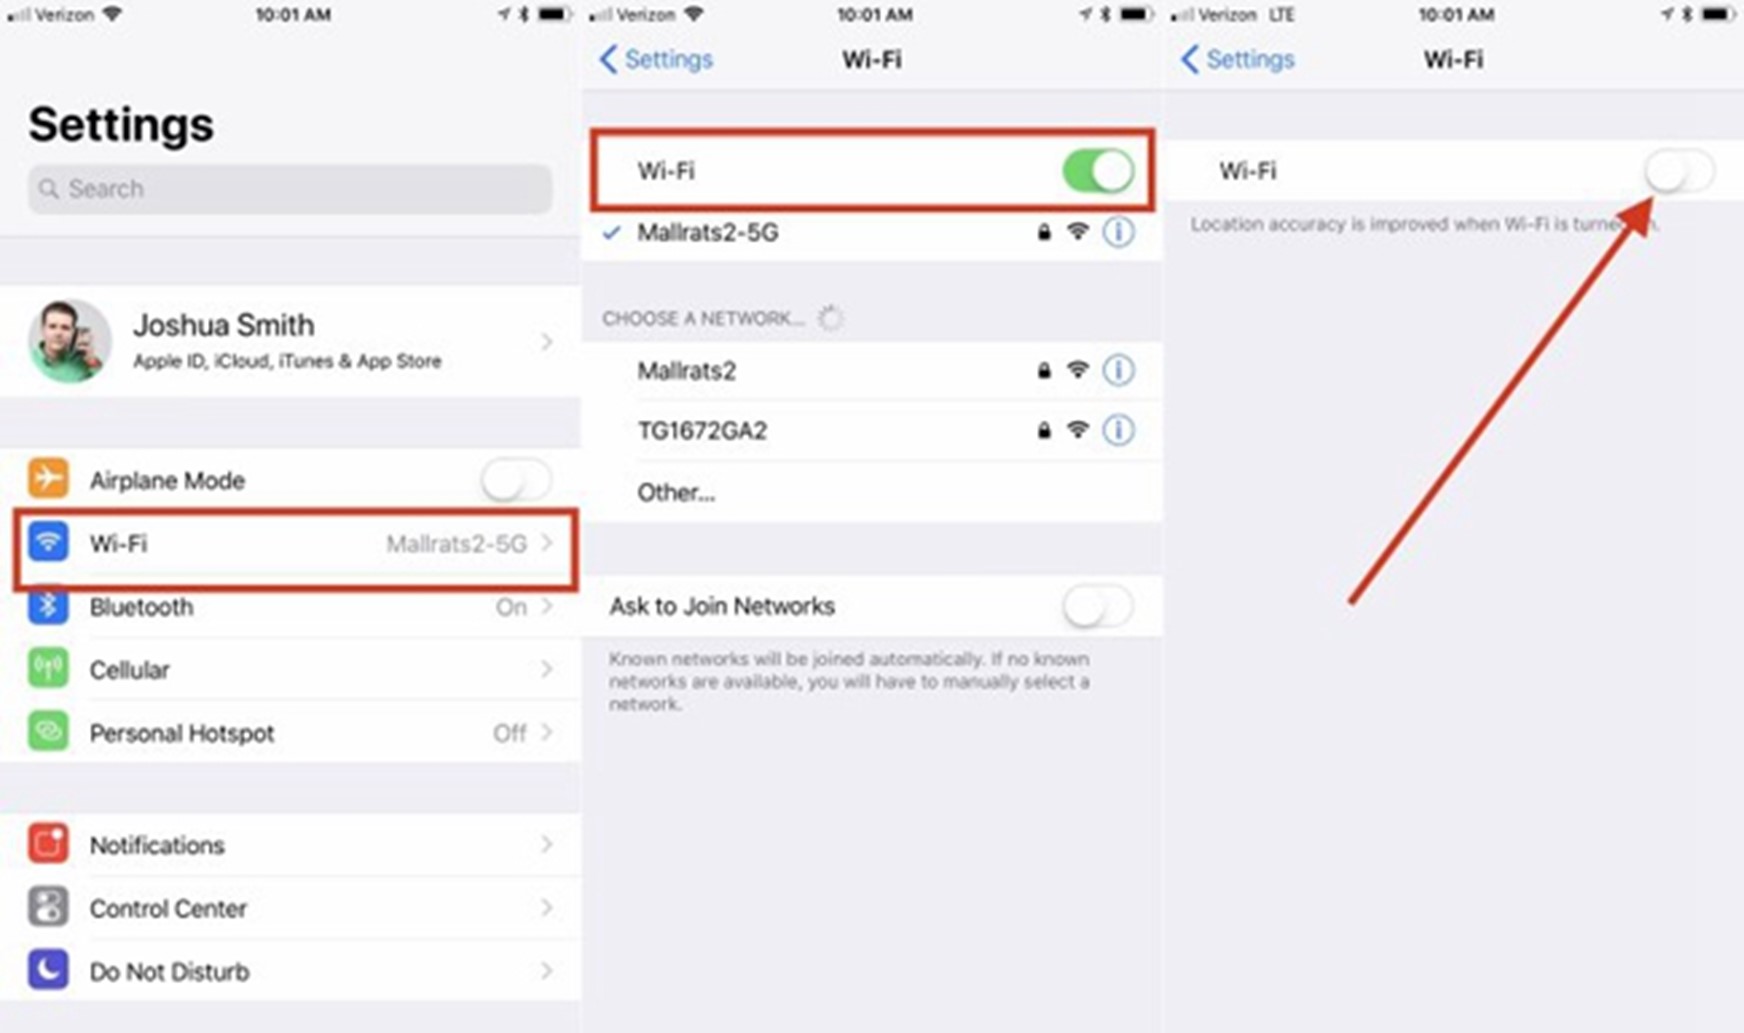
This is how you can check your Wi-Fi network:
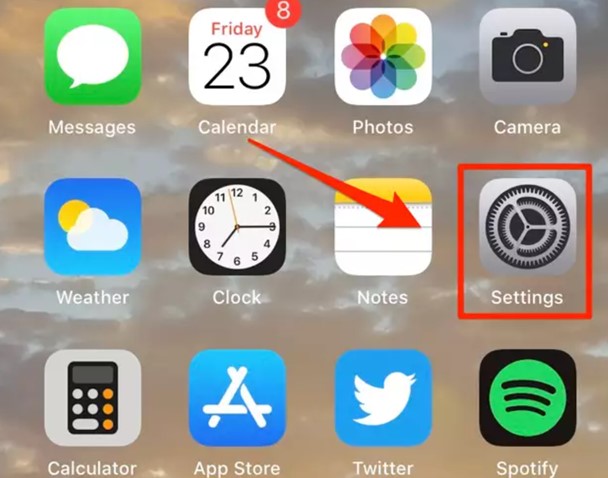
Step 1: Open the iPhone's Settings app.
Step 2: Choose Wi-Fi and switch the Wi-Fi on and off > then connect to a reliable network.
Try to Reboot the iPhone
Rebooting your iPhone is another easy fix that works quickly to remove any faults or malfunctions.
After reboot, you may then check if the update is installed this time or if it is still showing a stuck screen. Below are the ways to reboot the iPhone’s different models:
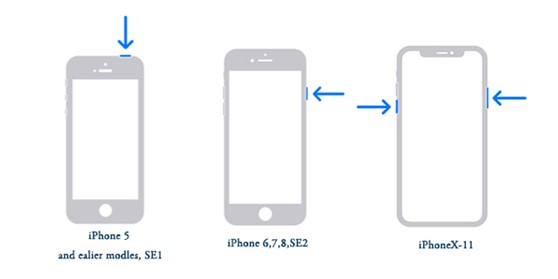
iPhone SE, 8, or earlier:
Press and hold down the Side/Top button. Drag the slider to the right side to turn your phone off. And then press and hold down the Side/Top button to turn it on.
iPhone X or later:
Press and hold down the Volume Up/Down and Side buttons simultaneously. Drag the slider to turn off the phone. Then press and hold down the Side button to turn it on.
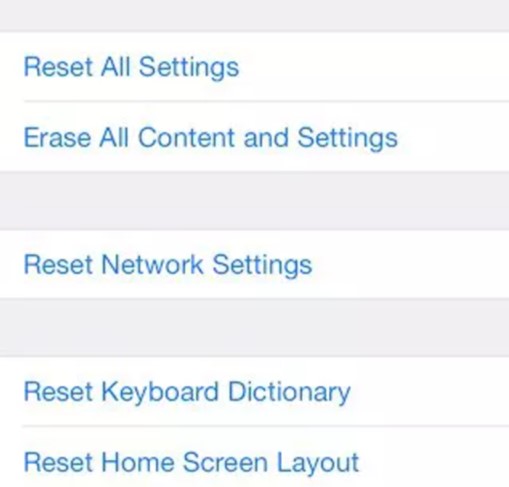
Reset Network Settings
One more effective way to fix the problem with the iOS 26 or iOS 17 update requested iPhone is to "Reset Network Settings" on your device.
To reset the network settings, go to Settings and then General. Choose Reset and select Reset Network Settings.
Delete iPhone Software Update
If you do a hard reset, and the iPhone still says "Update Requested," try deleting the software by following the instructions below:
Go to Settings and then General. Navigate to iPhone Storage and check if there is an option to get rid of the iOS update.
After selecting the software update, select "Delete Update."
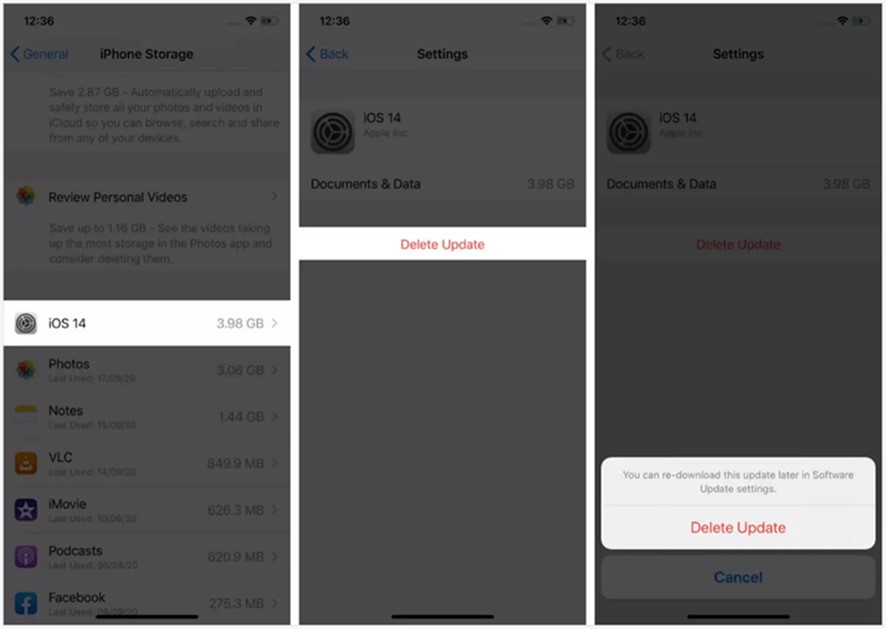
Go back to General in Settings and choose Software Update. Download and install the update again.
This should resolve common iOS issues, including “iPhone stuck on Update Requested.”
Enable/Disable Airplane Mode
To fix an iPhone iOS that is stuck on the "update requested" screen, you can even turn on airplane mode and then turn it off. The network problem may be one reason why iOS 26 is stuck on "Update Requested."
By following these steps, you'll be able to update your iPhone again, and the stuck screen problem will be fixed.
Step 1: Swipe up from below the bottom of your iPhone's screen to access Control Center first. If you own an iPhone X, swipe down from the top right corner of the screen to access the Control Center.
Step 2: Next, tap the airplane icon to switch on Airplane Mode; it will turn orange. To turn it off, tap it again; it will turn white.

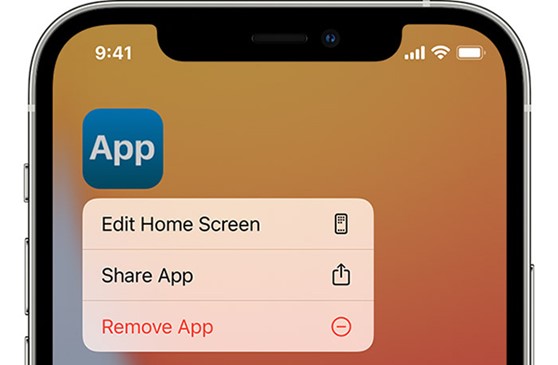
Free Up iPhone Space
When your device lacks sufficient storage to install iOS 26, you may encounter the iPhone stuck at update requested iOS 26 & iOS 17 issue.
To clear up storage on your iPhone, you can erase any unused apps or remove certain data from your iOS device.

To remove an app, hold down on its icon and select "Remove App" from the menu.
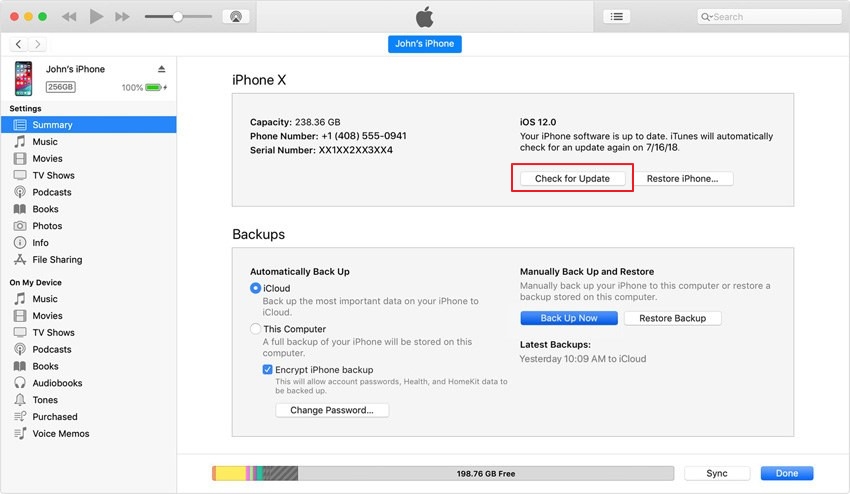
Update with iTunes
If you have an iOS device and a Windows device, using iTunes is another solution.
To update your iPhone to the newest version in iTunes, try the following steps:
Step 1: Plug in your iPhone using a charging cable and open iTunes on your computer. Once the program recognizes the iPhone, click the "iPhone" icon at the very top of the screen.
Step 2: The "Check for Update" button is located on the screen's right side. Now, click the "Download and Update" button in the pop-up window that appears on the display to confirm the whole process.
Third-Party Solution: Wondershare Dr.Fone - System Repair
Lastly, if none of the solutions above work, you can try this third-party solution, which is Dr.Fone - System Repair to fix the iOS software update requested issue.
This tool enables you to solve all kinds of iOS system issues, such as the system update error, Apple logo, boot loop, etc.
To begin, download and install Dr.Fone on your computer. Next, connect your device to PC and launch the tool.
The steps to repair the system is quite simple. First, open Dr.Fone, go to Toolbox. Choose System Repair. Then select the correct iPhone and then iOS Repair.
Select Standard Repair. Tap on Trust on your phone. When your phone is in Recovery Mode, choose Enter Recovery Code in Dr.Fone. Next, click Download to install the firmware version that you want.
It will take a few minutes to finish downloading. When it’s done, click on Repair Now to start resolving the iPhone system glitches. Dr.Fone will let you know when it’s done.

Part 3: [Bonus Tip] Safely Back Up iPhone Data to PC
As we all know, systems errors frequently result in the loss of data.
In this case, you need to create a data backup for a situation like system malfunctions if you don't want to lose crucial data, and for that, Wondershare MobileTrans - Backup & Restore is a useful tool for backup purposes.
MobileTrans can back up and restore over 18 types of data to your computer for a safe storage. It supports over 6,000 device types.
Whether you're using an Android or iPhone, you can restore a backup from the computer if you have backed up your Android or iPhone to a computer by MobileTrans before.
If you have not installed MobileTrans, you can try it out for a quicker and safer backup and restoration experience.
Wondershare MobileTrans
Safely Store Your iPhone Data With One Click!
- • No data loss. No data leaks.
- • Support various data, including files, photos, videos, apps, contacts, etc.
- • Safe backup to and restoration from PC.
 4.5/5 Excellent
The backup process is super easy; follow the instructions below to create a backup.
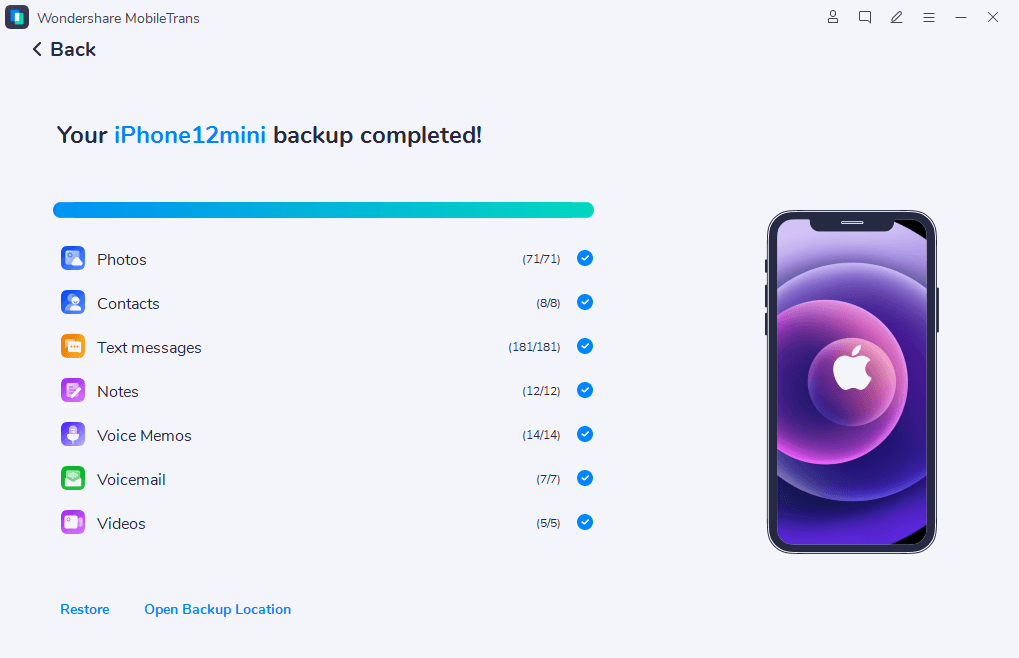
Step 1: Download and open MobileTrans on your computer. Connect your cell phone to the computer using a USB or lightning cable.

Step 2: Choose Backup & Restore on the interface. Click on Backup under the section of Phone Backup & Restore.
Step 3: MobileTrans supports all file types. Choose the file types you want to backup and press the Start option to begin.
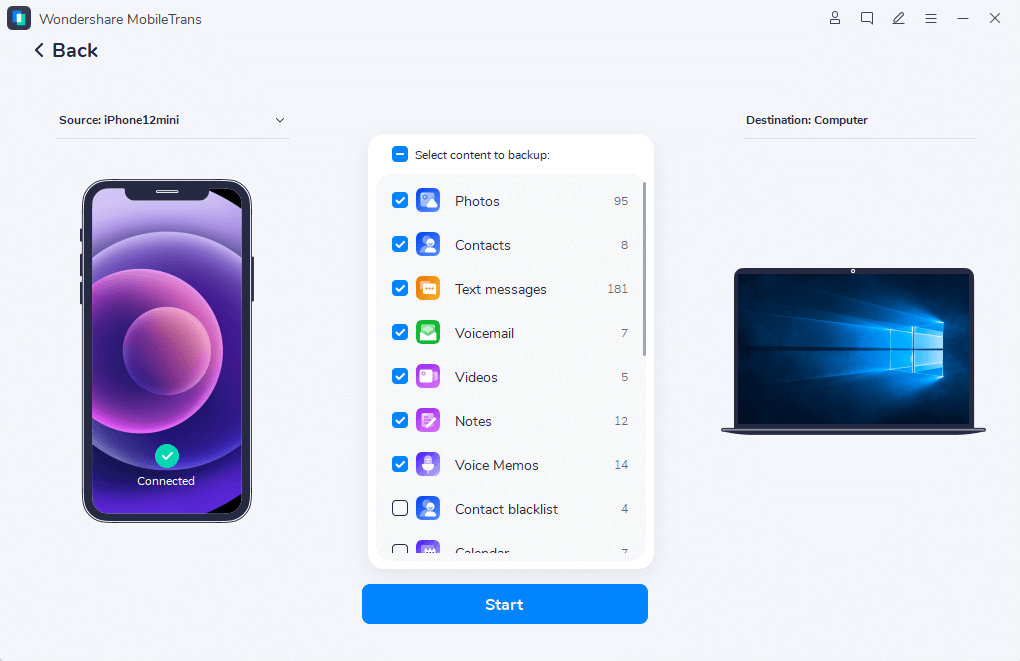
Step 4: Don't disconnect your phone; the backup process will take some time.
Final Verdict
You might not be too concerned about experiencing iPhone stuck on update requested, but if you don't fix the issue, you won't be able to update your iPhone with the most recent version, which will cause problems in future updates.
No need to worry; we have listed every possible reason why you might be seeing the iPhone update requested as well as their fixes to update your iPhone to iOS 26. Follow them, and you should resolve the issue with no hassle.
FAQ
-
1. How long does it take to prepare an update on the iPhone?
An update on an iPhone can take anywhere from 20 to 40 minutes to complete, and the amount of time it takes to prepare the update is also dependent on the internet connection you have.You should be able to easily download an update within 20 to 25 minutes if your internet speed is sufficient and your iPhone is charged to the point where it can download the update.
On the other hand, if your internet connection is slow, it could take up to 40 minutes and, in some cases, much longer.
-
2. Why is the software update taking so long on my new iPhone?
There could be a number of reasons why the software update on your iPhone is taking so long to finish.
It could be due to a slow internet connection, an error or incomplete software download, or any other program-related issue.
The size of the update is another factor that determines how long it takes to download and install the update successfully.


