


 TL;DR:
Google Photos Locked Folder secures sensitive media behind an authentication barrier tied directly to your device screen lock or Google Account password.
● The feature requires an active screen lock on Android 6+ or iOS 15+ devices, meaning anyone possessing your device passcode or Google password can unlock and view the hidden contents.
● Moving items into this folder removes their standard cloud backups unless you manually enable the Locked Folder backup option, and related copies or edited versions are not moved automatically.
● Unbacked-up locked files are saved exclusively on the local device, requiring either cloud synchronization or a local USB backup tool like Wondershare MobileTrans to prevent permanent data loss.
Ask AI for a summary
 ChatGPT
 Perplexity
 Gemini
 Claude
 Grok
Grok
People usually store a lot of pictures and videos on their mobile devices and computers. Some of these items are too personal. They could be anything from pictures or sensitive documents to videos you would rather no one else view. That's where Google Photos Locked Folder comes in.
It works the same way as the iPhone's Photos app, which allows you to hide and unhide photos on your device. The Locked Folder is a pass-code-protected space where you can save items on your smart device.
But you can also back up the Folder on the cloud, allowing you to access your content on different devices. Or you can set it up on the web on your Windows computer and be able to access it through your mobile devices.
Once the Folder is set up, you can only access your items after authenticating your identity. Only a person with access to the device screen lock can unlock and view the Locked Folder's content. Discover how you can use this feature to keep your sensitive documents safe.
In this article
Part 1 Google Photos Locked Folder: How to Set it Up
You'll be prompted to set up a Locked Folder the first time you try to add photos and videos. The device you use needs to be connected to your Google account.
Only Android devices running Android version 6 and later support this feature. Likewise, Locked Folder is only available for iOS versions 15 and later.
Setting up a Locked Folder in Google Photos on your smartphone is easy and will take a few minutes.
Check the steps out:
- Launch the Google Photos app on your mobile device and move to the Library.
- Choose Utilities.

- Under Utilities, tap Locked Folder.
- Tap Set up Locked Folder in the resulting window.

 Note: You can opt to turn on backup for Locked Folder at this time.
 - Follow prompts to unlock your device. You must first set up a screen lock for your Android device before using Locked Folder. Your Locked Folder password is the same as the phone's screen lock.
You'll also need to set up a Face ID, Touch ID, or passcode for an iPhone or iPad to use Locked Folder. Like Android, your Locked Folder password will be the same as your Face ID, Touch ID, or passcode.
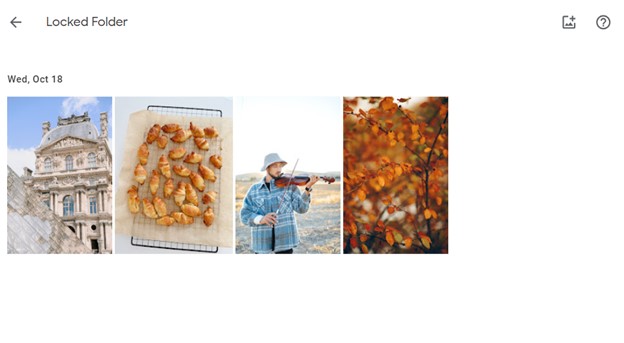
Upon unlocking your device, you'll see a window saying, "Nothing here yet." That means your Locked Folder is empty and ready to receive items.
If you're on a Windows PC, the steps to set up a Locked Folder are as follows:
- Open your browser and go to photo.google.com.
Note: If you haven't signed into your Google Account, click "Go to Google Photos" to do it.

- Once you sign in, click the Locked Folder option on the left panel under Library.
- Verify that it's you by entering your Locked Folder password. It is the same as your Google Account password.

- Once you click the Next button, you'll see the Locked Folder tab, "Nothing here yet." It's time to add photos and videos.
Part 2 How to Move Photos & Videos into the Locked Folder
Now that you have set up a Locked Folder, adding sensitive photos and videos is like cutting a piece of cake.
Here is how to lock Google photos (move items into the Locked Folder) on your mobile device:
- From the Google Photos app, tap Photos and choose the pictures and videos you wish to add to the Locked Folder.

- Tap More at the top right of the screen and then Move to Locked Folder.

- Tap Move to confirm your choice.
Here's how to move Google photos to Locked Folder on a Windows PC:
- From the Locked Folder window that says "Nothing here yet," tap Move items on the top-right.

- Select photos and videos to move to your Locked Folder.
- Click "Move to locked folder" to import the selected items.
Part 3 How to Access Locked Folder in Google Photos
To access the Locked Folder in Google Photos on your mobile device, follow the following simple steps:
- Launch the Google Photos app and go to the Library.
- Choose Utilities and then the Locked Folder option.
- Authenticate yourself. After that, you'll be presented with all the photos and videos you added to the Folder.
Part 4 Easy Way to Safely Back Up Your Sensitive Photos & Videos
You could lose photos and videos in the Locked Folder if you don't have backup. Items in the Folder without backup are only saved on that device. Also, even if Google Photos Locked Folder is password encrypted, it is still connected to the Internet and not fully protected.
Thus, backing up private photos and videos adds a layer of safety for your items. You can back up the Folder's content using the backup feature on your phone. But if you choose not to back your items to the cloud, Wondershare MobileTrans covers you.
MobileTrans provides a convenient and secure way to back up sensitive files. You can use it to safely back up your private photos and videos to a computer with a few clicks, which is even more secure than Google backup, as only you can access your computer data.
Wondershare MobileTrans - Backup & Restore
Back Up Private Data With One Click!
- • No data loss. No data leaks.
- • Support various data, including files, photos, videos, apps, contacts, etc.
- • Safely backup to and restoration from your computer.
 4.5/5 Excellent
In addition to pictures and videos, MobileTrans can back up more than 18 file types to a PC. These include photos, videos, documents, music, WhatsApp messages, etc.
Also, you can use it to transfer data between devices and manage your contacts.
This tool now supports both Android OS and iOS on over 6,000 types of devices.
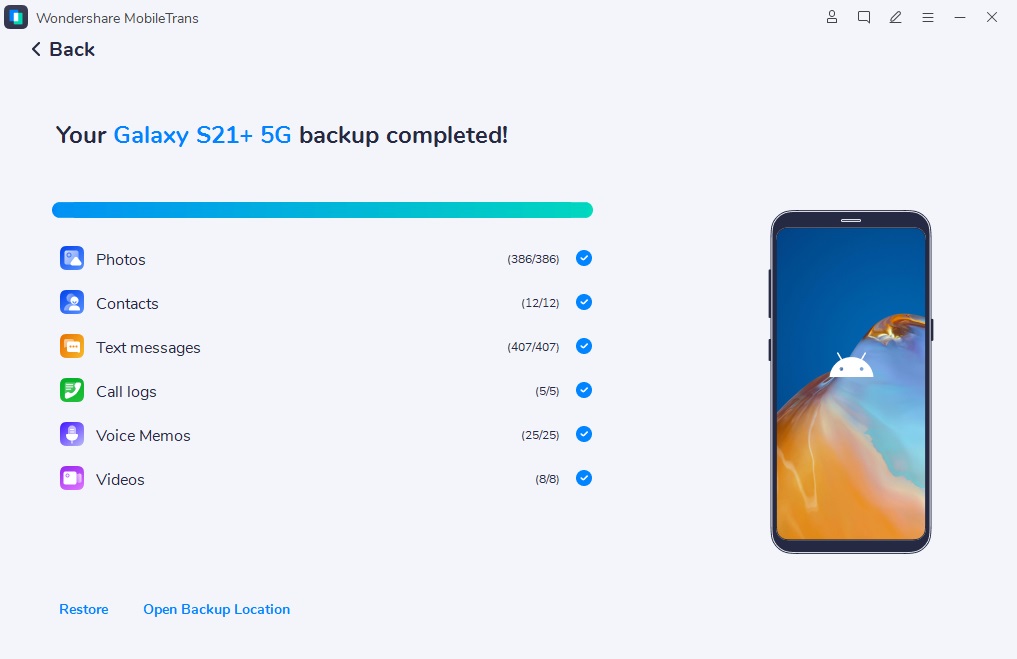
Steps to back up data to a PC with MobileTrans:
- Download and install MobileTrans on your PC for free.
- Connect your mobile to the PC using a functional USB data cable or a lightning cable.
- Open MobileTrans and choose the Backup & Restore option. Then click on Backup under Phone Backup & Restore.

- Once a connection between the phone and PC is established, MobileTrans will display all file types supported. Choose your files to back up.
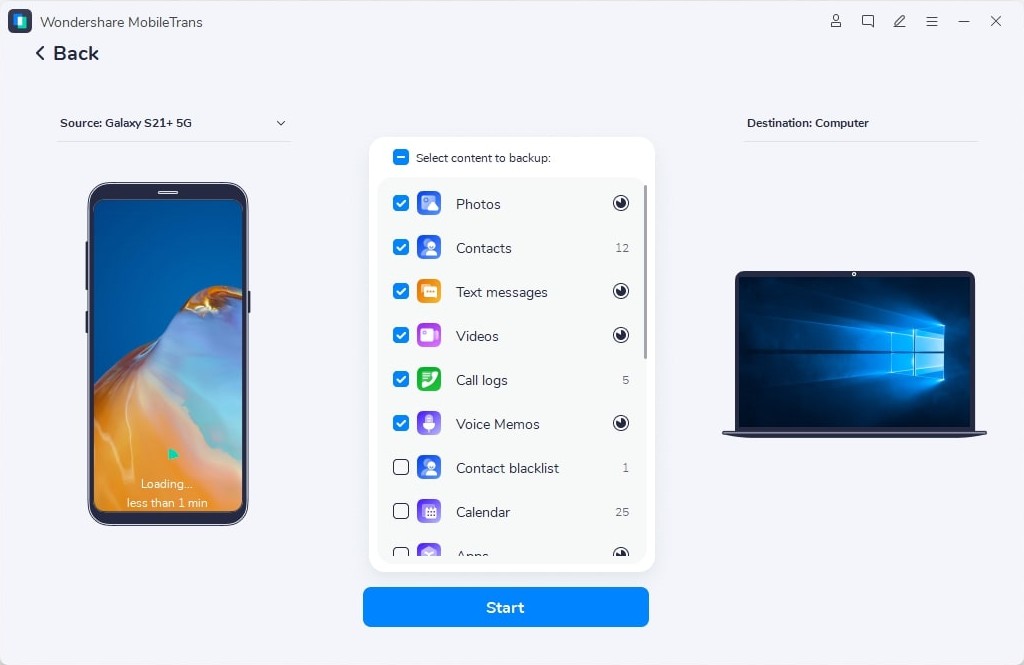
- Click Start and keep your device connected. The backup will be through in a few minutes.
Conclusion
You've learned what a Google Photo private folder (Locked Folder) is and how it works. It's a unique feature that helps keep snooping eyes away from your sensitive files. It's perfect if you want to tuck away private pictures like driver's license and credit cards.
The added layer of privacy can give you peace of mind, knowing that your private content is safe. So, don't hesitate to exploit this technology. Follow the steps talked about in this guide to set the Folder up on your device and move your items.
4.5/5 Excellent

