Having lots of stuff on your Drive can slow things down and make it confusing. That's why people want to delete files from Google Drive. It makes everything more organized and easier to reach.
This blog post will help you achieve this aim. We'll show you exactly how to delete files from your Google Drive step by step. You don't need to be tech-savvy. Just straightforward instructions and you will effortlessly clear your Google Drive without accidentally losing any important files or data.
We'll also talk about why your Google Drive gets messy in the first place. Understanding that will make it easier to keep things clean and avoid the same problem later on. Keep reading if you're tired of a cluttered Drive or you want to delete an unnecessary file in your Google Drive.
In this article
Part 1 How to Delete Files from Google Drive
In this section, you will learn how to delete files from Google Drive. There are different methods to achieve this, depending on the type of device, and you will learn these different methods here. If your WhatsApp takes too much of Google Drive space, you can also remove WhatsApp backup from Google Drive.
You will learn how to delete files from Google Drive on your computer, android, and iPhone. Below are the different methods to achieve this aim.
How Can I Delete Files from Google Drive on a Computer?
To delete files from Google Drive on a computer is a simple process.
Firstly, open your web browser and go to Google Drive. Log in with your account credentials. Once you're in, take a look at the list of files and find the ones you want to delete. Select them by clicking on each file while holding down the Ctrl key (or Command key on Mac). This action allows you to choose multiple files at once.
To remove a file, just click on it once to select it. Then, look for the Delete icon at the top and click on it. This action will send the selected file to the Bin.

Another way to do it is by right-clicking on the file, and from the menu that appears, choose Remove. This instantly removes the selected files from your Drive. This action doesn't permanently delete them yet. They are moved to the Trash folder.

To complete the deletion process, go to the left sidebar and click on Trash. Inside, you'll see the files you removed. Select the files you want to permanently delete. right-click again, and choose the Delete Forever option.
Afterwards, Confirm the deletion. your Google Drive is now lighter and more organized with the deleted files gone.

It's important to note that once you delete files forever, there's no way to get them back. So, double-check before confirming the deletion. Also, keep in mind that if you've shared these files with others, deleting them means others won't be able to access them anymore.
How Do I Delete Files from Google Drive on Android?
Now that you've got a handle on cleaning up your Google Drive clutter on a computer, let's shift our focus to mobile devices. It's a straightforward process, and we'll guide you through it step by step.
Firstly, open the Google Drive app on your Android device and login if prompted. Once you're in, locate the files you want to delete. Tap on the three dots right next to it. From the menu that appears, select Remove. A pop-up will show up asking for confirmation. Simply tap on Move to Trash to let Google Drive delete the file.

Similar to the computer process, this action doesn't permanently delete the file. It just moves it to a different location.

To complete the deletion, tap on the menu icon (often three horizontal lines or dots) in the upper-left corner. From the menu, select Trash Inside the Trash, you'll see the files you removed. Tap and hold on the files you want to delete permanently, then select Delete Forever from the options that appear.
Confirm the deletion, and like that, you've successfully cleared space on your Google Drive using your Android device.

Keep in mind that, like on a computer, once you delete files forever, there's no way to retrieve them. Also, if you've shared these files, deleting them means others won't be able to access them anymore.
How to Delete Files from Google Drive on iPhone?
Now let's address the same issue for iPhone users. The steps are not very different from that of Android.
Begin by opening the Google Drive app on your iPhone and signing in if required. Once you're in, locate the files you want to delete. Tap and hold on to the file you wish to remove.
Next, look for the three dots (more options) icon, usually located at the top-right corner of your screen. Tap on it, and you'll see a menu. Select Remove from the menu, and the chosen file will be moved to the Trash folder. Similar to other devices, this action doesn't permanently delete the file. it merely relocates it

To complete the deletion process, tap on the menu icon (often three horizontal lines) in the upper-left corner. From the menu, find and tap on Trash. Inside the Trash, you'll find the files you removed.
Tap the three dots next to the file, and then tap Delete Forever in the bottom. Confirm the deletion, and you've successfully freed up space on your Google Drive using your iPhone.

At text: remove files forever in google drive trash on iphone
Remember, just like on other devices, once you delete files forever, there's no way to recover them. Additionally, if you've shared these files, deleting them means others won't have access to them anymore.
Part 2 What Happens If I Delete Files from Google Drive
You've learned how to delete unwanted files from your Google Drive, now, let's dive into a crucial question: What happens if you delete files from Google Drive?
When you press the delete button, the file is removed from your main view, creating a cleaner Drive. However, that's not the end. The file isn't completely gone. instead, it heads to the Trash or Bin folder within Google Drive.

If you leave the file in the Trash, it continues to take up space in your overall storage. To truly free up space, you need to permanently delete it from the Trash. Until then, it still consumes your storage space.
But if you change your mind or accidentally delete something important, you can restore files from the Trash back to your main Drive. Just locate the file in the Trash, right-click on it, and choose the Restore option. your file will be back to where you deleted it from.

However, remember that once you permanently delete a file, there's no turning back. It's gone forever. So, before you hit the Delete Forever button, double-check to make sure you won't need the file again.
Part 3 Another Tool for Safe and Easy File Backup
Now, let's talk about another helpful tool that makes keeping your files safe and sound super easy. It also helps you secure your files in case you mistakenly delete a file permanently on your Google Drive. For this purpose, we introduce to you Wondershare MobileTrans - Backup & Restore feature.
If you ever worry about losing your important stuff or just want an extra layer of protection for your files, this tool will help you achieve that.
In a world where our digital stuff is super important, having a backup tool you can count on is a big deal. MobileTrans keeps things simple, so give it a shot.
It supports over 6,000 types of devices and 18+ data types. No matter you are iPhone or Android user, MobileTrans can help you quickly and safely store data on your computer.
Wondershare MobileTrans
Back Up Your Data to Computer Easily
- • No data loss. No data leaks.
- • Support various data, including files, photos, videos, apps, contacts, etc.
- • User-friendly and easy to use.

 4.5/5 Excellent
Here are the steps involved in using this tool.
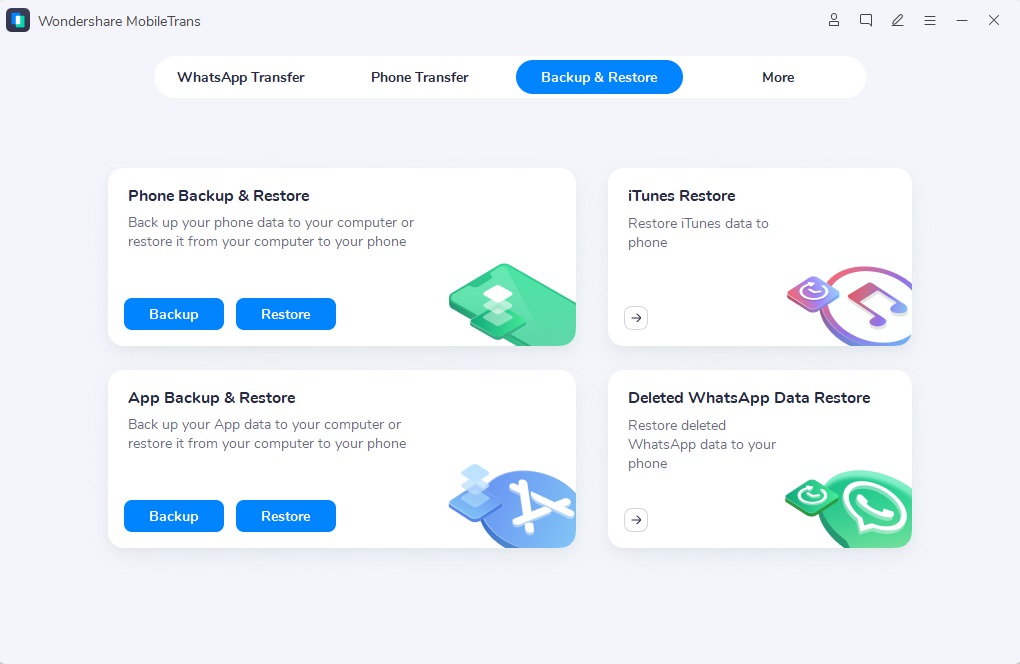
Step 1: Start by downloading and installing the MobileTrans app on your device. Once the app is ready, open it and select Backup & Restore from the main menu.

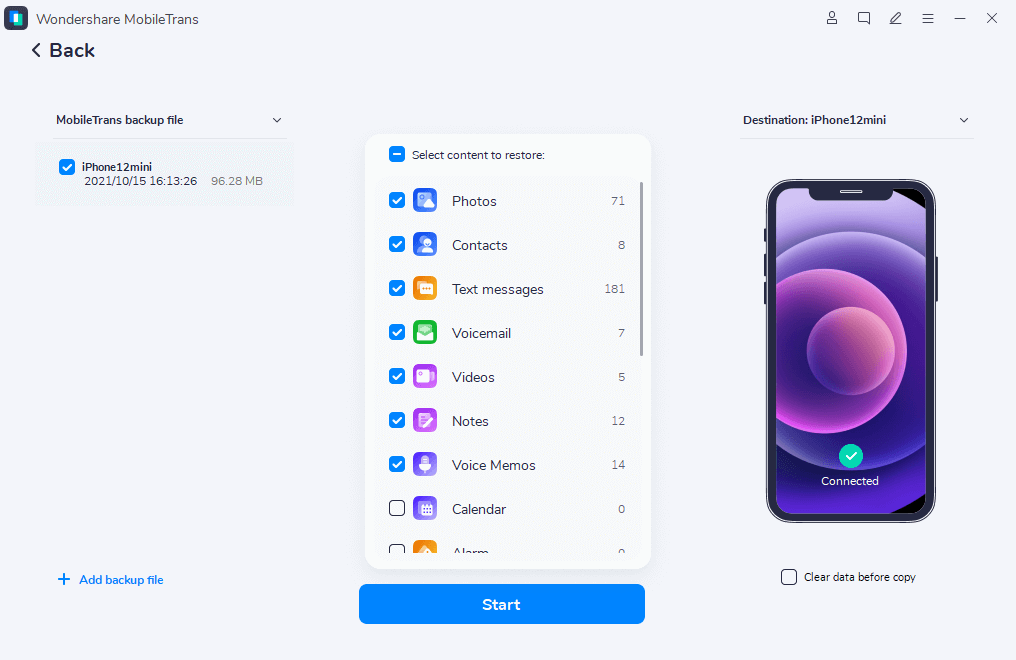
Step 2: Use a USB cable to connect your device to your computer. MobileTrans is compatible with both Android and iOS devices. After connecting, the app will identify your device. Now, you have the freedom to choose what types of files to back up, such as photos, videos, contacts, or other data.
Step 3: Once your selections are made, hit the Start button. MobileTrans will start the backup process. Allow MobileTrans some time to complete the backup process.

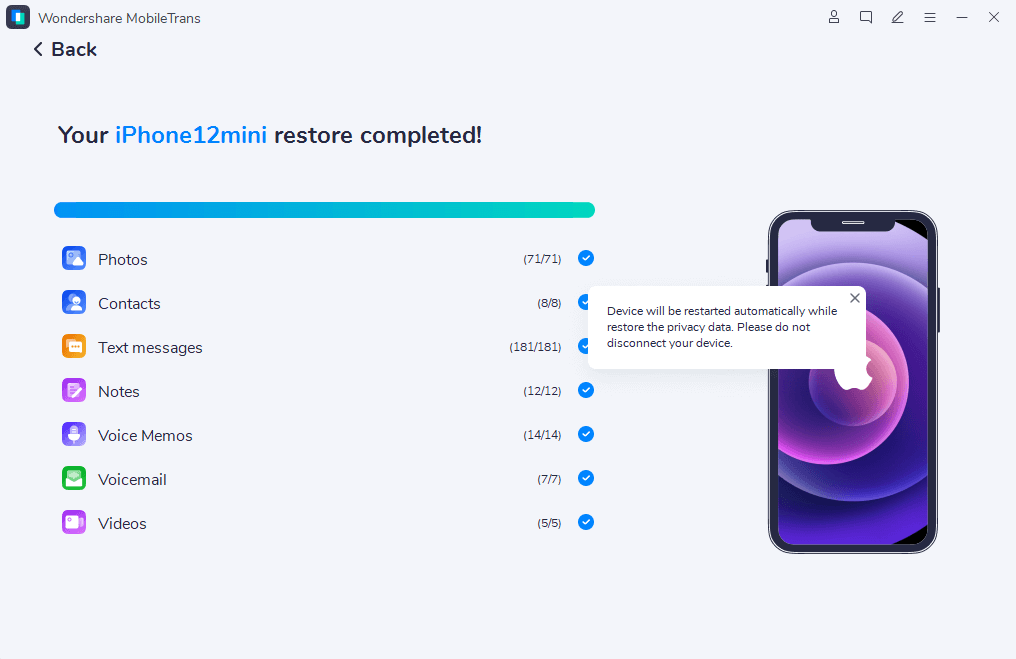
Once the backup is done, MobileTrans will notify you. Take a moment to confirm that the backup was successful before proceeding. Safely disconnect your device from the computer once the backup is complete. If prompted, choose a secure location on your computer to store the backup files.
In case you need to recover your files, open MobileTrans, select Backup & Restore, and follow the prompts.

MobileTrans helps to keep your data secure and easily retrievable when needed. Try MobileTrans today to experience the simplicity of safeguarding your important files.
Conclusion
In conclusion, you've learned how to tidy up your Google Drive and delete unnecessary files on different devices. Now, to keep things neat, make decluttering a regular habit for a smooth digital experience. When it comes to keeping your files safe, MobileTrans is your go-to friend. Its Backup & Restore feature ensures your files stay secure and ready for whenever you need it.
By making these habits part of your routine, you're in full charge of your digital world. A tidy Google Drive and a trusty backup plan with MobileTrans give you the tools for a stress-free digital journey.

 4.5/5 Excellent


