iOS users can share files wirelessly with a service called AirDrop. It's the fastest way for apple users to send any kind of data, like music, videos, photos, documents, and more.
Also, AirDrop's ability to send large files without compromising image or video quality is yet another perk.
However, many users have reported that after updating their devices to iOS 26 or 17, the airdrop not working properly. This could be due to a glitch, a network interruption, or another factor; continue reading to learn more about the problem and how to fix it.

 4.5/5 Excellent
In this article
Part 1: 8 Simple Solutions to AirDrop Not Working on iPhone/iPad
If your AirDrop does not work properly on your iPhone/iPad, then you should try out these 8 simple solutions to fix the problem immediately.
Reset network settings
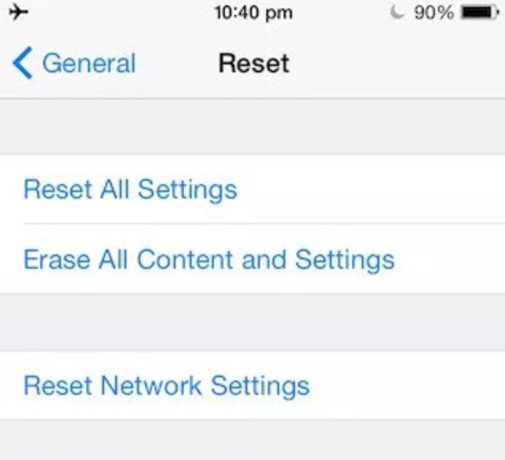
iPhone or iPad's airdrop stopped working? Then, try resetting the network settings. This will change the cellular, APN, VPN, and Wi-Fi settings, resolving whatever is preventing AirDrop from working. Here's how to reset your network settings on your iPhone and iPad.
- Go to Settings.
- Tap on “General” > Reset > “Reset Network Settings.”
Turn on your Wi-Fi and Bluetooth
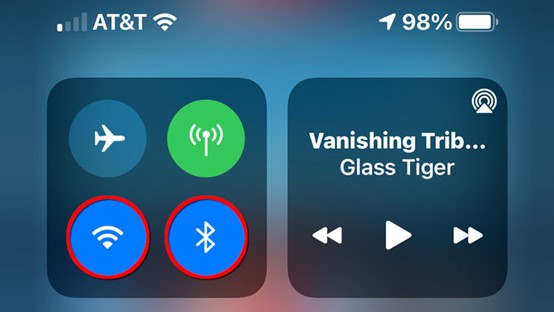
Turn on your Wi-Fi and Bluetooth for a smooth transfer from the AirDrop, as this could be the cause of the airdrop stopping working.
Simply swipe up from the iPhone/iPad home screen to enable Bluetooth and Wi-Fi before sending data via AirDrop.
Re-sign in iCloud
Resigning into iCloud on your iPhone/iPad is another quick fix.
On iPhone & iPad:
Step 1: Go to Settings > User Name > iCloud. Select "Sign Out."
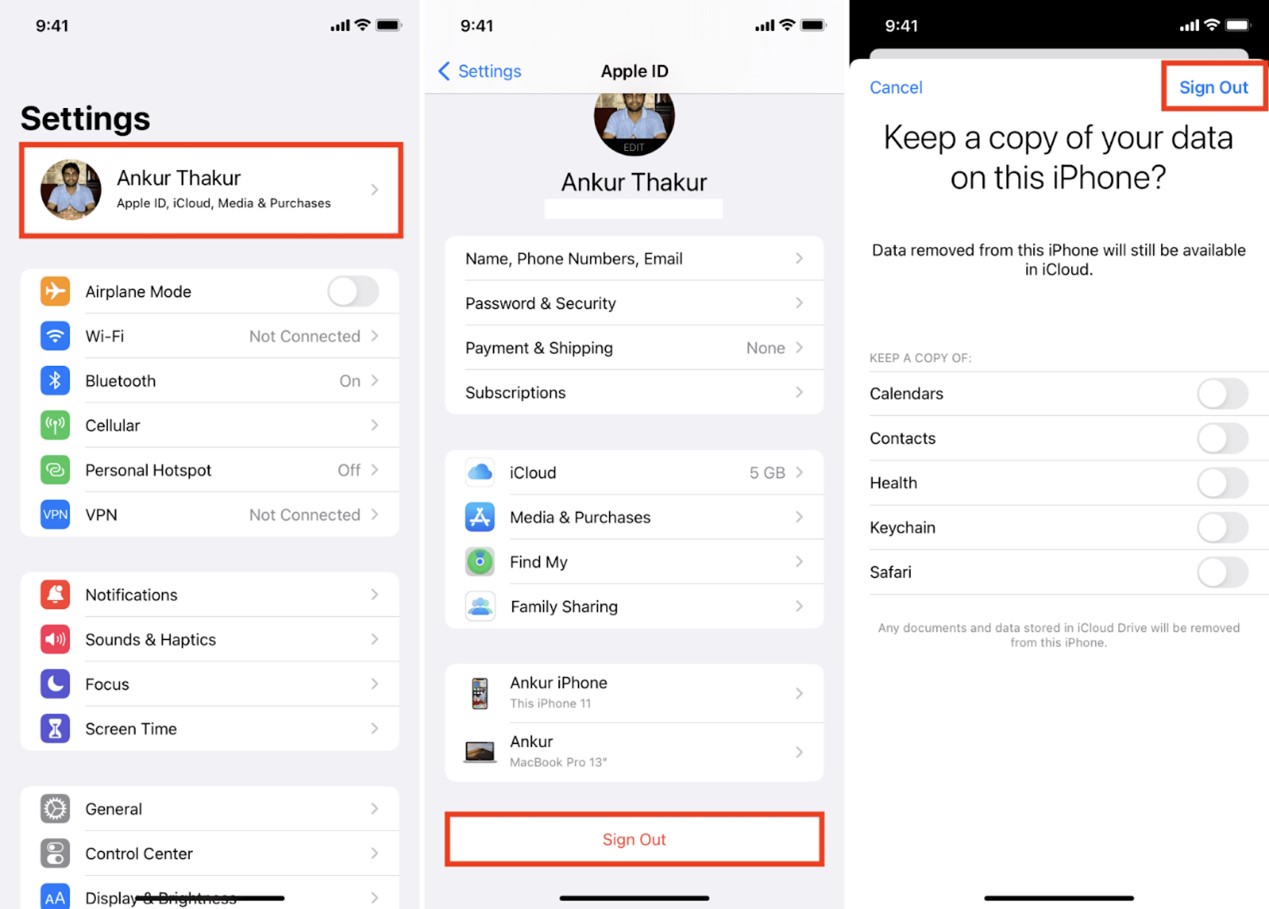
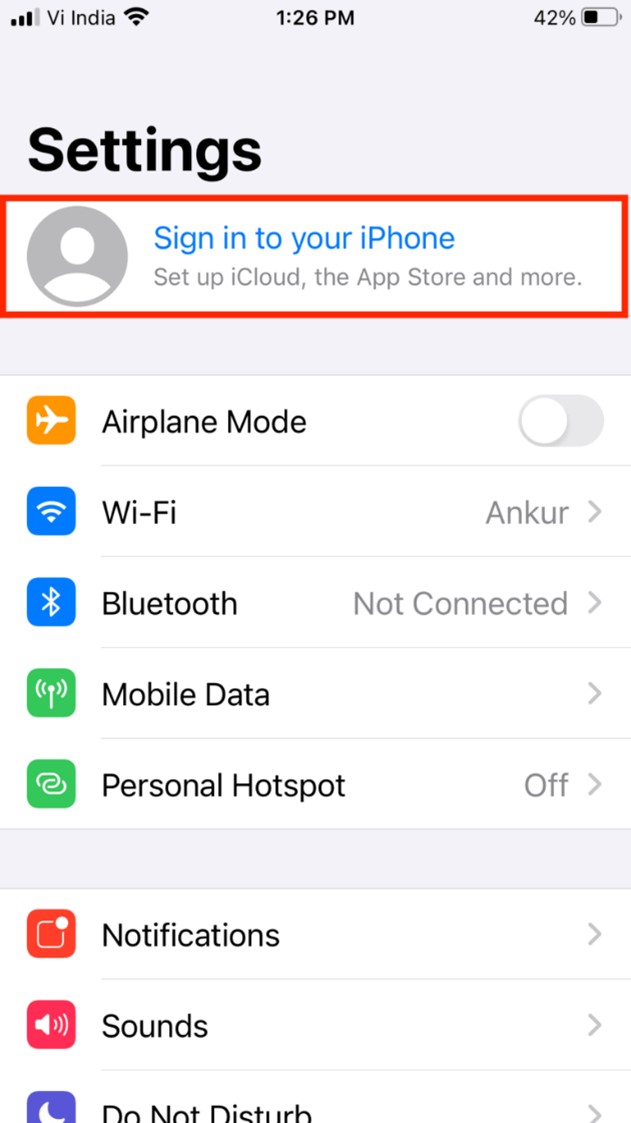
Step 2: Then, "Sign In" to iCloud again to see if the AirDrop starts working again.
Restart your device
When the AirDrop is not responding, it is not always due to a serious problem; sometimes, it's just a glitch! To resolve the issue, try restarting your device.
Check your AirDrop settings
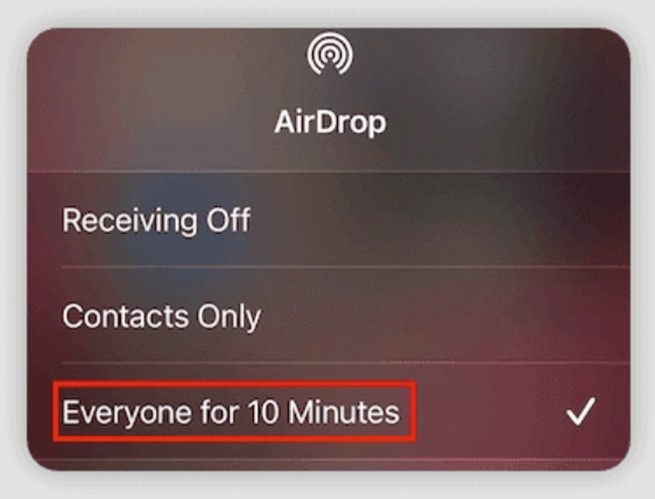
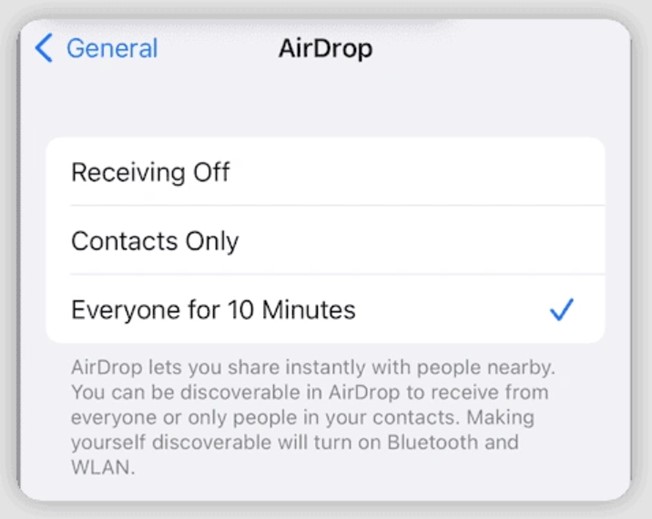
There are three options for the AirDrop: Receiving Off, Contacts Only, and Everyone for 10 Minutes.
Mostly, when airdrop not responding, it's because you haven't set up the settings on your device. Your AirDrop discoverability needs to be set to "Everyone." This setting makes it easy for people to find your device and transfer you the data.
To easily set up AirDrop, follow the process below:
Via Control Center:
- Swipe up or down to navigate to the Control Center>Hold on to the AirDrop option> Select “Everyone for 10 Minutes”.
Via Settings:
- Go to Settings > Tap on General > AirDrop > Everyone for 10 Minutes.
Turn off the personal hotspot
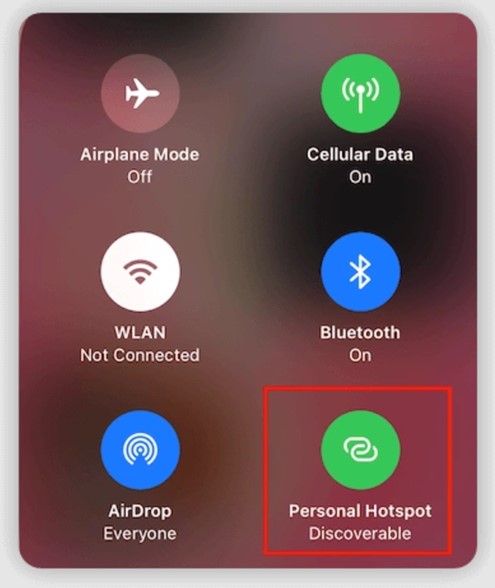
Using AirDrop only over Wi-Fi isn't necessary, but it is suggested. If you're wondering why airdrop is not working, it could be because you turned on your personal hotspot, which switched off your Wi-Fi automatically.
Try disabling your personal hotspot and turning on Wi-Fi to see if this resolves the iOS 26/17 AirDrop issue.
- Swipe down the screen> Tap "Personal Hotspot" to make it gray and undiscoverable, then turn on the WiFi.
Remove AirDrop Restrictions
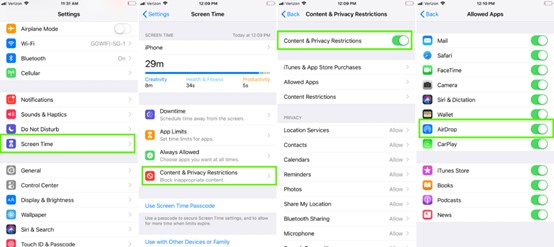
Is AirDrop on iPhone not working, not showing, or is it gray? Then, it may be because you have disabled AirDrop in "Content & Privacy Restrictions." The issue can be fixed by checking and allowing the restrictions on the iPhone/iPad.
Here's how to do it:
- Go to Settings> Screen Time> Content & Privacy Restrictions> Allowed Apps> AirDrop.
Upgrade to iOS 26
You may not have the most recent iOS version installed on your iPhone or iPad, which could be the reason for AirDrop on iPhone not working. If that's the case, you'll need to make sure that your device is up to date.
To update your iPhone & iPad, follow the steps listed below:
Step 1: Go to Settings.
Step 2: Choose "General" > "Software Update" and then install the latest update.
Part 2: 8 Fixes to AirDrop Not Responding on Mac
Is your Mac airdrop not working? Then, it might be due to a few bugs or unrelated problems that are easily fixable. Below are some of the best 8 fixes to try when your airdrop does not work.
Make sure AirDrop is On
If airdrop is not already activated on your Mac, you can activate it by following the steps outlined below.
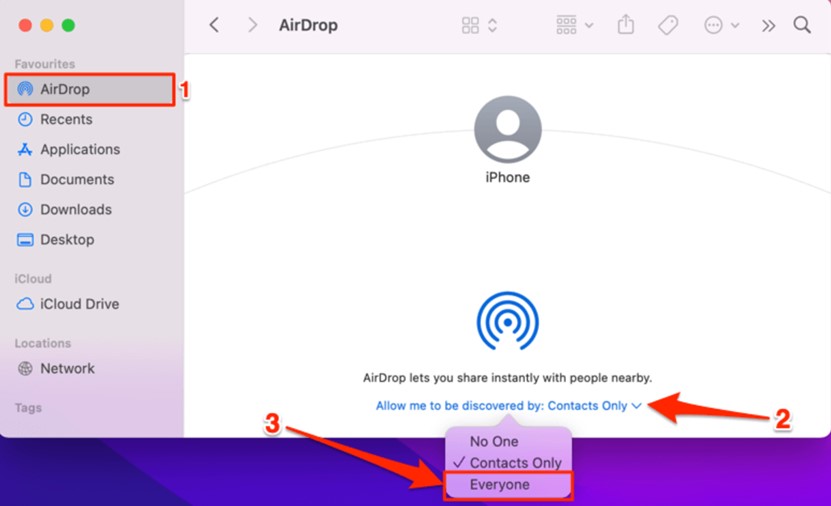
Step 1: Select AirDrop from the Finder’s Go menu.
Step 2: Tap on “Allow me to be discovered by” at the window’s bottom.
Step 3: Select “Everyone” to enable it for everyone.
Ensure that AirDrop is activated on both devices
AirDrop functions identically to Bluetooth; just as both the sender and receiver had to turn on Bluetooth in order to share and receive files, the same rule is for AirDrop. This means that if an airdrop is not working, then you should double-check that it is turned on both devices.
All you need to do is:
Open the Settings menu and select General> AirDrop> Select Contacts Only or Everyone for 10 minutes.
Move the devices closer
As Apple restricts AirDrop to a range of 30 feet, and as there have been reports of hiccups and other issues even at that distance, it’s best to keep the devices close together to ensure a seamless transfer without interruption.
Unlock your Mac
People frequently ask why AirDrop does not work, and they begin looking for major causes.
But sometimes AirDrop stops working for reasons, like when your device is not unlocked, and it may stop transferring the files, so be sure to keep your device awake at all times. This is what you need to do:
- Press any key on your keyboard.
- Click or move the mouse.
- Press the power button briefly to awaken your Mac again.
Also, you can adjust the energy settings in the Energy Saver preference pane.
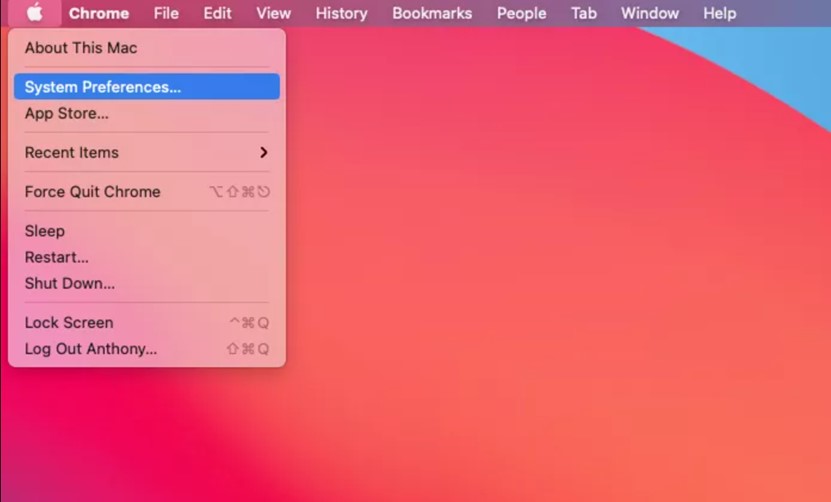
Step 1: In the upper left corner of your screen, you should see the Apple logo; click it and choose “System Preferences.”
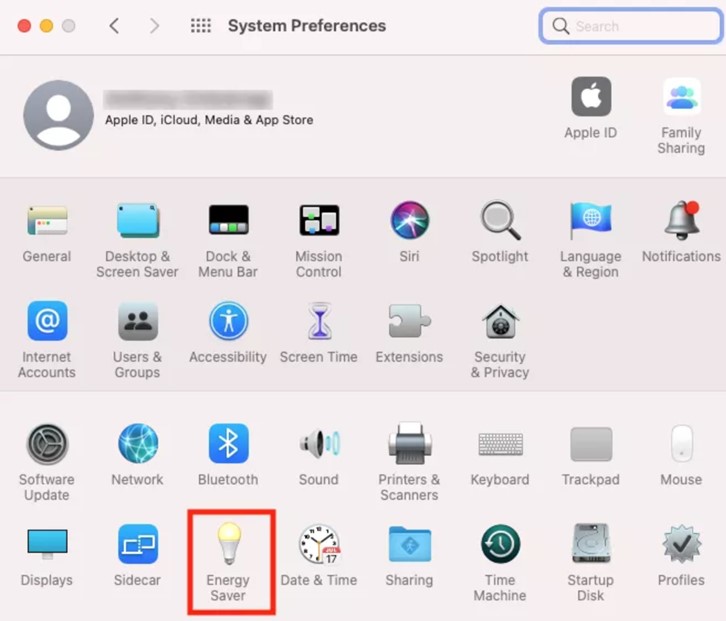
Step 2: Next, select “Energy Saver” > “Turn display off after slider”
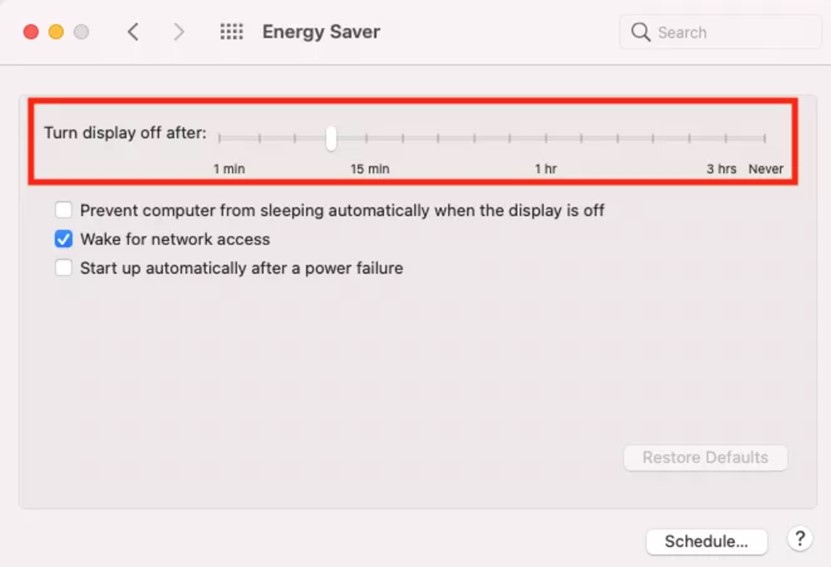
Step 3: Set it to "Never" to keep your Mac awake.
Turn Bluetooth and Wi-Fi off and on again.
AirDrop requires both the sender and the receiver to have Bluetooth and Wi-Fi enabled. If your Mac airdrop not working, try turning on and off the Bluetooth to solve the issue.
For Wi-Fi:
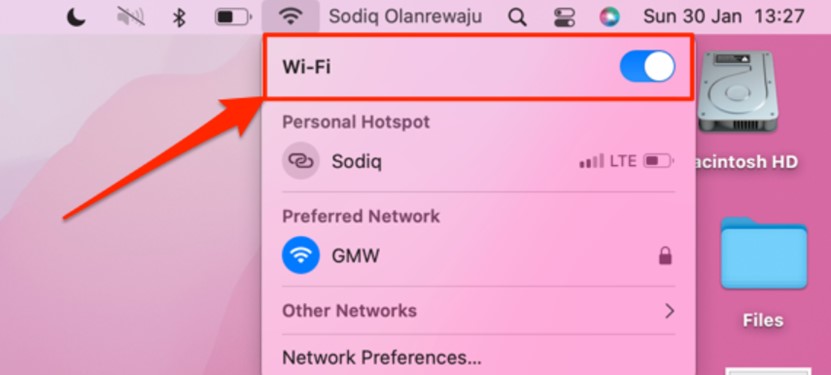
- On your Mac, go to the Status menu, select the Wi-Fi icon, and make sure Wi-Fi is turned on.
-
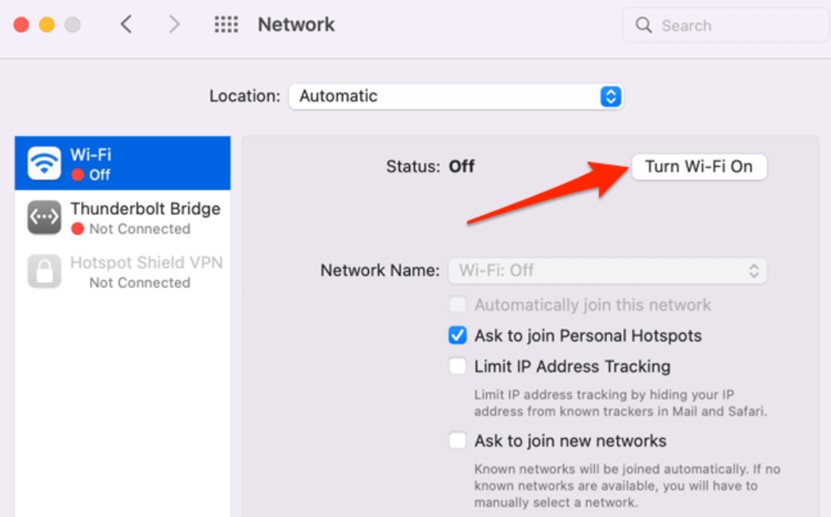
- Another option is to turn on Wi-Fi by going to System Preferences > Network > Wi-Fi and selecting "Turn Wi-Fi On".
For Bluetooth:
-
- To enable Bluetooth, go to the Status menu and switch “On” the Bluetooth icon.

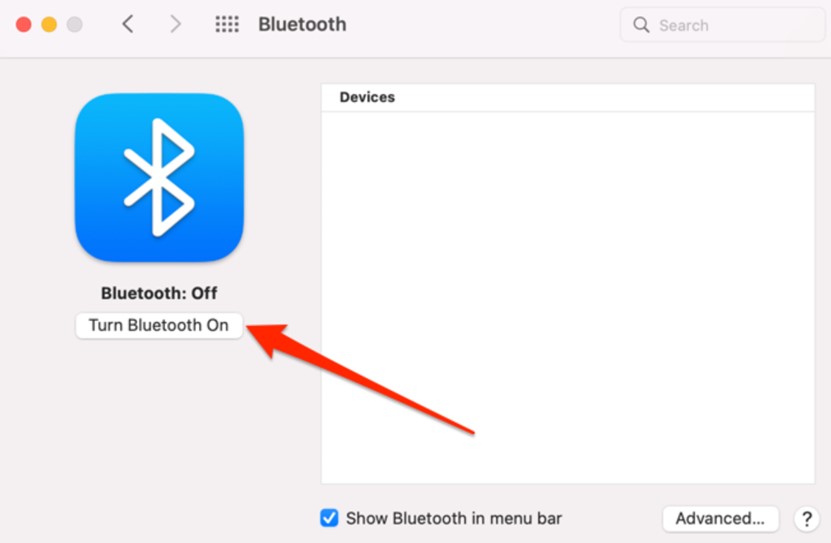
- To enable Bluetooth in another way, go to System Preferences > Tap on Bluetooth> Select the "Turn Bluetooth On" option.
- To enable Bluetooth, go to the Status menu and switch “On” the Bluetooth icon.
Check your Mac's Firewall settings
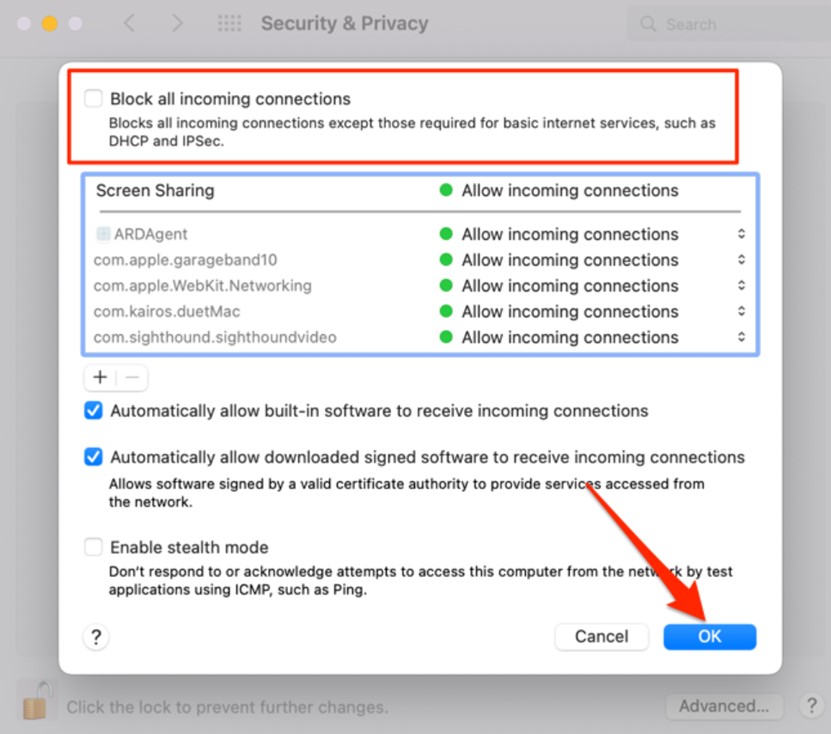
For the protection of its users, the Mac includes a firewall setting that prevents the device from accepting incoming connections from unauthorized applications and services. It might prevent AirDrop from functioning properly if you have it configured to block all incoming connections.
The steps listed below will help you change your Mac's firewall settings:
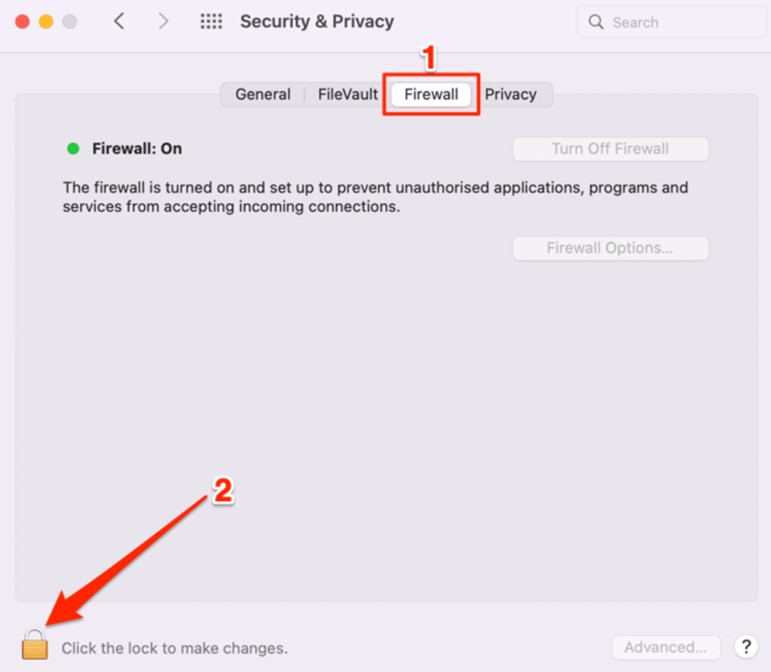
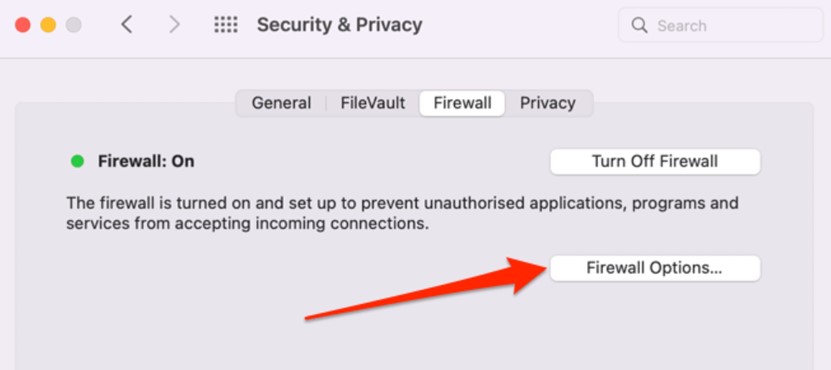
Step 1: Choose "System Preferences"> "Security & Privacy"> Open the Firewall tab. Click the bottom-left lock icon and unlock “Security & Privacy” with Touch ID or password.
Step 2: Tap on “Firewall Options.”
Step 3: Remove the checkmark from "Block all incoming connections" and click “OK”.
Restart your Mac.
If your Mac is still not responding to AirDrops after you've tried the above solutions, try restarting it.
Update your Mac.
In case you are still using an older version of Mac, AirDrop will not work. Make sure you have the most recent update and install it right away so your airdrop can work again.
Part 3: Share Data Between Devices Without AirDrop
You'll be happy to hear that using AirDrop for transfers is no longer necessary because MobileTrans offers a one-click fix for all of your problems with AirDrop and a Phone Transfer feature that lets you send files between devices without using AirDrop.

 4.5/5 Excellent
MobileTrans-Phone Tranfer:
Wondershare MobileTrans offers a Phone Transfer" feature, which is a fantastic error-free substitute for AirDrop that helps you transfer your data quickly. It is able to transfer data easily between Android to Android, Android to iOS, iOS to Android, and iOS to iOS.
Not only this, but it also lets you send any type of data without changing or lowering its quality, so you'll get the exact data you sent.
- You can easily move data from an Android device to an iOS device.
- It provides faster data transmission, and you can get data in a matter of minutes.
- It doesn’t overwrite your data, and your information will be intact on the new phone.
Mobile Trans - Backup & Restore:
The MobileTrans provides users with every convenience imaginable to keep their important data protected, backed up, and restored!
With the backup and restore feature, you can:
- Backup and restore phone data and iTunes content to your computer.
- Quickly transfer the contents of an old phone to a new phone.
How to transfer data through Phone Transfer
Step 1: Launch MobileTrans on your PC and choose Phone Transfer from the dashboard, then tap on Phone to Phone.

Step 2: Connect both the devices you're using to transfer data to the PC and select the data which you want to send. You can also choose to flip the source and destination phones by clicking the Flip button, although it is optional.
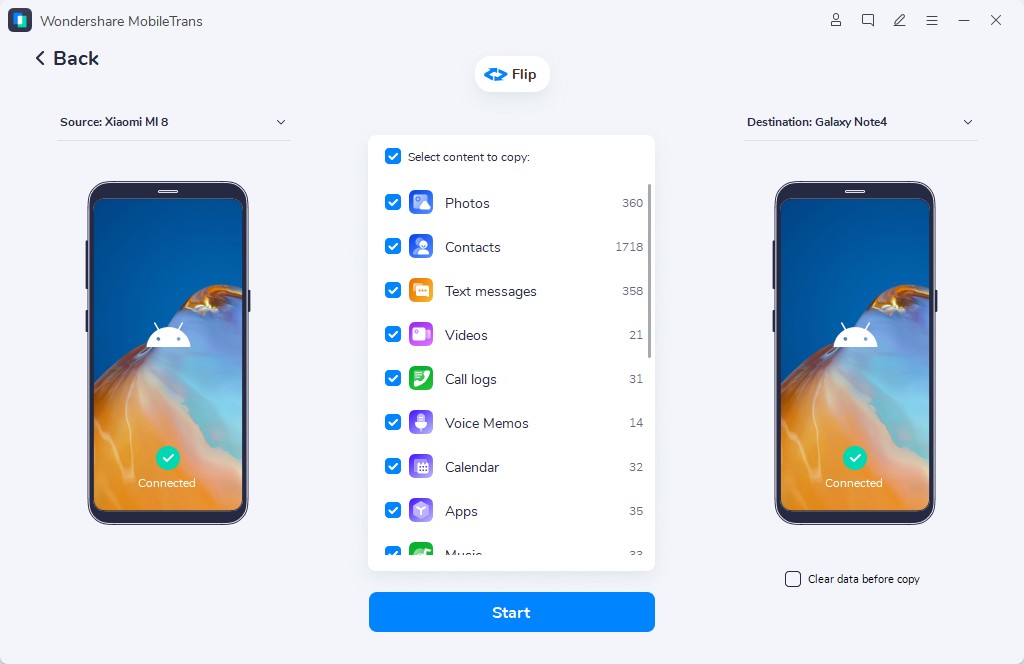
Step 3: Then click Start, and you're done!
Conclusion
After installing iOS 26 or iOS 17, the vast majority of iPhone users are encountering the issue that AirDrop is not working on iPhone, iPads and Macs. However, after reading this post, you won't have that problem anymore.
Well, there are never really significant reasons why AirDrop stops working; rather, it is always due to relatively minor issues that cause it to stop working. I have detailed all of the possibilities and solutions that are available to you in order to assist you in resolving the issue.


